Installing a Web, Email & MySQL Database Cluster on Debian 8.4 Jessie with ISPConfig 3.1 - Page 3
This tutorial exists for these OS versions
- Debian 8 (Jessie)
- Debian 6 (Squeeze)
- Debian 5 (Lenny)
On this page
6 Install ISPConfig on the Slave Server
Login into MySQL and create a root-user for server2:
CREATE USER 'root'@'192.168.0.106' IDENTIFIED BY 'myrootpassword';
GRANT ALL PRIVILEGES ON * . * TO 'root'@'192.168.0.106' WITH GRANT OPTION MAX_QUERIES_PER_HOUR 0 MAX_CONNECTIONS_PER_HOUR 0 MAX_UPDATES_PER_HOUR 0 MAX_USER_CONNECTIONS 0 ;
CREATE USER 'root'@'server2.example.tld' IDENTIFIED BY 'myrootpassword';
GRANT ALL PRIVILEGES ON * . * TO 'root'@'server2.example.tld' WITH GRANT OPTION MAX_QUERIES_PER_HOUR 0 MAX_CONNECTIONS_PER_HOUR 0 MAX_UPDATES_PER_HOUR 0 MAX_USER_CONNECTIONS 0;
CREATE USER 'root'@'2a01:dddd::2' IDENTIFIED BY 'myrootpassword';
GRANT ALL PRIVILEGES ON * . * TO 'root'@'2001:db8::2' WITH GRANT OPTION MAX_QUERIES_PER_HOUR 0 MAX_CONNECTIONS_PER_HOUR 0 MAX_UPDATES_PER_HOUR 0 MAX_USER_CONNECTIONS 0;
QUIT;
The replication covers all database. Copy the db-configs for PHPMyAdmin and roundcube from server1 to server2.
On server1:
scp /etc/dbconfig-common/phpmyadmin.conf [email protected]:/etc/dbconfig-common/phpmyadmin.conf
scp /etc/phpmyadmin/config-db.php [email protected]:/etc/phpmyadmin/config-db.php
scp /etc/dbconfig-common/roundcube.conf [email protected]:/etc/dbconfig-common/roundcube.conf
scp /etc/roundcube/debian-db.php [email protected]:/etc/roundcube/debian-db.php
On server2:
Download ISPConfig 3.1:
cd /tmp
wget -O ISPConfig-3.1-beta.tar.gz  https://git.ispconfig.org/ispconfig/ispconfig3/repository/archive.tar.gz?ref=stable-3.1
tar xfvz xfz ISPConfig-3.1-beta.tar.gz
cd ispconfig3-stable-3.1*
cd install
and start the installer with
php -q install.php
--------------------------------------------------------------------------------
 _____ ___________   _____              __ _         ____
|_   _/  ___| ___ \ /  __ \            / _(_)       /__  \
  | | \ `--.| |_/ / | /  \/ ___  _ __ | |_ _  __ _    _/ /
  | |  `--. \  __/  | |    / _ \| '_ \|  _| |/ _` |  |_ |
 _| |_/\__/ / |     | \__/\ (_) | | | | | | | (_| | ___\ \
 \___/\____/\_|      \____/\___/|_| |_|_| |_|\__, | \____/
                                              __/ |
                                             |___/
--------------------------------------------------------------------------------


>> Initial configuration

Operating System: Debian 8.0 (Jessie) or compatible

    Following will be a few questions for primary configuration so be careful.
    Default values are in [brackets] and can be accepted with <ENTER>.
    Tap in "quit" (without the quotes) to stop the installer.


Select language (en,de) [en]: <-- Hit Enter

Installation mode (standard,expert) [standard]: expert <-- expert

Full qualified hostname (FQDN) of the server, eg server1.domain.tld  [server2.example.tld]: <-- Hit Enter

MySQL server hostname [localhost]: <-- Hit Enter

MySQL server port [3306]: <-- Hit Enter

MySQL root username [root]: <-- Hit Enter

MySQL root password []: <-- Enter your MySQL root password

MySQL database to create [dbispconfig]: <-- dbispconfig2 (the local ispconfig database name of the master and slave must be different, as both servers share the same databases)

MySQL charset [utf8]: <-- Hit Enter

The next two questions are about the internal ISPConfig database user and password.
It is recommended to accept the defaults which are 'ispconfig' as username and a random password.
If you use a different password, use only numbers and chars for the password.

ISPConfig mysql database username [ispconfig]: <-- ispconfig2

ISPConfig mysql database password [06d434604a3371a706a100f9786aec9b]: <-- Hit Enter

Shall this server join an existing ISPConfig multiserver setup (y,n) [n]: <-- y

MySQL master server hostname []: <-- server1.example.tld

MySQL master server port []: <-- Hit Enter

MySQL master server root username [root]: <-- Hit Enter

MySQL master server root password []: <-- Enter the root password of the master server here

MySQL master server database name [dbispconfig]: <-- Hit Enter

Adding ISPConfig server record to database.

Configure Mail (y,n) [y]: <-- Hit Enter

Configuring Postgrey
Configuring Postfix
Generating a 4096 bit RSA private key
........................................................................++
....................++
writing new private key to 'smtpd.key'
-----
You are about to be asked to enter information that will be incorporated
into your certificate request.
What you are about to enter is what is called a Distinguished Name or a DN.
There are quite a few fields but you can leave some blank
For some fields there will be a default value,
If you enter '.', the field will be left blank.
-----
Country Name (2 letter code) [AU]: <-- Enter 2 letter country code
State or Province Name (full name) [Some-State]: <-- Enter the name of the  state
Locality Name (eg, city) []: <-- Enter your city
Organization Name (eg, company) [Internet Widgits Pty Ltd]: <-- Enter company name or press enter
Organizational Unit Name (eg, section) []: <-- Hit Enter
Common Name (e.g. server FQDN or YOUR name) []: <-- Enter the server hostname, in my case: server2.example.com
Email Address []: <-- Hit Enter
Configuring Mailman
Configuring Dovecot
Configuring Spamassassin
Configuring Amavisd
Configuring Getmail
Configuring Jailkit
Configuring Pureftpd
Configure DNS Server (y,n) [y]: <-- Hit Enter

Configuring BIND
Configure Web Server (y,n) [y]: <-- Hit Enter

Configuring Apache
Configuring vlogger
[WARN] autodetect for OpenVZ failed
Force configure OpenVZ (y,n) [n]: <-- Hit Enter

Skipping OpenVZ

Configure Firewall Server (y,n) [y]: <-- Hit Enter

Configuring Ubuntu Firewall
Configuring Metronome XMPP Server
writing new private key to 'localhost.key'
-----
Country Name (2 letter code) [AU]: <-- Enter 2 letter country code
Locality Name (eg, city) []: <-- Enter your city
Organization Name (eg, company) [Internet Widgits Pty Ltd]: <-- Enter company name or press enter
Organizational Unit Name (eg, section) []: <-- Hit Enter
Common Name (e.g. server FQDN or YOUR name) [server2.example.tld]: <-- Enter the server hostname, in my case: server2.example.tld
Email Address []: <-- Hit Enter

Install ISPConfig Web Interface (y,n) [n]: <-- Hit Enter


Configuring DBServer
Installing ISPConfig crontab
Detect IP addresses
Installation completed.
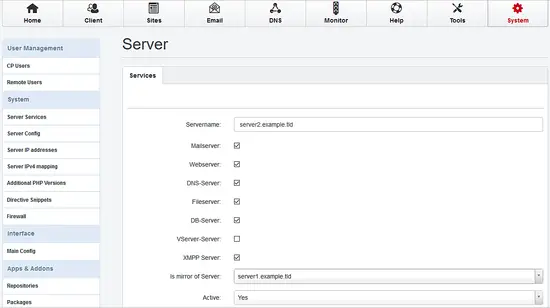
Login into ISPConfig on server1 and go to System / Server Services and choose server2.example.tld and set Is mirror of Server to server1.example.tld:
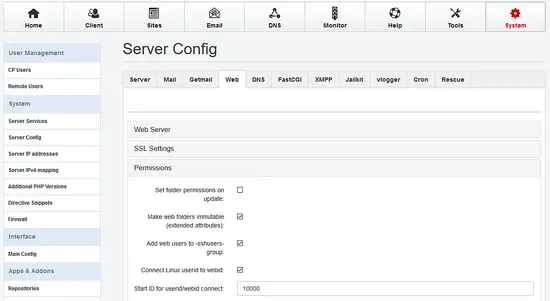
Go to Server Config, choose Tab Web and set the permissions for both servers:
If you have already data (Websites, Mail....) running on server1, go to Tools / Resync and start a full resync (enable all checkboxes).


