How to Install osTicket with Nginx on Ubuntu 16.04

OsTicket is an open source support ticket system based on PHP. It's a simple and lightweight support ticket system, designed to be easy to use and easy to install. OsTicket allows you to manage, organize and archive your support request. It's has support for LDAP and Active Directory authentication.

In this tutorial, I will show you step by step to install and configure OsTicket on Ubuntu 16.04. OsTicket will run under PHP-FPM 7, use Nginx as the web server, and use MySQL version 5.7 as database.

Prerequisite

  • Ubuntu 16.04
  • Root privileges

Step 1 - Install Nginx and MySQL

In this step, we will install Nginx and MySQL server from the Ubuntu repository, and then enable all services to start at boot time.

Log in to the server with your ssh account:

ssh [email protected]

Update the Ubuntu repository:

sudo apt-get update

Then install Nginx and MySQL server.

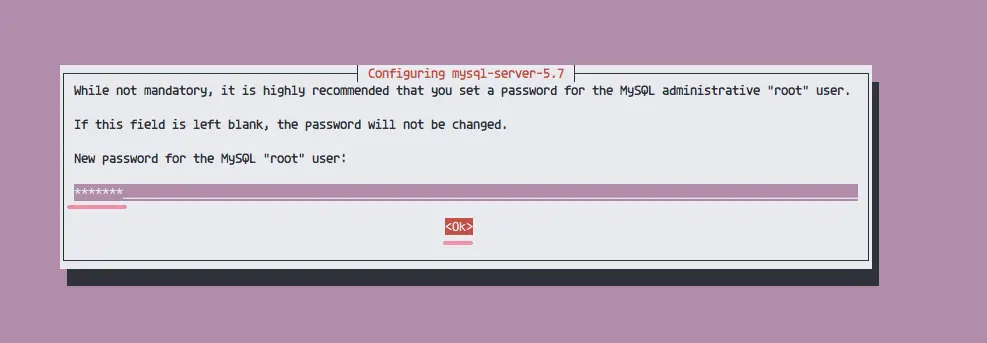
sudo apt-get install -y nginx mysql-server

You will be asked for the MySQL root password, type in a secure MySQL password.

Set Ubuntu MySQL password

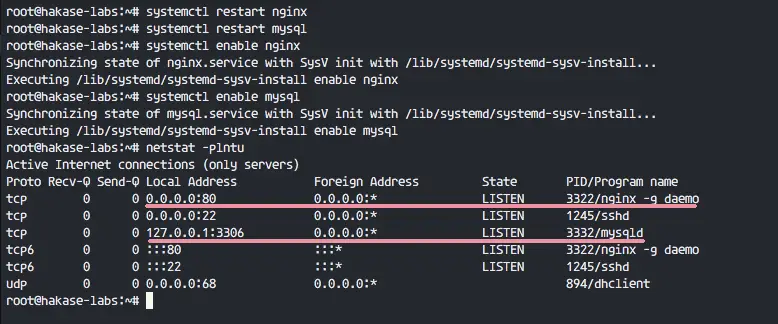
Now start Nginx and MySQL with the following systemctl command:

systemctl restart nginx
systemctl restart mysql

Add it to start at boot time:

systemctl enable nginx
systemctl enable mysql

Now make sure all the services are running by checking the server port of the services:

netstat -plntu

You will see port 80 is used by Nginx and port 3306 used by the MySQL server.

Nginx and MySQL are running

Step 2 - Install and Configure PHP-FPM7

OsTicket requires some PHP extension for the installation, including php-gd, imap, xml and mbstring. In this step, we will install PHP 7 and all of those extensions and then configure PHP to run with Nginx web server.

Install PHP-FPM 7 and all extension needed with the apt command below:

sudo apt-get install -y php7.0-cli php7.0-mysql php7.0-cgi php7.0-fpm php7.0-gd php7.0-imap php7.0-xml php7.0-mbstring php7.0-intl php-apcu

If all is done, go to the php 7 directory and edit the php.ini file.

cd /etc/php/7.0/
vim fpm/php.ini

Uncomment the cgi.fix_pathinfo line and change it's value to 0.

cgi.fix_pathinfo=0

Save the file and exit vim.

Now restart php7-fpm and add it to start at the boot time:

systemctl restart php7.0-fpm
systemctl enable php7.0-fpm

Next, we will configure PHP 7 FPM to work with the Nginx web server. Go to the Nginx virtual host directory and edit the default virtual host file with vim.

cd /etc/nginx/sites-available/
vim default

Uncomment the PHP 7 configuration line below:

        location ~ \.php$ {
                include snippets/fastcgi-php.conf;
        #
        #       # With php7.0-cgi alone:
        #       fastcgi_pass 127.0.0.1:9000;
        #       # With php7.0-fpm:
                fastcgi_pass unix:/run/php/php7.0-fpm.sock;
        }

Save and exit, then restart the web server.

systemctl restart nginx

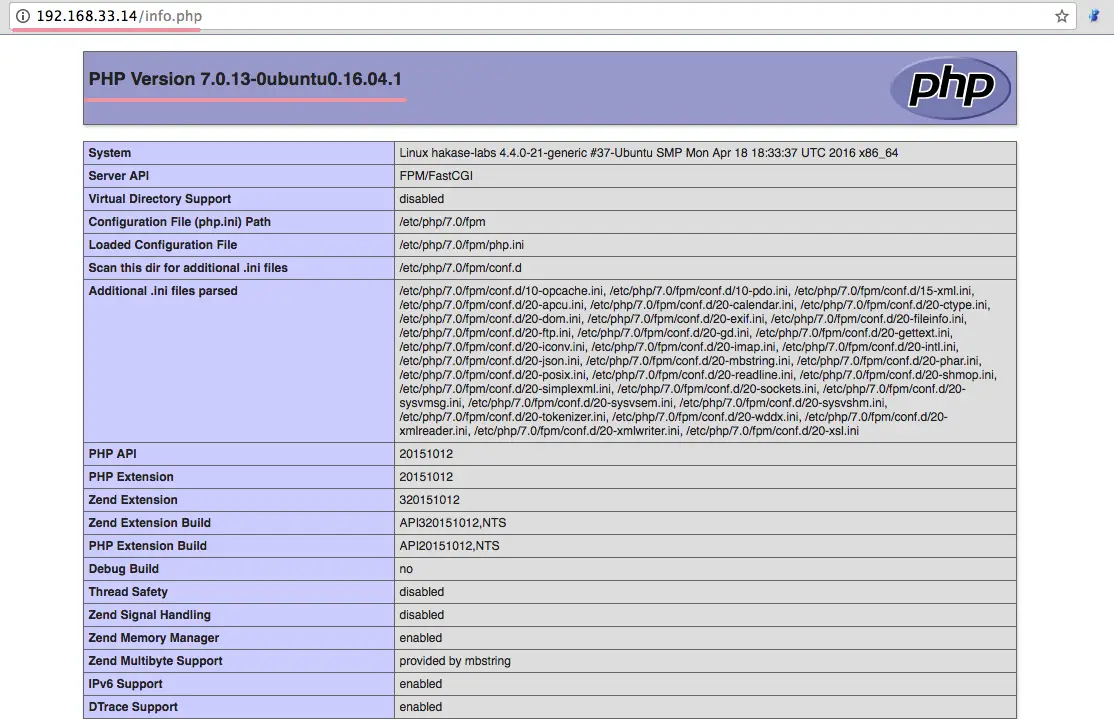
Now test PHP 7 and Nginx by creating a phpinfo file.

cd /var/www/html/
echo '<?php phpinfo(); ?>' > info.php

Open your web server URL in a Browser and visit the server IP address.

http://192.168.33.14/info.php

You will get information about your php configuration.

PHP info

Step 3 - Create Database for OsTicket

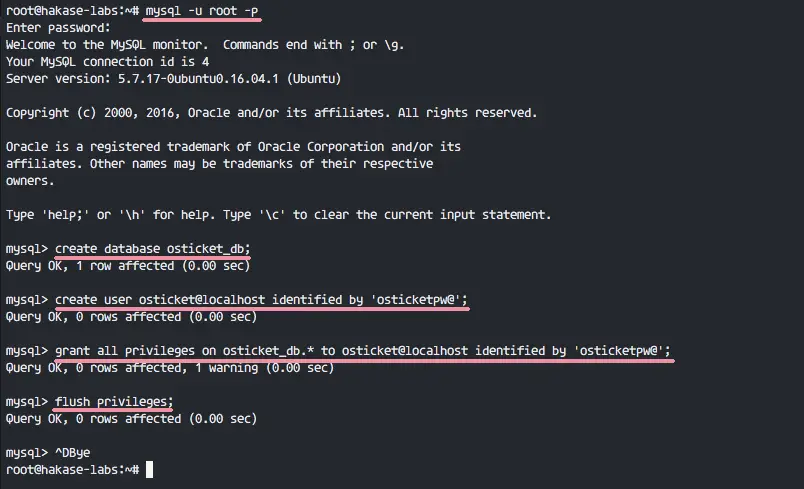
In this step, we will create a new database and MySQL user for OsTicket. Login to the MySQL shell with your MySQL root password:

mysql -u root -p
TYPE YOUR PASSWORD

Create a new database named 'osticket_db', and a new user 'osticket' with password '[email protected]'.

create database osticket_db;
create user [email protected] identified by '[email protected]';

Grant all privileges for the new user to the database 'osticket_db'.

grant all privileges on osticket_db.* to [email protected] identified by '[email protected]';
flush privileges;

Database for OsTicket has been created.

Create OSTicket database and user

Step 4 - Create OsTicket Virtual Host

Now we have to a create new virtual host configuration for OsTicket.

Go to the Nginx virtual host directory and create a new file 'osticket' with vim:

cd /etc/nginx/sites-available/
vim osticket

Paste the configuration below:

server {
  listen 80;
        server_name osticket.hakase-labs.com;

        root   /var/www/osticket/upload;

        access_log  /var/log/nginx/access.log;
        error_log  /var/log/nginx/error.log;

        index index.php;
        client_max_body_size 2000M;
        client_body_buffer_size 100M;
        client_header_buffer_size 10M;
        large_client_header_buffers 2 10M;

        client_body_timeout 12;
        client_header_timeout 12;
        keepalive_timeout 15;
        send_timeout 10;

        gzip             on;
        gzip_comp_level  2;
        gzip_min_length  1000;
        gzip_proxied     expired no-cache no-store private auth;
        gzip_types       text/plain application/x-javascript text/xml text/css application/xml;

        set $path_info "";

        location ~ /include {
            deny all;
            return 403;
        }

        if ($request_uri ~ "^/api(/[^\?]+)") {
            set $path_info $1;
        }

        location ~ ^/api/(?:tickets|tasks).*$ {
            try_files $uri $uri/ /api/http.php?$query_string;
        }

        if ($request_uri ~ "^/scp/.*\.php(/[^\?]+)") {
            set $path_info $1;
        }

        location ~ ^/scp/ajax.php/.*$ {
            try_files $uri $uri/ /scp/ajax.php?$query_string;
        }

        location / {
            try_files $uri $uri/ index.php;
        }

        location ~ \.php$ {
            fastcgi_param  SCRIPT_FILENAME  $document_root$fastcgi_script_name;
            include        fastcgi_params;
        include snippets/fastcgi-php.conf;
        fastcgi_pass unix:/run/php/php7.0-fpm.sock;
            fastcgi_param  PATH_INFO    $path_info;
        }
}

We will use domain name 'osticket.hakase-labs.com', and using '/var/www/osticket/upload' directory as the web root directory. Replace the domain name 'osticket.hakase-labs.comwith your own domain.

Save the Nginx configuration file and exit.

Now activate the virtual host and test the configuration.

ln -s /etc/nginx/sites-available/osticket /etc/nginx/sites-enabled/
nginx -t

Make sure there is no error and restart Nginx.

systemctl restart nginx

Create Nginx Virtual Host Configuration

Step 5 - Download and Configure osTicket

Create a new directory for osTicket and go to that directory.

mkdir -p /var/www/osticket/
cd /var/www/osticket/

Download osTicket with the wget command.

wget http://osticket.com/sites/default/files/download/osTicket-v1.10.zip

Extract the osTicket archive file with unzip.

unzip osTicket-v1.10.zip

All osTicket web files are available on the 'upload' directory, go to that directory and copy the sample osticket config file.

cd upload/
cp include/ost-sampleconfig.php include/ost-config.php

Now change the owner of all osticket files and directories to the 'www-data' user and group.

cd /var/www/osticket/
chown -R www-data:www-data upload/

Step 6 - Install OsTicket

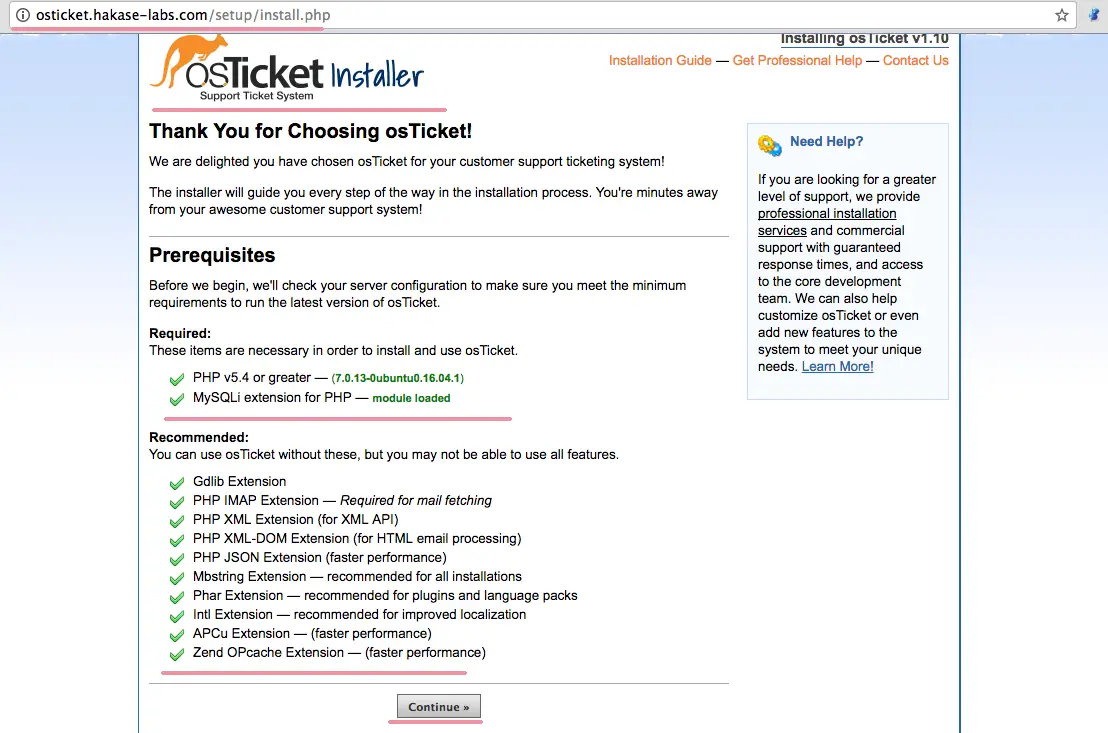
Open your web browser and visit your OsTicket domain name, mine is:

h77p://osticket.hakase-labs.com

Make sure all required packages are marked in green as shown in the picture.

Check osTicket requirements

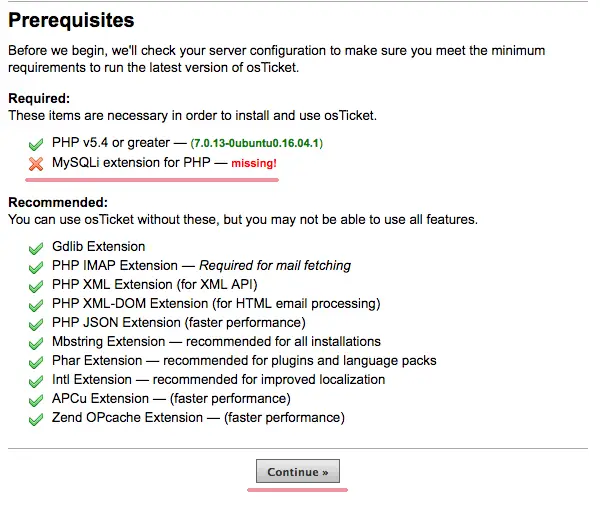
If there is an error, you can see the red mark like in the example below:

osTicket Missing dependencies

Click on 'Continue' and you will be redirected to the OsTicket configuration section.

In the 'System Settings', type your 'HelpDesk Name' and the default email address. In the 'Admin User' section, type in your admin configuration including admin email, and make sure the email is the different from the default helpdesk email.

OsTicket configuration

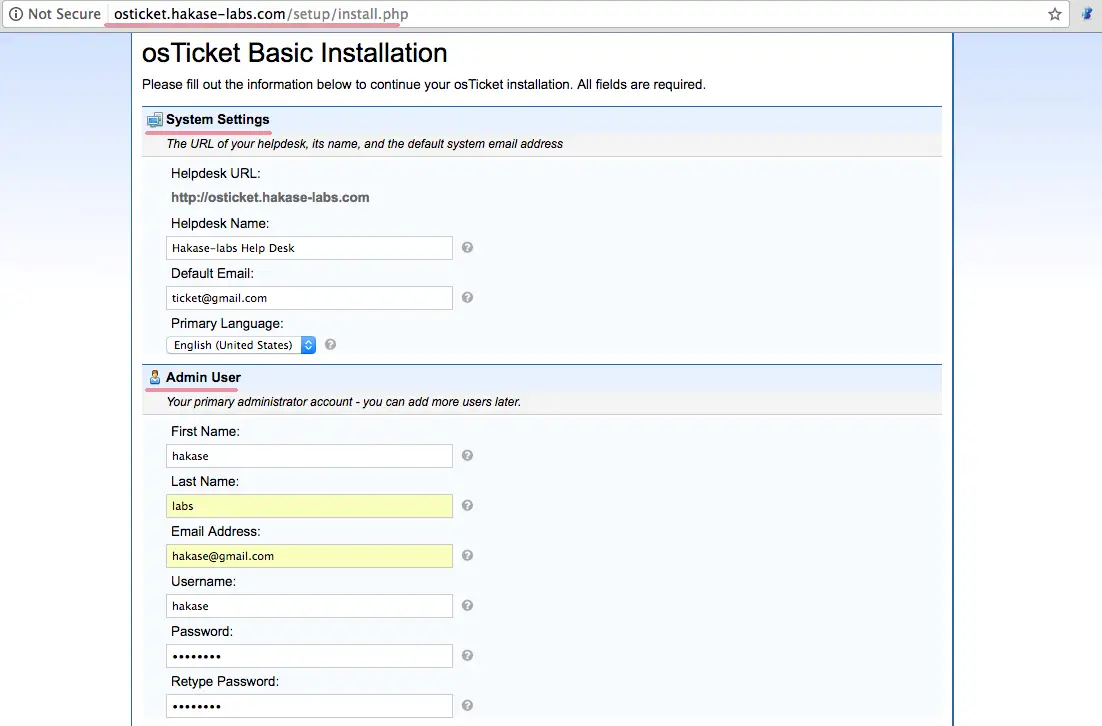
In the database settings, just fill in the details of our database created in step 3.

Database details

Click 'Install Now' and wait a sec for the installation. And if it's done, you will see below.

OsTicket installation finished

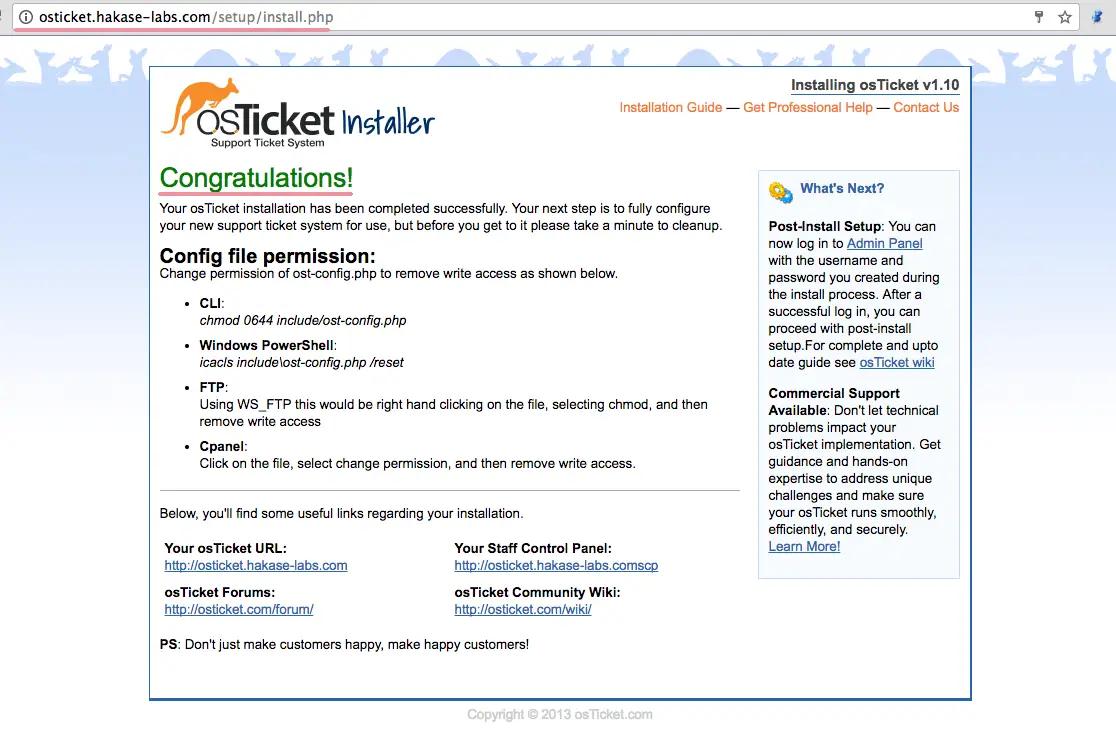
cd /var/www/osticket/upload/

Remove or rename the setup directory and change the permission of the osticket config file.

mv setup/ setup-sh/
chmod 0644 include/ost-config.php

OsTicket Installation is finished.

Step 7 - Testing

OsTicket home page - http://osticket.hakase-labs.com/

OsTicket home page

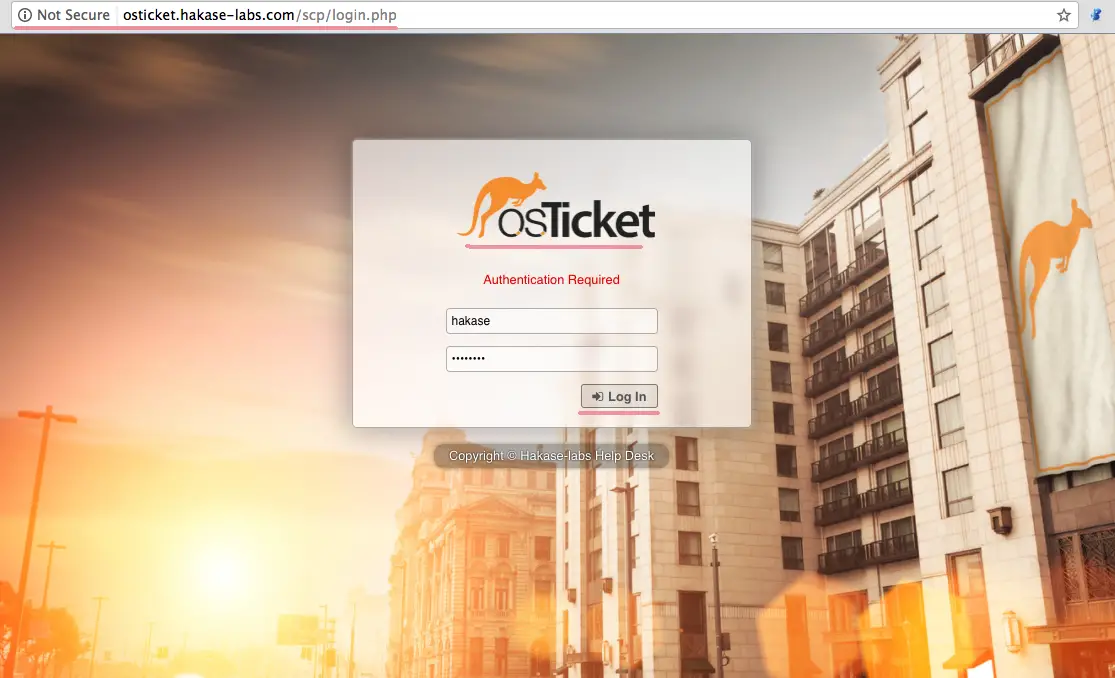
OsTicket admin login - http://osticket.hakase-labs.com/scp/

osTicket admin login

OsTicket agent panel - http://osticket.hakase-labs.com/scp/index.php

OsTicket Agents page

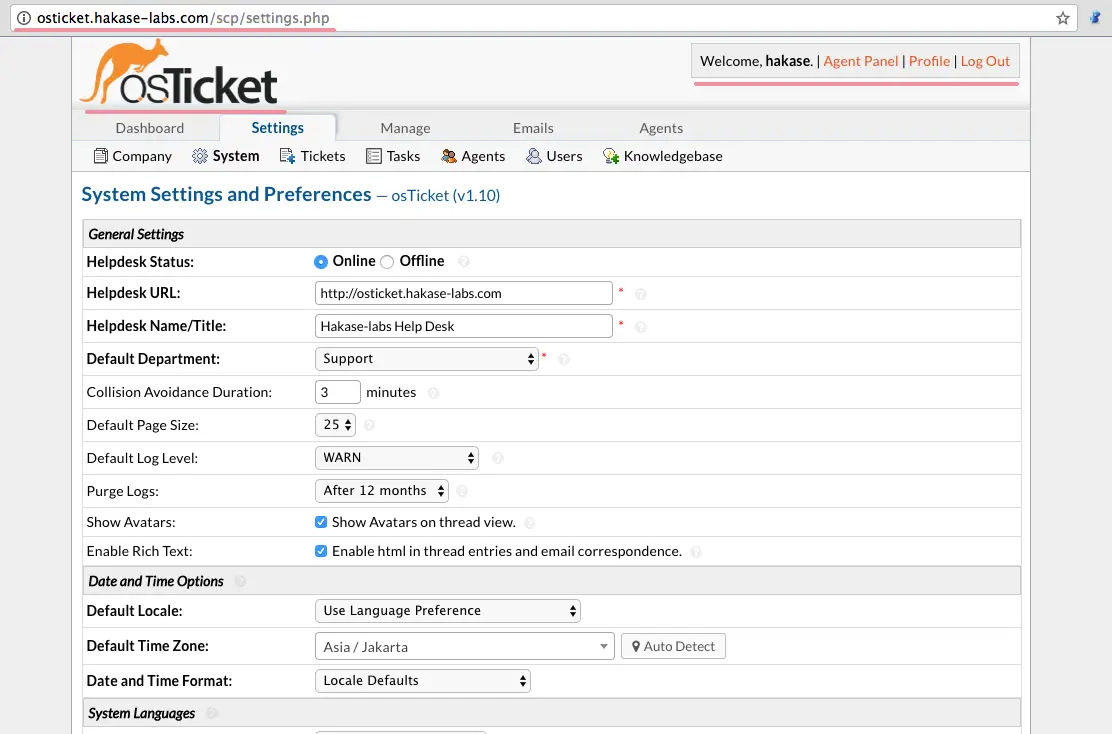
OsTicket Admin panel configuration - http://osticket.hakase-labs.com/scp/settings.php

OsTicket settings

Share this page:

Suggested articles

18 Comment(s)

Add comment

Comments

By: Yael

I have an error, missing extensions, MySQLi extension for PHP and other 3 recommended.

I follow every step twice, Am I missing something with the php.ini configuration?

Regards

By: Brury

phpinfo is works

nginx is work

When in step 6, i i open the browser for http://osticket.hakase-labs.com but show your server is not found

can you help me


Thanks


By: Patrick

Same issue, all good steps 1-5, no errors to report until I get to step 6 and same result as Brury.Any suggestions or help?  Thanks in advance.

By: Guy

There's is a missing entry just before Step 6. Ngnix need to be restarted to reload config. Can also be a php module... anyway on my side I did a 'reboot -now' then all good after.

By: Mike

The install worked great, but the help info popups and if I want to delete a ticket are blank white boxes.

By: fernando

Osticket doesn't support nginx!

By: Bruce

To fix AJAX problems showing up as blank white boxes, the nginx osticket configuration needs specific settings.

In my nginx osticket configurations, I force mandatory TLS as passwords and confidential information are passing between clients and nginx osticket server.  With that said I followed this how to aricle on installing self-signed TLS certificate on my osticket server.

https://www.digitalocean.com/community/tutorials/how-to-create-a-self-signed-ssl-certificate-for-nginx-in-ubuntu-16-04


Below is my nginx osticket configuration that fixes the AJAX blank white boxes.  Change the server name to your liking.


server {    server_name support.nscap.gov;    listen 80;    listen [::]:80;    return 301 https://$server_name$request_uri;}server {    # SSL configuration    server_name support.nscap.gov;    listen 443 ssl http2;    listen [::]:443 ssl http2;    include snippets/self-signed.conf;    include snippets/ssl-params.conf;    root /var/www/osticket/upload;    index index.php index.html index.htm;    set $path_info "";    # Deny access to all files in the include directory    location ~ ^/include {        deny all;        return 403;    }    # Deny access to apache .ht* files (nginx doesn't use these)    location ~ /\.ht {        deny all;    }    # Requests to /api/* need their PATH_INFO set, this does that    if ($request_uri ~ "^/api(/[^\?]+)") {        set $path_info $1;    }    # /api/*.* should be handled by /api/http.php if the requested file does not exist    location ~ ^/api/(tickets|tasks)(.*)$ {        try_files $uri $uri/ /api/http.php;    }    # /scp/ajax.php needs PATH_INFO too, possibly more files need it hence the .*\.php    if ($request_uri ~ "^/scp/.*\.php(/[^\?]+)") {        set $path_info $1;    }    # Make sure requests to /scp/ajax.php/some/path get handled by ajax.php    location ~ ^/scp/ajax.php/(.*)$ {        try_files $uri $uri/ /scp/ajax.php;    }    if ($request_uri ~ "^/ajax.php(/[^\?]+)") {        set $path_info $1;    }    location ~ ^/ajax.php/.*$ {        try_files $uri $uri/ /ajax.php;    }    location / {        index     index.php;        # try_files $uri $uri/ /index.php$is_args$args;    }    location ~ \.php$ {        try_files $uri =404;        # fastcgi_split_path_info ^(.+\.php)(/.+)$;        fastcgi_pass unix:/run/php/php7.0-fpm.sock;        fastcgi_index index.php;        include fastcgi_params;        fastcgi_param SCRIPT_FILENAME $document_root$fastcgi_script_name;        fastcgi_param SCRIPT_NAME $fastcgi_script_name;        fastcgi_param PATH_INFO $path_info;    }    location = /50x.html {        root /var/www/html;    }    error_page 404 /404.html;    error_page 500 502 503 504 /50x.html;}

Regards

By: Austin

I'm also having an ajax issue with the blank white bar showing up in place of the pop up.  I can't make sense of the formatting in this comment, does anything have a solution for this issue.

By: Oscar

Try to comment or delete the next line:

include snippets/fastcgi-php.conf;

Now its working ;=)

By: Kia

Thanks Oscar, you made my day. It is now working. Thanks a lot. 

By: Maniyeri

Thanks Oscar!

By: Kimberly

Thank you Oscar. You're my hero!!! :-) 

By: Travis

I used Bruce's script but omitted the SSL stuff and that fixed the issue for me.  Obviously the site won't use SSL if you decide to go this route.  My system is internal and I didn't want to pay for an SSL certificate or deal with browser warnings about using a self-signed one.

My scripts are as follows:

default:

server {    listen 80 default_server;        listen [::]:80 default_server;        #        # Note: You should disable gzip for SSL traffic.        # See: https://bugs.debian.org/773332        #        # Read up on ssl_ciphers to ensure a secure configuration.        # See: https://bugs.debian.org/765782        #        # Self signed certs generated by the ssl-cert package        # Don't use them in a production server!        #        # include snippets/snakeoil.conf;        root /var/www/html;        # Add index.php to the list if you are using PHP        index index.html index.htm index.nginx-debian.html;        server_name _;        location / {                # First attempt to serve request as file, then                # as directory, then fall back to displaying a 404.                try_files $uri $uri/ =404;        }        # pass the PHP scripts to FastCGI server listening on 127.0.0.1:9000        #        location ~ \.php$ {                include snippets/fastcgi-php.conf;        #        #       # With php7.0-cgi alone:        #       fastcgi_pass 127.0.0.1:9000;        #       # With php7.0-fpm:                fastcgi_pass unix:/run/php/php7.0-fpm.sock;        }        # deny access to .htaccess files, if Apache's document root        # concurs with nginx's one        #        #location ~ /\.ht {        #       deny all;        #}}# Virtual Host configuration for example.com## You can move that to a different file under sites-available/ and symlink that# to sites-enabled/ to enable it.##server {#       listen 80;#       listen [::]:80;##       server_name example.com;##       root /var/www/example.com;#       index index.html;##       location / {#               try_files $uri $uri/ =404;#       }#}

osticket:

server {        server_name 10.39.0.110;        listen 80;        listen [::]:80;         root   /var/www/osticket/upload;         index index.php index.html index.htm;        set $path_info "";        # Deny access to all files in the include directory        location ~ ^/include {         deny all;        return 403;}        # Deny access to apache .ht* files (nginx doesn't use these)         location ~ /\.ht {         deny all;}        # Requests to /api/* need their PATH_INFO set, this does that        if ($request_uri ~ "^/api(/[^\?]+)") {        set $path_info $1;}        # /api/*.* should be handled by /api/http.php if the requested file does not exist        location ~ ^/api/(tickets|tasks)(.*)$ {        try_files $uri $uri/ /api/http.php;}        # /scp/ajax.php needs PATH_INFO too, possibly more files need it hence the .*\.php        if ($request_uri ~ "^/scp/.*\.php(/[^\?]+)") {        set $path_info $1;}        # Make sure requests to /scp/ajax.php/some/path get handled by ajax.php        location ~ ^/scp/ajax.php/(.*)$ {        try_files $uri $uri/ /scp/ajax.php;}        if ($request_uri ~ "^/ajax.php(/[^\?]+)") {        set $path_info $1;}        location ~ ^/ajax.php/.*$ {        try_files $uri $uri/ /ajax.php;}        location / {        index     index.php;        # try_files $uri $uri/ /index.php$is_args$args;}        location ~ \.php$ {        try_files $uri =404;        # fastcgi_split_path_info ^(.+\.php)(/.+)$;        fastcgi_pass unix:/run/php/php7.0-fpm.sock;        fastcgi_index index.php;        include fastcgi_params;        fastcgi_param SCRIPT_FILENAME $document_root$fastcgi_script_name;        fastcgi_param SCRIPT_NAME $fastcgi_script_name;        fastcgi_param PATH_INFO $path_info;}        location = /50x.html {        root /var/www/html;}        error_page 404 /404.html;        error_page 500 502 503 504 /50x.html;}

Hope this helps!

By: Steffen Ruempel

Hello, thank you for this this exellent how-to. Installation is complete, my preferred löanguage is installed, but windows to create new departments for example or the help bubbles are empty. Is there an php parameter that I hav to configure ? Thanks for your help ! Regards, Steffen.

By: Travis

 Steffen, try using the Nginx scripts that I posted in my other comment (substituting in your web address or IP address of course).  I had the same issue and that solved it.  Unfortunately this website didn't recognize the new lines so it looks messy.  Any time there is a series of spaces it means a new line.

Lyes, http://osticket.hakase-labs.com is just an example address.  You need to substitute the web address or IP address of your server.


By: lyes

please help me  i have same problem

phpinfo is works

nginx is work

When in step 6, i i open the browser for http://osticket.hakase-labs.com but show your server is not found

can you help me


Thanks

By: rjtogy1966

I installing osticket in my httpd but my proxy is nginx and i not cant https.Thats website work fine in me httpd in adress 192.168.1.1:8080, but i not work in nginx.I need configuration to proxy nginx.

By: nanu

osticket zip file is not downloaded