How to Install Mautic Marketing Automation Tool on Ubuntu 20.04
This tutorial exists for these OS versions
- Ubuntu 20.04 (Focal Fossa)
- Ubuntu 16.04 (Xenial Xerus)
On this page
- Step 1 - Install Nginx Web Server
- Step 2 - Install and Configure PHP-FPM 7.3 on Ubuntu 20.04
- Step 3 - Install and Configure MySQL Server
- Step 4 - Generate SSL Letsencrypt
- Step 5 - Download Mautic Source Code Latest Version
- Step 6 - Set up Nginx Server Blocks for Mautic
- Step 7 - Mautic Post Installation
- Reference
Mautic is an open-source self-hosted marketing automation tool for everyone. You can use it to grow up your business or community, monitor your website, create landing pages, create a campaign for your business, manage contacts, and even send marketing emails.
This tutorial will show you how to install the Mautic Marketing Automation Tool on the latest Ubuntu 20.04 Server. We will install Mautic with the LEMP Stack (Linux, Nginx, MySQL, and PHP-FPM), and we will secure our installation using the SSL Letsencrypt.
Prerequisites
- Ubuntu 20.04 Server
- 2GB or more RAM
- Root privileges
What will we do?
- Install Nginx Web Server
- Install and Configure PHP-FPM 7.3 on Ubuntu 20.04
- Install and Configure MySQL Server
- Generate SSL Letsencrypt
- Download Mautic Source Code Latest Version
- Configure Nginx Server Blocks for Mautic
- Mautic Post Installation
Step 1 - Install Nginx Web Server
Firstly, we will install the Nginx packages to the Ubuntu 20.04 Server. The Mautic software will be running under the Nginx web server with a secure HTTPS connection.
Update all available repositories on your system and install Nginx packages using the apt command below.
sudo apt update
sudo apt install nginx -y
Once all installation is completed, start the Nginx service and add it to the system boot.
systemctl start nginx
systemctl enable nginx
The Nginx service is up and running, check using the following command.
systemctl status nginx
Below is the result you will get.
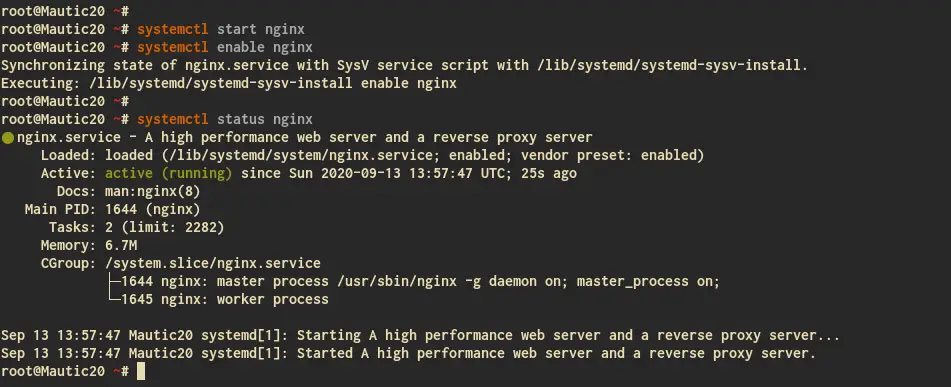
As a result, the Nginx web server installation on Ubuntu Server has been completed.
Step 2 - Install and Configure PHP-FPM 7.3 on Ubuntu 20.04
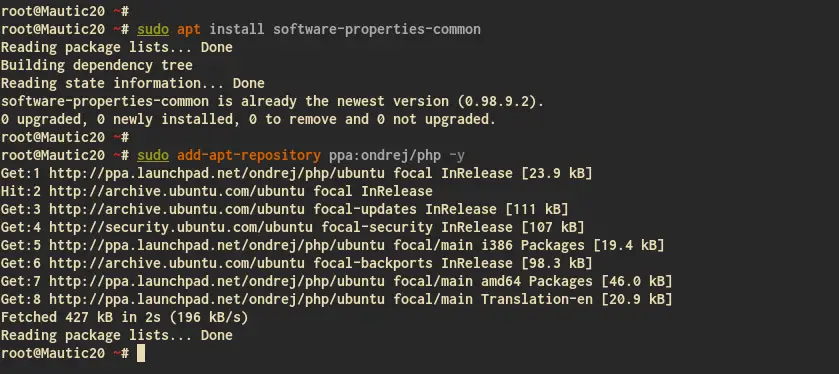
At this time, the Mautic software still does not support the new PHP 7.4 version. In that case, we will install the PHP 7.3 packages from the PPA repository to our Ubuntu 20.04 Server.
Install the 'software-properties-common' package and add the PPA repository for PHP using the command below.
sudo apt install software-properties-common
sudo add-apt-repository ppa:ondrej/php -y
Once all is completed, you're ready to install and configure PHP-FPM 7.3 packages.
Install PHP-FPM 7.3 packages with some additional packages using the apt command below.
sudo apt install -y php7.3-fpm php7.3-mbstring php7.3-xml php7.3-mysql php7.3-common php7.3-gd php7.3-json php7.3-cli php7.3-curl php7.3-zip php7.3-xml php7.3-imap php7.3-intl
Once all installation is completed, go to the '/etc/php/7.3/fpm' directory and edit the configuration file 'php.ini' using vim editor.
cd /etc/php/7.3/fpm/
vim php.ini
Uncomment the following lines and change the values as below.
date.timezone = "UTC"
cgi.fix_pathinfo = 0
Save and close.
Next, start the PHP-FPM service and add it to the boot time.
systemctl start php7.3-fpm
systemctl enable php7.3-fpm

The PHP-FPM service is up and running. Check using the following command.
systemctl status php7.3-fpm
ss -pl | grep php
Below is the result you will get.

As can be seen, the PHP-FPM service is up and running under the sock file '/var/run/php/php7.3-fpm.sock'.
As a result, the installation and configuration of PHP-FPM 7.3 on Ubuntu 20.04 Server has been completed.
Step 3 - Install and Configure MySQL Server
In this step, we will install the MySQL Server and configure the default MySQL root password using the 'mysql_secure_installation' command utility. And after that, we will create a new MySQL database and user for our Mautic installation.
Install MySQL Server packages using the apt command below.
sudo apt install mysql-server mysql-client
Once all installation is completed, start the MySQL service and add it to the system boot.
systemctl start mysql
systemctl enable mysql
Now check the MySQL service status using the following command.
systemctl status mysql
Below is the result you will get.

As can be seen, the MySQL service is up and running on the Ubuntu 20.04 Server.
Next, we will set up the MySQL root password using the 'mysql_secure_installation' command utility provided by MySQL.
Run the 'mysql_secure_installation' command below.
mysql_secure_installation
Now you will be asked for some configurations, type your new password for MySQL root user and type 'Y' for others configuration.
Press y|Y for Yes, any other key for No:
Please set the password for root here.

New password:
Re-enter new password:

Remove anonymous users? (Press y|Y for Yes, any other key for No) : Y
Disallow root login remotely? (Press y|Y for Yes, any other key for No) : Y
Remove test database and access to it? (Press y|Y for Yes, any other key for No) : Y
Reload privilege tables now? (Press y|Y for Yes, any other key for No) : Y
As a result, the password configuration for the MySQL root user has been completed and was ready to create a new database and user for Mautic.
Next, log in to the MySQL shell using the 'mysql' command below.
mysql -u root -p
Create a new database named 'mautic_db' and the user 'mauticuser' with the password 'mautic321' using the following queries.
CREATE DATABASE mautic_db;
CREATE USER mauticuser@localhost IDENTIFIED WITH mysql_native_password BY 'mautic321';
GRANT ALL PRIVILEGES ON mautic_db.* TO mauticuser@localhost WITH GRANT OPTION;
FLUSH PRIVILEGES;
Now type 'exit' to log out from the MySQL shell.

As a result, the MySQL database and user for Mautic installation have been created.
Step 4 - Generate SSL Letsencrypt
For this tutorial, we will secure our Mautic installation using the SSL Letsencrypt. Also, make sure that you have got a domain name, and it's resolved to your server IP address.
Now install the certbot tool for generating SSL Letsencrypt using the apt command below.
sudo apt install certbot
Once all installation is completed, stop the Nginx service and generate the SSL Letsencrypt using the command below. Also, make sure to change the email address and with your own.
systemctl stop nginx
certbot certonly --rsa-key-size 2048 --standalone --agree-tos --no-eff-email --email [email protected] -d mautic.hakase-labs.io
One all is completed, your SSL certificates will be available at the '/etc/letsencrypt/live/your-domain.com/' directory.
As a result, the SSL Letsencrypt certificates for Mautic has been generated.
Step 5 - Download Mautic Source Code Latest Version
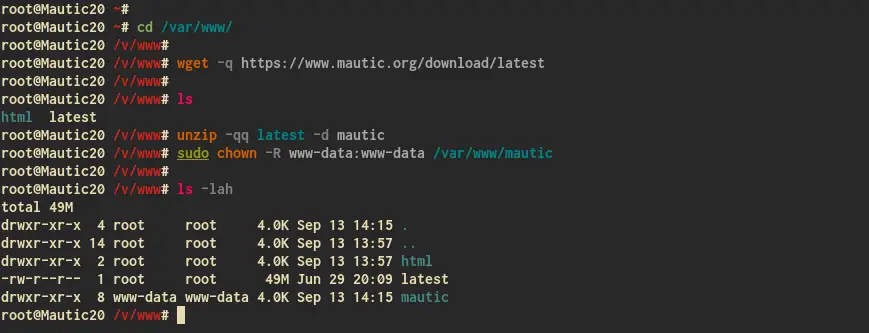
In this step, we will download and install the Matic latest version to the '/var/www' directory.
Before downloading the Mautic Source Code, install the unzip package using the apt command below.
sudo apt install unzip
Next, go to the '/var/www' directory and download the Mautic source code using the wget command below.
cd /var/www/
wget -q https://www.mautic.org/download/latest
Extract the Mautic source code to the new directory named 'mautic', then change the ownership of the 'mautic' directory to the 'www-data' user.
unzip -qq latest -d mautic
sudo chown -R www-data:www-data /var/www/mautic
As a result, the Mautic source code has been downloaded to the '/var/www' directory, and we're ready to install the Mautic Marketing software tool.
Step 6 - Set up Nginx Server Blocks for Mautic
In this step, we will set up the Nginx server blocks for the Mautic installation.
Now go to the '/etc/nginx/sites-available' directory and create a new configuration 'mautic' using vim editor.
cd /etc/nginx/sites-available/
vim mautic
Change the domain name and path of the SSL certificates with your own, then paste the configuration into it.
server {
    listen               80;
    server_name          mautic.hakase-labs.io;
    return 301 https://$server_name$request_uri;
}

server {
    listen 443 ssl;
    server_name mautic.hakase-labs.io;

    ssl_certificate /etc/letsencrypt/live/mautic.hakase-labs.io/fullchain.pem;
    ssl_certificate_key /etc/letsencrypt/live/mautic.hakase-labs.io/privkey.pem;

    ssl_session_timeout 5m;
    ssl_ciphers "HIGH:!aNULL:!MD5 or HIGH:!aNULL:!MD5:!3DES";

    client_max_body_size 4M;
    client_body_buffer_size 128k;

     root /var/www/mautic;
     index index.php index.html index.htm index.nginx-debian.html;

     location / {
       try_files $uri $uri/ =404;
     }

     location ~ .php$ {
       include snippets/fastcgi-php.conf;
       fastcgi_pass unix:/run/php/php7.3-fpm.sock;
     }

     location ~* ^/index.php {
       fastcgi_split_path_info ^(.+.php)(/.+)$;
       fastcgi_pass unix:/var/run/php/php7.3-fpm.sock;
       fastcgi_index index.php;
       fastcgi_param SCRIPT_FILENAME $document_root$fastcgi_script_name;
       include fastcgi_params;
       fastcgi_buffer_size 128k;
       fastcgi_buffers 256 16k;
       fastcgi_busy_buffers_size 256k;
       fastcgi_temp_file_write_size 256k;
     }
}
Save and close.
Next, activate the Nginx virtual blocks for Mautic and make a test for the configuration. Also, make sure there is no error.
ln -s /etc/nginx/sites-available/mautic /etc/nginx/sites-enabled/
nginx -t
Now restart the Nginx service to apply the new server blocks configuration.
systemctl restart nginx
As a result, the Nginx server blocks configuration for Mautic has been completed, and we're ready to continue for the Mautic Post Installation.

Warm up the Mautic cache:
cd /var/www/mautic/app
rm -rf cache/*
./console cache:warmup
Step 7 - Mautic Post Installation
Open your web browser and type the domain name of your Mautic installation on the address bar. Mine is:
https://mautic.hakase-labs.io/
The Mautic installer will do system environment checks for the installation, and make sure you get the "Ready to install" message as below.

Click 'Next Step' to continue the installation.
Now type details MySQL database for the Mautic installation and click 'Next Step' to continue.

Next, type the new admin user, email, and password for the Mautic and click the 'Next Step' button.

For the Mautic Email configuration, chose as you need and click the 'Next Step' button.

And the Mautic installation has been completed, and you will be redirected to the Mautic Login page.

Type your admin user and password, then click the 'Login' button.
Now you will get the Mautic Dashboard.

As a result, the installation of Mautic with the Nginx web server, MySQL database, and PHP-FPM on Ubuntu 20.04 has been completed successfully.

