How to Install Laravel 5.x with Nginx and PHP-FPM 7.1 on CentOS 7
On this page
- Step 1 - Install the EPEL Repository
- Step 2 - Install Nginx
- Step 3 - Install and Configure PHP-FPM 7.1
- Step 4 - Install MariaDB Server
- Step 5 - Install PHP Composer
- Step 6 - Configure Nginx Virtual Host for Laravel
- Step 7 - Install Laravel
- Step 8 - Configure SELinux
- Step 9 - Testing Laravel
- Reference
Laravel is an open source PHP framework that follows the MVC (Model-View-Controller) design pattern. It has been created by Taylor Otwell in 2011 as an attempt to provide an advanced alternative to the CodeIgniter (CI) framework. In 2011, the Laravel project released version 1 and 2, this year version 5.4 has been released with many improvements like Command-Line (CLI) support named 'artisan', built-in support for more database types and improved routing.
In this tutorial, I will show you how to install the Laravel Web Framework with Nginx web server, PHP-FPM 7.1 and MariaDB on a CentOS 7 system. I will show you step by step how to install and configure Laravel under the LEMP stack on CentOS 7 server.
This tutorial is available for Laravel on Ubuntu too.
Prerequisite:
- CentOS 7 Server.
- Root Privileges.
Step 1 - Install the EPEL Repository
EPEL or Extra Package for Enterprise Linux is an additional package repository that provides useful software packages that are not included in the CentOS official repository. It can be installed on RPM based Linux distributions like CentOS and Fedora.
In this tutorial, we need the EPEL repository for the Nginx installation as Nginx packages do not exist in the official CentOS repository. Install the EPEL repository with the yum command below.
yum -y install epel-release
EPEL repository has been installed.
Step 2 - Install Nginx
In this tutorial, we will run a Laravel under the LEMP Stack. Nginx is the web server part of the LEMP stack and can be installed from EPEL repository.
Install Nginx 1.10 from the EPEL repository with yum.
yum -y install nginx
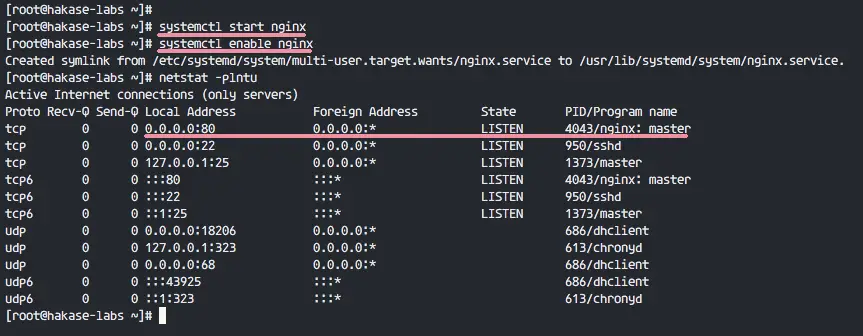
When the installation is complete, start Nginx and add it to start at boot time.
systemctl start nginx
systemctl enable nginx
Nginx is running on port 80, check it with the netstat command below.
netstat -plntu
In case you get 'Command not found' as result, then install the net-tools package as shown below.
yum -y install net-tools
Step 3 - Install and Configure PHP-FPM 7.1
Laravel can be installed on a server with PHP version >= 5.6.4. In this tutorial, we will use the latest version PHP 7.1 that is supported by Laravel.
PHP 7.1 does not exist in the CentOS base repository, we need to install it from a third party repository named 'webtatic'.
Install the webtatic repository with this rpm command.
rpm -Uvh https://mirror.webtatic.com/yum/el7/webtatic-release.rpm
Now we can install PHP-FPM with all of the extensions needed by Laravel with a single yum command.
yum install -y php71w php71w-curl php71w-common php71w-cli php71w-mysql php71w-mbstring php71w-fpm php71w-xml php71w-pdo php71w-zip
PHP 7.1 has been installed on our CentOS 7 system.
Next, configure PHP by editing the configuration file php.ini with vim.
vim /etc/php.ini
Uncomment the line below and change the value to 0.
cgi.fix_pathinfo=0
Save the file and exit the editor.
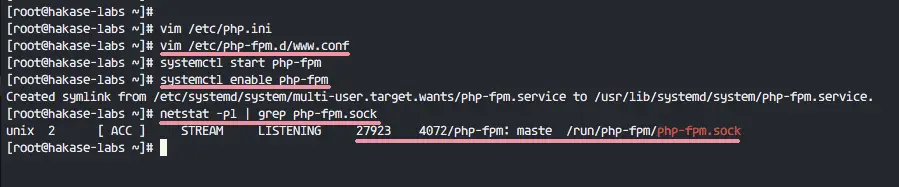
Now edit the PHP-FPM file www.conf.
vim /etc/php-fpm.d/www.conf
PHP-FPM will run under the user and group 'nginx', change the value of the two lines below to 'nginx'.
user = nginx
group = nginx
Instead of using the server port, PHP-FPM will run under a socket file. Change the 'listen' value to the path '/run/php-fpm/php-fpm.sock' as shown below.
listen = /run/php-fpm/php-fpm.sock
The socket file owner will be the 'nginx' user, and the permission mode is 660. Uncomment and change all values like this:
listen.owner = nginx
listen.group = nginx
listen.mode  = 0660
For the environment variables, uncomment these lines and set the values as shown below.
env[HOSTNAME] = $HOSTNAME
env[PATH] = /usr/local/bin:/usr/bin:/bin
env[TMP] = /tmp
env[TMPDIR] = /tmp
env[TEMP] = /tmp
Save the file and exit vim, then start PHP-FPM and enable it to run at boot time.
systemctl start php-fpm
systemctl enable php-fpm
PHP-FPM is running under the socket file, check it with the command below.
netstat -pl | grep php-fpm.sock
The PHP and PHP-FPM 7.1 installation and configuration have been completed.
Step 4 - Install MariaDB Server
You can use MySQL or PostgreSQL for your Laravel project. I will use the MariaDB database server for this tutorial. It's available in the CentOS repository. Install MariaDB-server with the yum command below.
yum -y install mariadb mariadb-server
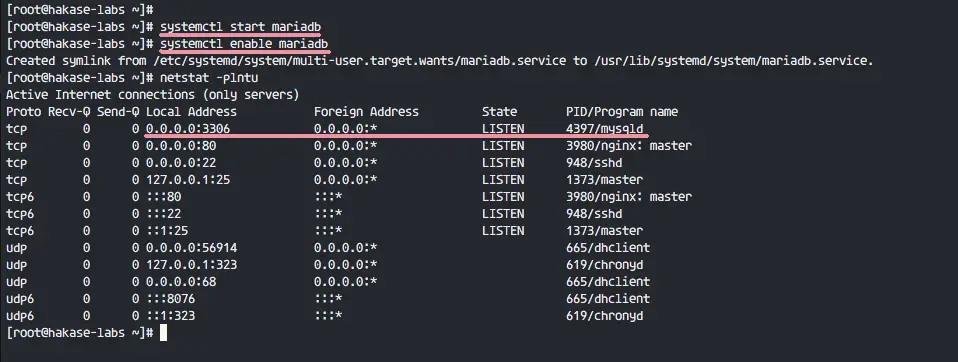
When the installation is complete, start 'mariadb' and enable it to start at boot time.
systemctl start mariadb
systemctl enable mariadb
MariaDB has been started and is running on port 3306, check it with the netstat command.
netstat -plntu
Next, configure the root password for MariaDB with the 'mylsq_secure_installation' command below.
mysql_secure_installation
Type in your mariadb root password, remove the anonymous user etc.
Set root password? [Y/n] Y
Remove anonymous users? [Y/n] Y
Disallow root login remotely? [Y/n] Y
Remove test database and access to it? [Y/n] Y
Reload privilege tables now? [Y/n] Y
MariaDB installation and configuration has been completed.
Step 5 - Install PHP Composer
PHP composer is a package manager for the PHP programming language. It has been created in 2011 and it's inspired by the Node.js 'npm' and Ruby's 'bundler' installer. Install composer with the curl command.
curl -sS https://getcomposer.org/installer | sudo php -- --install-dir=/usr/bin --filename=composer
When the installation completed, try to use the 'composer' command and you will see the results as below.
composer
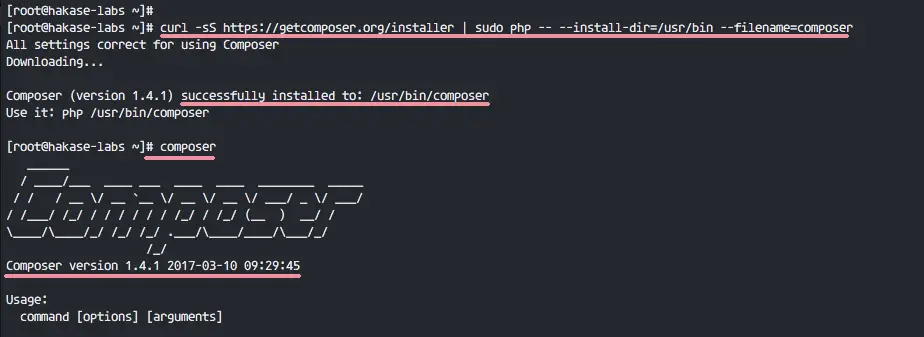
PHP Composer installed on CentOS 7.
Step 6 - Configure Nginx Virtual Host for Laravel
In this step, we will create the nginx virtual host configuration for the Laravel project. We need to define the web root directory for this Laravel installation, I will use the '/var/www/laravel' directory as web root directory.
Create it with the mkdir command below:
mkdir -p /var/www/laravel
Next, go to the nginx directory and create a new virtual host configuration file laravel.conf in the conf.d directory.
cd /etc/nginx
vim conf.d/laravel.conf
Paste the configuration below into the file:
server {
        listen 80;
        listen [::]:80 ipv6only=on;

    # Log files for Debugging
        access_log /var/log/nginx/laravel-access.log;
        error_log /var/log/nginx/laravel-error.log;

    # Webroot Directory for Laravel project
        root /var/www/laravel/public;
        index index.php index.html index.htm;

        # Your Domain Name
        server_name laravel.hakase-labs.co;

        location / {
                try_files $uri $uri/ /index.php?$query_string;
        }

    # PHP-FPM Configuration Nginx
        location ~ \.php$ {
                try_files $uri =404;
                fastcgi_split_path_info ^(.+\.php)(/.+)$;
                fastcgi_pass unix:/run/php-fpm/php-fpm.sock;
                fastcgi_index index.php;
                fastcgi_param SCRIPT_FILENAME $document_root$fastcgi_script_name;
                include fastcgi_params;
        }
}
Save the file and exit vim.
Test the nginx configuration and make sure there is no error, then restart the nginx service.
nginx -t
systemctl restart nginx

The nginx virtual host configuration for Laravel has been completed.
Step 7 - Install Laravel
Before installing Laravel, we need to install unzip on the server.
yum -y install unzip
Now go to the laravel web root directory '/var/www/laravel'.
cd /var/www/laravel
Laravel provides two ways for the installation of the framework on the server. We can install Laravel with the laravel installer, and we can install it with PHP composer. In this tutorial, I will install Laravel by creating a new project with the composer command.
Run the command below to install Laravel.
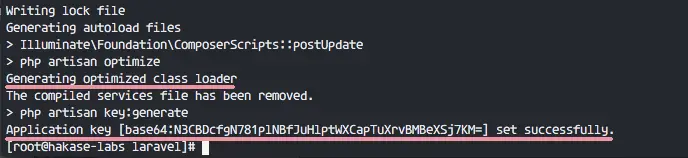
composer create-project laravel/laravel .

Wait for the Laravel installation to finish. This may take some time.
When the installation is complete, change the owner of the Laravel web root directory to the 'nginx' user, and change the permission of the storage directory to 755 with the commands below.
chown -R nginx:root /var/www/laravel
chmod 755 /var/www/laravel/storage
Laravel installation has been completed.
Step 8 - Configure SELinux
In this tutorial, Laravel will run under SELinux 'Enforcing' mode. To check the SELinux status, run the command below.
sestatus

The result is that SELinux is running in 'Enforcing' mode.
Next, we need to install the SELinux management tools for CentOS 7.
Install 'policycoreutils-python' on the server.
yum -y install policycoreutils-python
Now we need to change the context of the Laravel directories and then apply the changes with the restorecon command. Run the SELinux management commands as shown below.
semanage fcontext -a -t httpd_sys_rw_content_t '/var/www/laravel(/.*)?'
semanage fcontext -a -t httpd_sys_rw_content_t '/var/www/laravel/public(/.*)?'
semanage fcontext -a -t httpd_sys_rw_content_t '/var/www/laravel/storage(/.*)?'
semanage fcontext -a -t httpd_sys_rw_content_t '/var/www/laravel/app(/.*)?'
semanage fcontext -a -t httpd_sys_rw_content_t '/var/www/laravel/bootstrap(/.*)?'
semanage fcontext -a -t httpd_sys_rw_content_t '/var/www/laravel/config(/.*)?'
semanage fcontext -a -t httpd_sys_rw_content_t '/var/www/laravel/database(/.*)?'
semanage fcontext -a -t httpd_sys_rw_content_t '/var/www/laravel/resources(/.*)?'
semanage fcontext -a -t httpd_sys_rw_content_t '/var/www/laravel/routes(/.*)?'
semanage fcontext -a -t httpd_sys_rw_content_t '/var/www/laravel/vendor(/.*)?'
semanage fcontext -a -t httpd_sys_rw_content_t '/var/www/laravel/tests(/.*)?'
restorecon -Rv '/var/www/laravel/'
SELinux configuration for Laravel is done.

Step 9 - Testing Laravel
Open your web browser and type in the Laravel URL of your server. We've defined the domain name for the Laravel in the Nginx virtual host file. Mine is laravel.hakase-labs.co.
When you visit the domain name, you will see the Laravel home page.

Laravel installation with Nginx, PHP-FPM7, and MariaDB on CentOS 7 has been successful.

