How to compile and install PHP 7.4 as PHP-FPM & FastCGI for ISPConfig 3 on Ubuntu 18.04 LTS

Ubuntu 18.04 ships with PHP 7.2 as default PHP version. Major PHP versions are not 100% compatible with each other, so a website might require a newer or older PHP version to work. ISPConfig supports it to use multiple PHP versions on the same server, the PHP version can be selected for each website individually in the website settings. This tutorial shows how to install PHP 7.4 as FPM and FCGI mode alongside PHP 7.2 on a Ubuntu 18 server. The additional PHP versions are installed in the /opt folder, so their installation does nit affect the default PHP version

1 Preliminary Note

I will install PHP 7.4. Please note that PHP-FPM can be used on both Apache and Nginx servers while FastCGI is available only for Apache servers.

2 Install the prerequisites

Install the prerequisites for building PHP and the nano editor that I will use to edit the config files:

apt -y install build-essential nano net-tools autoconf
apt -y install libfcgi-dev libfcgi0ldbl libjpeg-turbo8-dev libmcrypt-dev libssl-dev libc-client2007e libc-client2007e-dev libxml2-dev libbz2-dev libcurl4-openssl-dev libjpeg-dev libpng-dev libfreetype6-dev libkrb5-dev libpq-dev libxml2-dev libxslt1-dev libzip-dev libsqlite3-dev libonig-dev
ln -s /usr/lib/libc-client.a /usr/lib/x86_64-linux-gnu/libc-client.a
cd /usr/include
ln -s x86_64-linux-gnu/curl

(The last command is needed if you build PHP with --with-imap, because otherwise ./configure will stop with the following error:

checking for crypt in -lcrypt... yes
configure: error: Cannot find imap library (libc-client.a). Please check your c-client installation.
[email protected]:/tmp/php-7.4.0

)

3 Compile PHP 7.4 as PHP-FPM and Fastcgi

Download and extract PHP archive:

cd /tmp
wget https://www.php.net/distributions/php-7.4.0.tar.gz
tar xfz php-7.4.0.tar.gz
cd php-7.4.0

Configure and build PHP 7.4 as follows (you can adjust the ./configure command to your needs, take a look at

./configure --help

to see all available options; if you use a different ./configure command, it is possible that additional libraries are required, or the build process will fail):

./configure --prefix=/opt/php-7.4 --with-pdo-pgsql --with-zlib-dir --with-freetype --enable-mbstring --enable-soap --enable-calendar --with-curl --with-zlib --enable-gd --with-pgsql --disable-rpath --enable-inline-optimization --with-bz2 --with-zlib --enable-sockets --enable-sysvsem --enable-sysvshm --enable-pcntl --enable-mbregex --enable-exif --enable-bcmath --with-mhash --with-zip --with-pdo-mysql --with-mysqli --with-mysql-sock=/var/run/mysqld/mysqld.sock --with-jpeg --with-openssl --with-fpm-user=www-data --with-fpm-group=www-data --with-libdir=/lib/x86_64-linux-gnu --enable-ftp --with-imap --with-imap-ssl --with-kerberos --with-gettext --with-xmlrpc --with-xsl --enable-opcache --enable-intl --with-pear --enable-fpm

The last switch (--enable-fpm) makes sure this PHP version will work with PHP-FPM.

make
make install

Copy the files to the correct locations:

cp php.ini-production /opt/php-7.4/lib/php.ini
cp /opt/php-7.4/etc/php-fpm.conf.default /opt/php-7.4/etc/php-fpm.conf
cp /opt/php-7.4/etc/php-fpm.d/www.conf.default /opt/php-7.4/etc/php-fpm.d/www.conf

Adjust /opt/php-7.4/etc/php-fpm.conf

sed -i 's/;pid = run\/php-fpm.pid/pid = run\/php-fpm.pid/g' /opt/php-7.4/etc/php-fpm.conf

Then update /opt/php-7.4/etc/php-fpm.d/www.conf:

cp /opt/php-7.4/etc/php-fpm.d/www.conf.default /opt/php-7.4/etc/php-fpm.d/www.conf

If you have already additional PHP-versions installed, please check, that the port is not already in use:

netstat -tapn | grep -E ".*899.*php-fpm"

If you use nginx as your webserver, adjust /opt/php-7.4/lib/php.ini:

sed -i 's/;date.timezone =/date.timezone = "Europe\/Berlin"/g' /opt/php-7.4/lib/php.ini
sed -i 's/;cgi.fix_pathinfo=1/cgi.fix_pathinfo=0/g' /opt/php-7.4/lib/php.ini

3.1 Create the systemd unit file

Next, we'll create the system unit file which is used to start and stop the PHP-FPM daemon.

nano /lib/systemd/system/php-7.4-fpm.service

with the following content:

[Unit]
Description=The PHP 7.4 FastCGI Process Manager
After=network.target

[Service]
Type=simple
PIDFile=/opt/php-7.4/var/run/php-fpm.pid
ExecStart=/opt/php-7.4/sbin/php-fpm --nodaemonize --fpm-config /opt/php-7.4/etc/php-fpm.conf
ExecReload=/bin/kill -USR2 $MAINPID

[Install]
WantedBy=multi-user.target

Enable the service and reload systemd:

systemctl enable php-7.4-fpm.service
systemctl daemon-reload

Finally, start PHP-FPM.

systemctl start php-7.4-fpm.service

To enable the Zend OPcache:

echo zend_extension=opcache.so >> /opt/php-7.4/lib/php.ini

3.2 Enable Memcache (optional)

Install memcache with these commands.

cd /opt/php-7.4/etc
../bin/pecl -C ./pear.conf update-channels
../bin/pecl -C ./pear.conf install memcached

and enable memache

echo extension=memcached.so >> /opt/php-7.4/lib/php.ini

3.3 Install xDebug extension (optional)

The xDebug module is a debugging extension for PHP. The installation is optional.

Install xDebug with these commands.

cd /opt/php-7.4/etc
../bin/pecl -C ./pear.conf update-channels
../bin/pecl -C ./pear.conf install xdebug

and enable xDebug

echo zend_extension=/opt/php-7.4/lib/php/extensions/no-debug-non-zts-20190902/xdebug.so >> /opt/php-7.4/lib/php.ini

Finally restart the php-fpm daemon:

systemctl start php-7.4-fpm.service

Test the PHP version:

cd /opt/php-7.4/bin
./php --version

3.4 Enable PHP 7.4 in ISPConfig

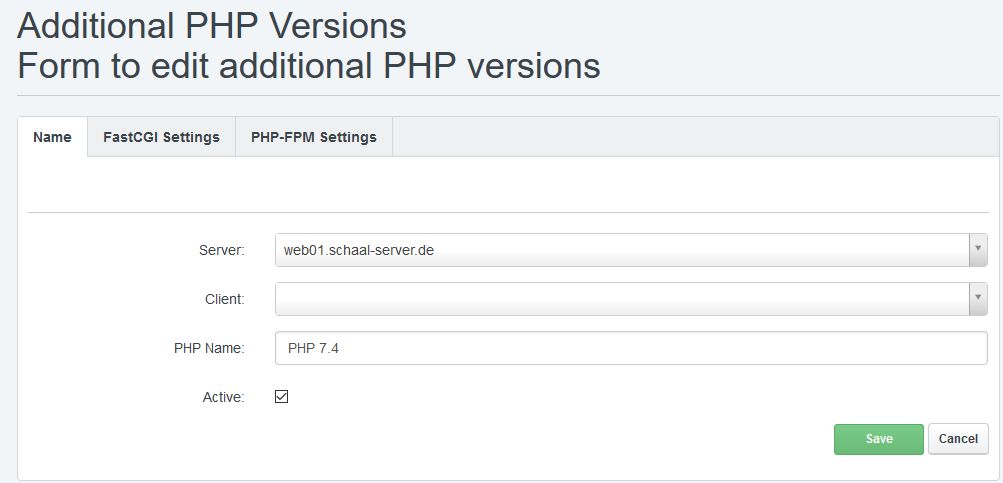
In ISPConfig 3.1, you can configure the new PHP version under System > Additional PHP Versions. On the Name tab, you just fill in a name for the PHP version (e.g. PHP 7.4) - this PHP version will be listed under this name in the website settings in ISPConfig:

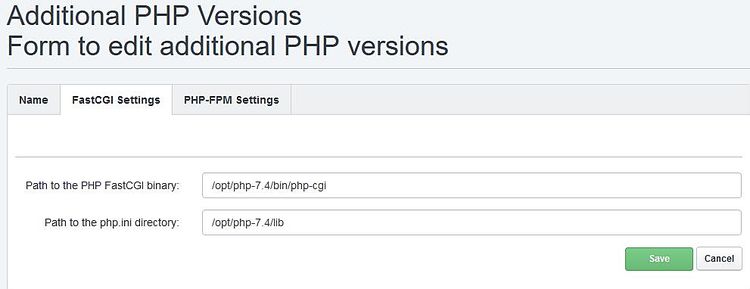
Go to the FastCGI Settings tab and fill out the fields as follows:

Path to the PHP FastCGI binary: /opt/php-7.4/bin/php-cgi
Path to the php.ini directory: /opt/php-7.4/lib

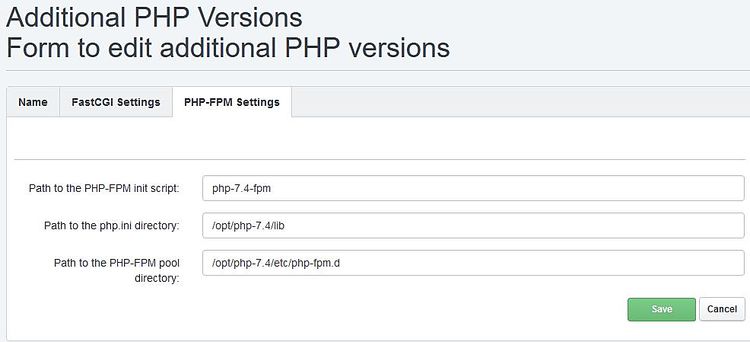
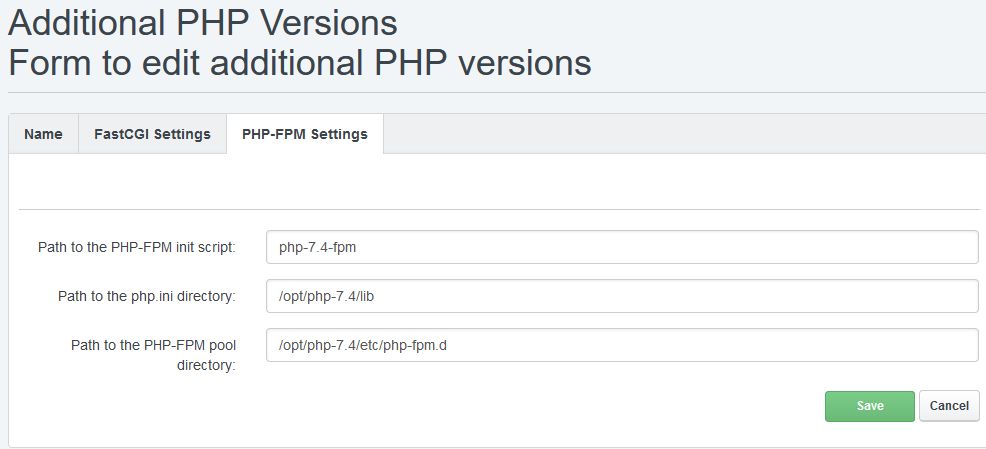
Then go to the PHP-FPM Settings tab and fill out the fields as follows:

Path to the PHP-FPM init script: php-7.4-fpm
Path to the php.ini directory: /opt/php-7.4/lib
Path to the PHP-FPM pool directory: /opt/php-7.4/etc/php-fpm.d

Share this page:

Suggested articles

18 Comment(s)

Add comment

Comments

By: ustoopia

Thank you very much for this tutorial. I was almost half way through it doing it by myself but I was too insecure to do this on production machines. So I decided to setup a test environment. And then I noticed this now post so I tried it without even reading up on it first. Worked like charm!! I'm confident enough now to also set up php 7.4 on some production machines.

As always, great job!! Keep up the good work!


By: corto

hello, and thx for the tutorial.

do it work on debian 9?

By: why

Please dont advocate this advice. Debsury already has PHP 7.4 packaged.

As soon as you hack out the frame work of using a repo, all bets are off. Thats for security and quality of package building. Please see https://deb.sury.org/

Ubuntu PPA ppa:ondrej/php – the main PHP repository Debian DPA packages.sury.org/php – the main PHP repository for Debian

HTH

By: till

The pros and cons are listed here already: https://www.howtoforge.com/community/threads/php7-4-is-released.83337/#post-396671

By: Ark74

 Seems like --with-pear is deprecated.

configure: WARNING: The --with-pear option is deprecated

By: andresgt2000

When try to configure memcache and I get this error:


checking for libmemcached location... configure: error: memcached support requires libmemcached. Use --with-libmemcached-dir=<DIR> to specify the prefix where libmemcached headers and library are locatedERROR: `/tmp/pear/temp/memcached/configure --with-php-config=/opt/php-7.4/bin/php-config --with-libmemcached-dir=no --with-zlib-dir=no --with-system-fastlz=no --enable-memcached-igbinary=no --enable-memcached-msgpack=no --enable-memcached-json=no --enable-memcached-protocol=no --enable-memcached-sasl=yes --enable-memcached-session=yes' failed

To solve it is necesary install libmemcached-dev, the library not appear in the prerequisites.

To install the library just execute this:

sudo apt install libmemcached-dev

By: Nushara

Hey there, great howto but after setting this up I am getting errors on my cron.


Do 9. Apr 12:42:02 CEST 2020 PHP Fatal error:  Uncaught Error: Call to undefined function mysqli_init() in /usr/local/ispconfig/server/lib/classes/db_mysql.inc.php:83

Do 9. Apr 12:42:02 CEST 2020 Stack trace:

Do 9. Apr 12:42:02 CEST 2020 #0 /usr/local/ispconfig/server/lib/app.inc.php(47): db->__construct()

Do 9. Apr 12:42:02 CEST 2020 #1 /usr/local/ispconfig/server/lib/app.inc.php(232): app->__construct()

Do 9. Apr 12:42:02 CEST 2020 #2 /usr/local/ispconfig/security/check.php(32): require('/usr/local/ispc...')

Do 9. Apr 12:42:02 CEST 2020 #3 {main}

Do 9. Apr 12:42:02 CEST 2020 thrown in /usr/local/ispconfig/server/lib/classes/db_mysql.inc.php on line 83


Can somebody help me with that please. It is very urgent for me to get this working again :(

By: PHLY

 PHP Fatal error:  Uncaught Error: Call to undefined function mysqli_init() in /usr/local/ispconfig/server/lib/classes/db_mysql.inc.php:83

I'm guessing you probbaly dont have the mysqli extension enabled or installed. You can confirm this by checking your  phpinfo() if mysqli extension is there.

Perhaps you left out the --with-mysqli flag while compiling PHP from the command above. 

--with-mysqli[=FILE]Include MySQLi support. FILE is the path to mysql_config. If no value or mysqlnd is passed as FILE, the MySQL native driver will be usedThat said, you should listen to what @why said and prefer grabbing instead from the sury.org repository.

For example:


$ wget -O /etc/apt/trusted.gpg.d/php.gpg https://packages.sury.org/php/apt.gpg $ echo "deb https://packages.sury.org/php/ stretch main" | sudo tee /etc/apt/sources.list.d/php.list $ sudo apt-get -y update && sudo apt-get -y --no-install-recommends install \ php7.4-cli php7.4-curl php7.4-mysql php7.4-fpm php7.4-common php7.4-xml php7.4-xmlrpc \ php7.4-gd php7.4-imagick php7.4-dev php7.4-imap php7.4-mbstring php7.4-opcache php7.4-soap \ php7.4-zip


By: svenner

thanks great work...is there a guide for php 7.4 on centos 7 with ispconfig, or anyone else try this guide on a centos machine ? 

By: Matteo Busolin

Thanks for the tutorial. I suggest to add another (optional) section after the point 3.2 to install imagick module for php-fpm (very useful if you need to host new wordpress websites). I achived this following these steps:

sudo apt-get install libmagickwand-dev libmagickcore-devcd /opt/php-7.4/etc../bin/pecl -C ./pear.conf update-channels../bin/pecl -C ./pear.conf install imagickecho extension=imagick.so >> /opt/php-7.4/lib/php.ini

By: Cedric Barthe

Thanks for tuto. Just add pkg-config too the prerequiseites !

apt -y install build-essential nano net-tools autoconf pkg-config

By: till

@Cedric. These packages are installed by default on any ISPConfig system, that's why they re not listed here again.

By: Roy S

Trying to install ISPConfig on Godaddy GenV4 VPS with php7.4. I have tried several interations for "The Perfect Server Ubunto 16.04", then tried "How to use Multiple PHP Ubunto 1210." and this set of instruction. While I have gotten through this set of instructions with no errors, a simple php page of

dies with only a cryptic message in the error.log No such file or directory: [client xxx.xxx.xxx] FastCGI: failed to connect to server "/var/www/clients/client0/web1/cgi-bin/php-fcgi-*-80 What is the right recipe for getting php7.4 working with ISPConfig on a Ubunto 16.04 server?

By: Dennis_sp

Under step 3 i had to change --with-libdir=/lib/x86_64-linux-gnu to --with-libdir=/lib/ and i had to skip making the symlink.

By: peterpetr

I have ISPconfig version: 3.2.4 and did the installation of PHP 7.4 as instructed above.  Since I host mostly WordPress sites, I did NOT install Memcache and xDebug.

My VPS runs Ubuntu v18.04 with the NGINX web server.  I did enter the info you provided under the FastCGI Settings tab but I assume I didn't have to since I'm not running Apache?

My QUESTION:

When adding PHP 7.4 in the PHP FPM Setting tab, you provide three values above (in this tutorial). However, there are actually four fields.

What string do I use for the last field labelled: "PHP-FPM socket directory" ??

Thank you.

By: till

You can leave the socket directory field empty. ISPConfig will use the default socket directory then.

By: Deeko

I don't understand how you know wich version to install