Configuring a single Ubuntu installation as a dual-boot option and a VirtualBox appliance under Windows 10
On this page
- Step 1: Enable Virtualization Technology
- Step 2: Download and Verify the Ubuntu ISO
- Step 3. Create a Partition for the Ubuntu Installation
- Step 4: Create Bootable Ubuntu media
- Step 5: Install Ubuntu
- Step 6: Update Ubuntu
- Step 7: Create VirtualBox Raw Disk Image of Ubuntu Partition
- Step 8: Create a GRUB ISO
- Step 9: Create Virtual Machine in Windows
- Recommendations and Caveats
- Troubleshooting
I often need to use Windows 10 and Ubuntu on the same machine within a single login session, so I run Ubuntu as a virtual machine in Oracle VirtualBox. But I also like to be able to boot my computer natively into Ubuntu, so a dual-boot configuration is optimal.
To get the best of both worlds, I install Ubuntu in a dual-boot configuration alongside Windows, and configure VirtualBox to access the Ubuntu disk partitions as a raw disk image. This allows me to boot directly into Ubuntu, or boot the same Ubuntu installation from within Windows using VirtualBox.
This configuration was performed successfully using Ubuntu 14.04.4, Windows 10 Pro v.1511 build 10586, and VirtualBox 5.0.24 for 64-bit Windows.
Step 1: Enable Virtualization Technology
Direct hardware access is key to this configuration, so make sure that virtualization technology is enabled in your BIOS, specifically Intel VT-x or AMD-v.
Step 2: Download and Verify the Ubuntu ISO
Download the ISO you'll be installing on your system. In this example, we're installing the 64-bit Desktop version of Ubuntu 14.0.4.
Verify the ISO before installing. Download SHA256SUMS and SHA256SUMS.gpg from the same directory that contains the ISO. For Ubuntu 14.0.4, the files are here (random U.S. mirror).
Use gpg to verify the authenticity of SHA256SUMS. (If you are on a Windows-only machine, gpg is available as a package for Cygwin.)
Download the Ubuntu public key, and add it to gpg's keyring:
gpg --keyserver hkp://keyserver.ubuntu.com --recv-keys 0xEFE21092
Verify the key's fingerprints:
gpg --list-keys with-fingerprint 0xEFE21092
Verify the file SHA256SUMS using the signature in SHA256SUMS.gpg:
gpg --verify SHA256SUMS.gpg SHA256SUMS
If you see "Good signature," the file is verified. (You may receive a message about the key not being certified with a trusted signature, which means that you have not specifically marked Ubuntu's key as trusted. This message can be ignored.)
Finally, verify the ISO. SHA256SUMS will contain several checksums, so grep only the one you need and check it with gpg.
sha256sum -c < (grep ubuntu-14.04.4-desktop-amd64.iso SHA256SUMS)
Step 3. Create a Partition for the Ubuntu Installation
Create a partition for Ubuntu to use, using the disk partitioning utility of your choice. In this example, I'm starting from a Windows install so I use Windows 10 Disk Manager. Windows 10 occupies the entire disk; I need to carve out some space for Ubuntu.
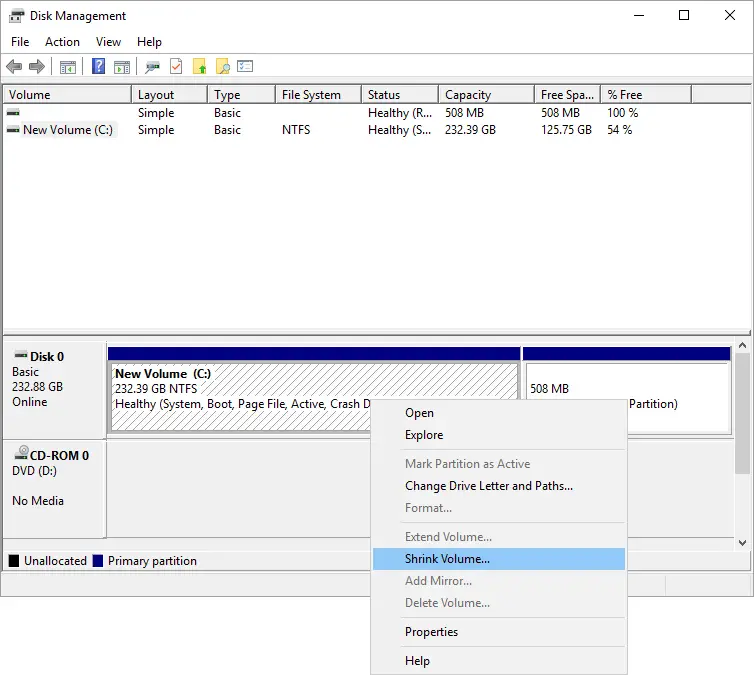
Right click the Windows partition and select Shrink Volume.
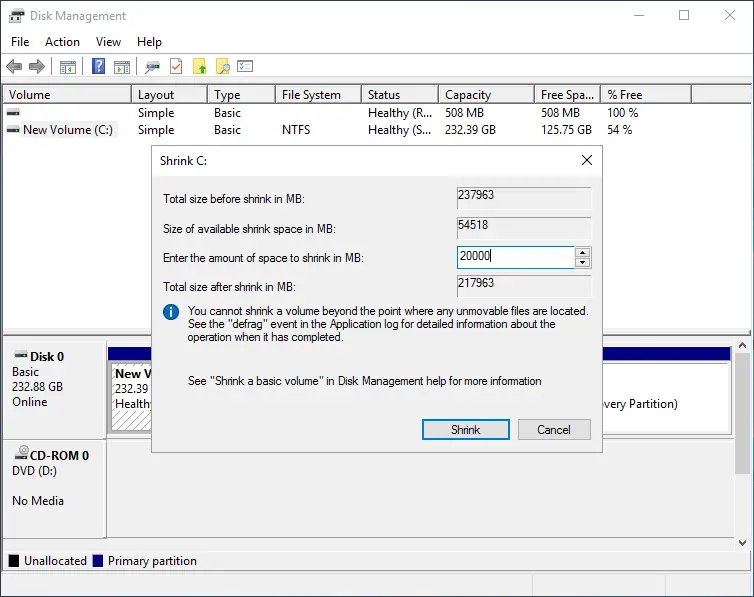
For my purposes, 20GB is enough for Ubuntu so I shrink the Windows volume by that amount:
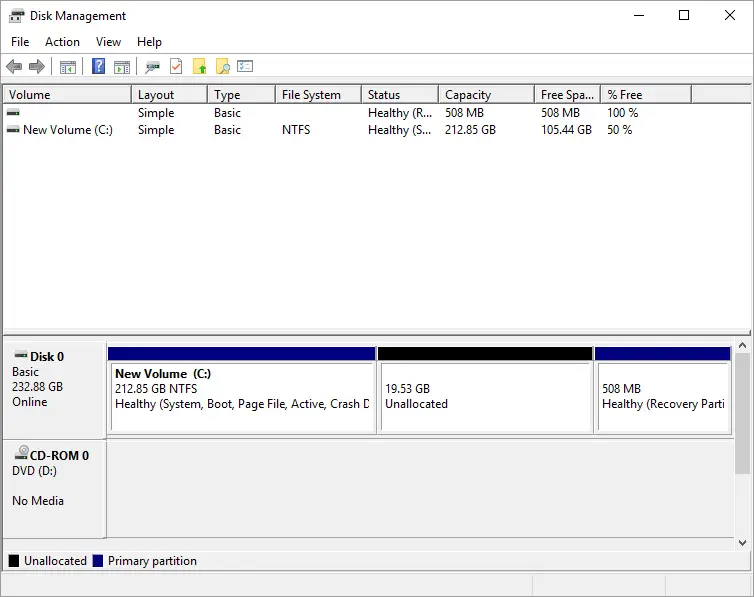
The operation successful, and I'm left with a little less than 20GB of unallocated space:
Step 4: Create Bootable Ubuntu media
Next, create bootable USB media from the Ubuntu ISO. This process overwrites ALL data on the thumbdrive, so move any pre-existing data off the thumbdrive before proceeding.
Creating Bootable USB in Linux:
Determine the device name of your USB disk with lsblk. If the disk is mounted, unmount it now.
You can write the ISO using the dd utility. As root:
dd bs=4M if=/path/to/ubuntu-14.04.4-desktop-amd64.iso of=/dev/sdx && sync
Where sdx is the device identifier of your USB disk, e.g. sdb. Do not specify a partition, such as sdb1.
Creating Bootable USB in Windows 10:
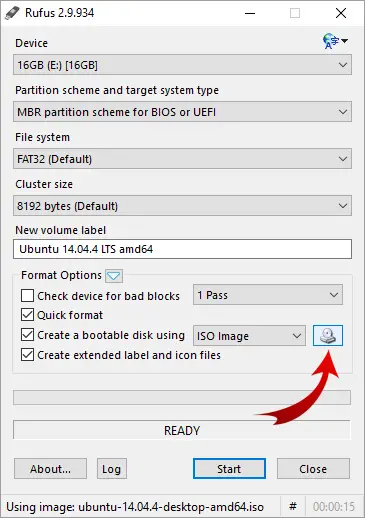
I recommend using Rufus, a free Windows application. In the Rufus dialog, you can select your source ISO by clicking the removable media icon (indicated here with a red arrow).
When you're ready to create the USB, click Start.
Step 5: Install Ubuntu
Boot your computer from the USB drive, which will start the Ubuntu Live session. Choose to Install Ubuntu Alongside Windows 10.
When installation is complete, remove the installation media and reboot. You will be greeted by a GRUB boot menu. Select Ubuntu.
Step 6: Update Ubuntu
Log in to Ubuntu, open a terminal and bring your system up to date.
sudo apt-get update && sudo apt-get upgrade
If you will be installing the VirtualBox Guest Services to enhance your virtualization experience, install the kernel module build requirements:
sudo apt-get install dkms build-essentials linux-headers-generic
You might also want to install your preferred window manager now:
sudo apt-get install openbox
Step 7: Create VirtualBox Raw Disk Image of Ubuntu Partition
Boot into Windows 10. If you have not already installed VirtualBox, do so now.
Open a command prompt as Administrator. Use the Windows Management Instrumentation Command-line (WMIC) tool to get the DeviceID for the physical disk drive:
wmic diskdrive list brief /format:list
In this example, our DeviceID is \\.\PHYSICALDRIVE0.
In the Administrator Command Prompt, change directory to your VirtualBox installation directory and use VBoxManage to list all partitions on that drive:
cd "\Program Files\Oracle\VirtualBox"
VBoxManage.exe internalcommands listpartitions -rawdisk \\.\PHYSICALDRIVE0
Output will resemble the following:
Number  Type  StartCHS     EndCHS       Size (MiB)  Start (Sect)
1       0x07  0   /32 /33  1023/239/63  217962      2048
6       0x83  1023/254/63  1023/254/63  16110       446392320
5       0x82  1023/254/63  1023/254/63  3891        479385600
2       0x27  1023/239/63  1023/239/63  508         487354368
Here, partition number 1 is my Windows installation, and partition 2 is my Windows Recovery partition. Partition 6 is my Ubuntu installation, and partition 5 is the Ubuntu swap partition.
I want to create a raw disk image which provides access to my Ubuntu partitions, which are partitions 5 and 6. For this configuration, the VBoxManage command is:
VBoxManage internalcommands createrawvmdk -filename “C:\path\to\ubuntu-raw.vmdk” -rawdisk \\.\PHYSICALDISK0 -partitions 5,6
Where C:\path\to\ubuntu-raw.vmdk is the location of the raw disk image file to be created.
Step 8: Create a GRUB ISO
Ubuntu needs GRUB to boot, but the Ubuntu virtual machine will not have access to the default GRUB installation because it resides on your Windows partition.
In this step we create a bootable GRUB Recovery ISO which the Virtual Machine will use to boot into Ubuntu.
In Ubuntu, choose a location (such as a temporary directory) and create the directory structure iso/boot/grub.
mkdir -p iso/boot/grub
Copy the contents of /usr/lib/grub/i386-pc/* into iso/boot/grub:
cp /usr/lib/grub/i386-pc/* iso/boot/grub
Then copy /boot/grub/grub.cfg into the same directory:
cp /boot/grub/grub.cfg iso/boot/grub
Edit this copy of grub.cfg with your favorite text editor:
vi iso/boot/grub
In this file, locate and remove the boot menu entry for Windows 10. It looks like this:
menuentry 'Windows 10' {
...
}
Comment out or delete this menu entry (everything between menuentry and }, inclusive). Write the changes to grub.cfg and exit the editor.
Next, use grub-mkrescue to create a bootable GRUB ISO. This requires GNU xorriso. If you do not already have it installed, install it now:
sudo apt-get install xorriso
Run grub-mkrescue, specifying your iso directory:
grub-mkrescue -o boot.iso ./iso
This creates the bootable GRUB recovery ISO boot.iso, which must be transferred to Windows 10. Copy it to your USB thumbdrive.
Step 9: Create Virtual Machine in Windows
Boot into Windows 10. Copy boot.iso to a location suitable for long-term access, such as your VirtualBox VMs directory, or your Documents folder.
Launch VirtualBox as Administrator. It's important that VirtualBox has Administrator privileges so that it can access the Ubuntu partition.
Now, create a new Virtual Machine for Ubuntu. When configuring the hard disk drive, choose Use an existing virtual hard drive file. Select the VDMK file you created in step 7. This raw disk image enables your virtual machine to access the Ubuntu partition.
After creating the Ubuntu VM, select it and go to Settings -> Storage. Select Controller: IDE and use the optical drive icon to add a removable disk.
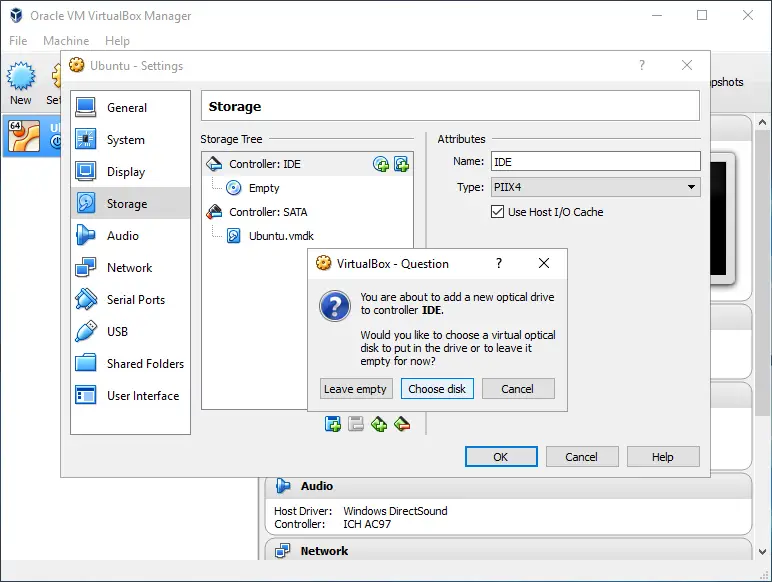
Select your boot.iso file and click OK.
Now when you boot the virtual machine, it will read the GRUB Recovery ISO as a removable disk and provide you with your GRUB boot menu, minus the option to boot Windows 10.
After this step, your Virtual Machine should be ready to go.
Recommendations and Caveats
Make sure that you run VirtualBox as Administrator when you want to virtualize Ubuntu, otherwise the Ubuntu partition will be inaccessible.
Feel free to pause the VM and leave it in a saved state in between consecutive virtualization sessions, but make sure to properly shut down the virtual machine before booting the computer directly into Ubuntu.
Do not try to access your Windows partition from within the Ubuntu Virtual Machine -- this will produce unpredictable results. Doing so may destroy data! Use other methods to exchange data between the Ubuntu VM and Windows, such as removable media or network transfers such as rsync.
Troubleshooting
If you boot your computer and the GRUB menu entry for Windows is missing, log in to Ubuntu as root and run os-prober to scan for bootable operating systems:
os-prober
Then, update your GRUB configuration:
update-grub
...and reboot.

