Installing the Jaws CMS on Ubuntu 7.10
Jaws is a content management system that utilizes a PHP framework with a MySQL back end. I have been looking for a good CMS for a little while now, but what attracted me to Jaws was its simplicity and appearance. I decided that since I was going to test Jaws out, I may as well document it, so that it might help others who are thinking about using it.
Before we begin though, I will get a few preliminaries out of the way.
Jaws can be found at http://jaws-project.com/
The system being used was built upon the "The Perfect Server - Ubuntu Gutsy Gibbon (Ubuntu 7.10) " guide by falko located at https://www.howtoforge.com/perfect_server_ubuntu7.10. So, if you have set your system up using another guide, your mileage may vary.
This is mostly a copy and paste guide, so the process is fairly simple
The first half of the installation will be done from the command line. I prefer to SSH into my server using PuTTY, but you can just as easily do it directly from your server.
1 - Obtaining Jaws
I prefer to place my downloaded files into a temporary directory. You can either use "tmp" or one of your own choosing. For this example, we will work out of the "tmp" directory.
cd /tmp/
Lets ensure that we are now in the "tmp" directory, by issuing the "pwd" command.
pwd
this should provide output similar to this
user@Server1:/tmp# pwd
/tmp
If you show "/tmp", then you are good to proceed.
Issue the following command, to obtain the latest version of Jaws (currently Jaws 0.7)
wget http://bits.jaws-project.com/releases/jaws-0.7.4/jaws-complete-0.7.4.tar.gz
Once the download is complete, we will need to extract it using the following command
tar -xvzf jaws-complete-0.7.4.tar.gz
2 - Compiling Jaws
Now we will begin the actual installation process.
The first step in this process is to create the Jaws directory under your web root and to grant the proper permissions.
mkdir /var/www/jaws
Once you have created the Jaws directory in your web root, you need to copy the files from the extracted archive into the newly created directory. You can do this, by issuing the following command
cp -R jaws/html/* /var/www/jaws/
Now, you need to set permissions on that directory by using these commands
chmod -R 755 /var/www/jaws/
chown -R www-data /var/www/jaws/data/ /var/www/jaws/include/
chmod -R 777 /var/www/jaws/config
Please note that setting the permissions for the config directory to 777 are only temporary and will be changed later in this tutorial.
3 - Create the database
Jaws requires a MySQL database to store your data in, so we will create that before beginning the web based portion of the setup.
From the command line, enter
mysql -uroot -p
You will now be prompted for your root password for MySQL.
Once you have entered your password and are logged into MySQL, you can create the database by issuing the following command
create database jaws;
I like running as little as possible under the root MySQL user, so I create an account for Jaws to use. If you feel the same, then you can issue this command to create a new user and to set the permissions in place.
GRANT ALL ON jaws.* TO jawsadmin@localhost IDENTIFIED BY 'somepassword';
flush privileges;
exit
If running your site under the root user is okay with you, then you can skip the first two commands above and simply exit with the "exit" command.
4 - Begin the web based installation process
You are now ready to begin the web based portion of the installation process. Begin by opening jaws in your web browser (here it can either be localhost if you are physically on your server or the IP address of your server if working remotely).
http://localhost/jaws/install.php
or
http://192.168.1.115/jaws/install.php
Note that 192.168.1.115 is only an example
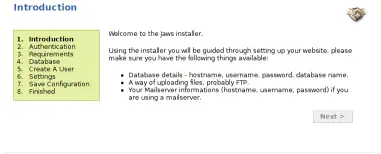
The first screen that you are greeted with is the "Introduction" screen. Once you have read it over, you can click on "Next" to proceed.
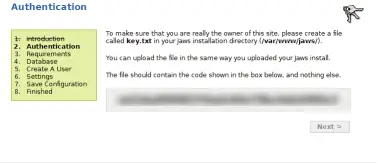
The next screen is the "Authentication" screen. For security purposes, Jaws requires you to create a key in your Jaws web root directory. Here will need to do some manual work from the command line again.
You will notice a string of characters on the authentication screen similar in style to "1b26hg54rt5mx56491245jsd802ap409". You will need that code in just a moment.
Back in PuTTY, issue the following command to invoke the nano editor:
nano /var/www/jaws/key.txt
Now that nano is open, go back to your browser and copy the authentication string and paste it into the key.txt file that you are working with.
Press Ctrl-O to write out your changes
Press Ctrl-X to exit nano
You are now ready to proceed, so click on the "next" button.
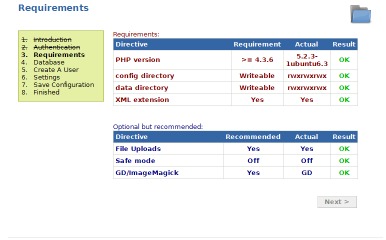
The requirements screen will let you know whether your system has met the necessary requirements to complete the installation
If everything shows as "OK", you are good to proceed.
Again, click on the "next" button.
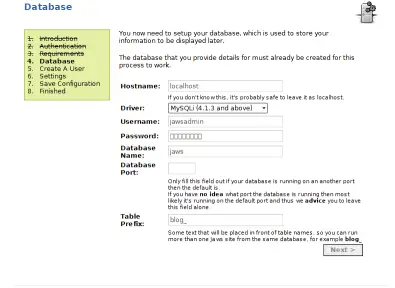
The database screen is where we will input the credentials to allow Jaws to populate the database back end.
There are several fields here, but the only ones that you need to fill in are:
Hostname - Where hostname is your sever name. "localhost" will most likely suffice
Driver - Should be set to MySQLi(4.1.3 and above) and should be fine
Username - For the example here, I have used "jawsadmin" which we created earlier
Password - Again, the password created in the DB step above
Database name - The DB we created in the step above. In this case, it is "jaws"
Database Port: your can leave this field blank as it defaults to 3306. If you are not using the default MySQL port though, you will need to input the correct port.
Table Prefix - Enter a prefix for your site. In this case, we will use their example of "blog_"
Once you have entered all of your information, click on the "next" button to proceed.
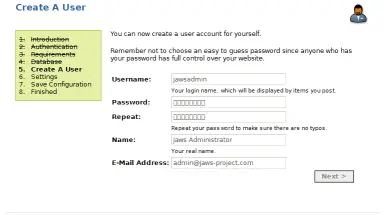
The "Create A User" screen is where you will create your admin account.
The fields on this screen are self explanatory, but they are as follows:
Username - The admin user for your site
Password - Your password
Repeat - Your password again
Name - Your name
E-Mail address - Your email address
Once you have entered all of your information, click on the "next" button to proceed.
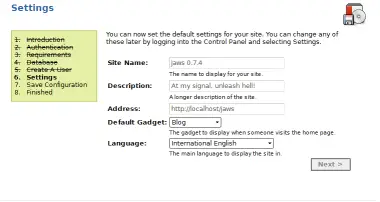
On the "Settings" screen, you will begin to define your site.
Complete the following fields:
Site Name - Enter the name of your site.
Description - A description of your site's purpose.
Address - Ensure that your address shows properly. Most likely it will be along the lines of http://192.168.1.115/jaws
Default gadget - Gadgets, as I understand them , are modules that set the theme of your site.
Language - Choose your language.
You can read more about gadgets at the following URL to help you decide which is right for you - official Jaws gadgets
Once you have entered all of your information, click on the "next" button to proceed.
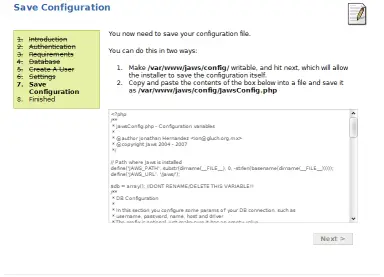
The "Configuration" screen is where you finalize your installation.
You can either do this manually, by copying and pasting the config into the "/var/www/jaws/config/JawsConfig.php" file which you could create using nano:
nano /var/www/jaws/config/JawsConfig.php
or by making the config/ directory writable, which we did earlier, so we will proceed using the web installer.
Click on the "next" button to write your configuration to your server.
5 - Set permissions
Before you begin using your new site powered by Jaws, you should set the permissions on the config directory back from being world writable. Issue the following command in PuTTY to do so.
chmod -R 755 /var/www/jaws/config
Back in the web installer, click on "view your site" and you should be taken to your new web site.
6 - Done
To access the admin section, you would simply point your browser to http://Your Server IP address/jaws/admin.php and login with the credentials that you created earlier.
You can read more about configuring your site at Jaws Configuration as that information would fall outside of the scope of this document.
I would like to thank both Pablo and Jonathan for allowing me to post this guide.

