Indicate Mail Accounts On Your Desktop (Ubuntu)
Version 1.0
Author: Christian Schmalfeld <c [dot] schmalfeld [at] projektfarm [dot] de>![]() Follow me on Twitter
Follow me on Twitter
This article is about how to get informed about new mails without actually opening your mail client using a handy indication tool called popper. Popper is silently running in the background and gives you a notice when a new mail arrives at your mail account, containing the mail's sender, subject and the time it arrived.
1 Preliminary Note
Popper does not actually display the mail's content - it only gives you the information mentioned above. I have tested it on Linux Mint 11, but it should work fine with all other Ubuntu derivatives.
I do not issue any guarantee that this will work for you!
2 Install Popper
Popper is not available in the standart Ubuntu repositories, therefore we first must add another repository to be able to download it. Open a terminal and enter the following commands to install Popper:
sudo add-apt-repository ppa:ralf.hersel/rhersel-ppa
sudo apt-get update
sudo apt-get install popper
Afterwards you can find the Popper Configurator in Menu > Applications > Internet > Popper Configurator.
3 Configure Popper
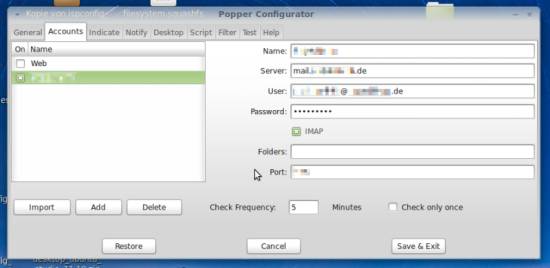
What you basically need to do to configure Popper is the same thing that you do when configuring an email client like Thunderbird or Evolution, you give it your email account data in the Accounts tab:
- Name - For you to identify the account. You cannot enter anything wrong here
- Server - Enter the server that your account is on here. Usually its something like mail.example.com or, if you have a specified server, imap.example.com
- User - The email that you have on the server goes here - type in the full mail address, for example [email protected]
- Password - Enter the password of your mail account here
- IMAP - IMAP is the most common type of protocol to retrieve mails from servers. It is likely that it is also used by your provider, however you should be able to check that on their website
- Folders - If you only want specific folders to be checked on your mail account, list them here. Leave the line blank if you want all folders contents to be retrieved
- Port - Enter the port here that is used to retrieve mails from your server. If you already configured the same account via Thunderbird, then you can look up the port in your Thunderbird account settings
- Check Frequency - Times Popper checks your account for mails
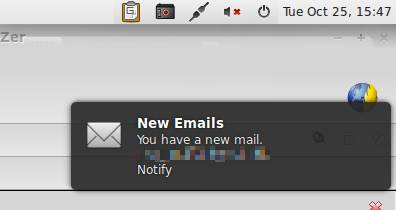
After you have entered all the information, check the box in the list on the left to activate the retrieval. Next, you choose what the notification you get should look like. First, go to the Notify tab. There, check the Notify on new emails box to get a notification like this:
If you want a more customized notification, uncheck the box again and go to the Desktop tab. Check the box saying Enable Desktop Display to get a customized notification as the one seen on the top-right corner:
You should not check both boxes - one notification is quite enough to know that you got mails. On the other tabs, there are more really handy options you can enable, such as script execution on a certain event or filtering emails containing certain keywords.
4 Start Popper
Popper is activated after login if you chose that option in the first configuration tab, which is checked by default. It binds the few options it enables for the desktop to the messages indicator which is preinstalled on Ubuntu, but not on all of its derivatives such as Linux Mint (that is why you will not see any panel icon on Linux Mint despite popper being installed and activated - it still notifies you about new mails though).
To have the massages indicator on Mint or other Ubuntu derivatives it is not preinstalled on, open a terminal and enter
sudo apt-get install indicator-messages
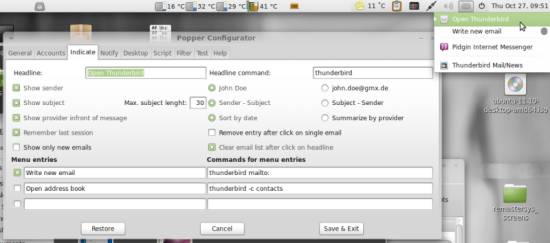
For an applet to appear on the applet list or the panel you usually need to start a new session, so log out and in again to find the messages indicator in your panel. The options that popper puts into the messages indicator can be configured in the Indicate tab of the popper-configurator:


