How to Setup SaltStack Master and Minion on Rocky Linux
Salt or Saltstack is an open-source IT automation framework that allows administrators to execute commands remotely to multiple machines directly. Salt is mainly written in Python and designed with Master and Minion architecture. SaltStack master is the central controller of Salt configuration management, and Minions are servers managed by SaltStack Master, or you named minions as target servers.
SaltStack master is running on Linux OS by default, but minions can be any operating system. Saltstack is revolutionary configuration management for automation deployment, remote task execution, and infrastructure as code. SaltStack also can be used to provision multiple infrastructure servers, this includes physical and virtual servers, and also the cloud.
By following this guide, you will install SaltStack Master and Minion on Rocky Linux servers. Also, you will learn how to use Salt for running Arbitrary commands from SaltStack Master against Salt Minions. And at the end, you will also learn how to create a Salt state for installing the basic LEMP Stack (Linux, Nginx, MariaDB, and PHP-FPM).
Prerequisites
Tom complete this tutorial, you will need at least two or more Rocky Linux servers. All of those servers should have a non-root user with root/administrator privileges.
Setting Up /etc/hosts file
For this example, we will use three Rocky Linux servers for the SaltStack installation. One server will be used as Master, and two servers will be used as minions.
Below are the detailed Rocky Linux servers that we will use:
Hostname    IP Address      Used as
---------------------------------------------
master      192.168.5.10    SaltStack Master
minion1     192.168.5.15    SaltStack Minion
minion2     192.168.5.16    SaltStack Minion
Before installing SaltStack packages, you will set up the /etc/hosts file on every Linux host.
Edit the file /etc/hosts using the following command.
sudo nano /etc/hosts
Now add the following configuration to the file.
master 192.168.5.10
minion1 192.168.5.15
minion2 192.168.5.16
When you are finished, save and close the file.
Adding SaltStack Repository
The SaltStack packages are available on its official repository. You will add the SaltStack repository and GPG key to all of your Rocky Linux servers.
Run the following command to import the GPG key for the SaltStack repository. Then, add the SaltStack repository. In this example, you will add the latest version of the SaltStack repository.
sudo rpm --import https://repo.saltproject.io/py3/redhat/8/x86_64/latest/SALTSTACK-GPG-KEY.pub
curl -fsSL https://repo.saltproject.io/py3/redhat/8/x86_64/latest.repo | sudo tee /etc/yum.repos.d/salt.repo
Now run the following command to check and verify the list of repositories on your Rocky Linux server. Then, update and generate new metadata for all available repositories.
You should see the SaltStack repository is added to the Rocky Linux server.
sudo dnf repolist
sudo dnf makecache
Installing SaltStack Master
You have added the SaltStack repository to all of your Rocky Linux servers. Now you will install and set up the SaltStack Master on the "master" server.
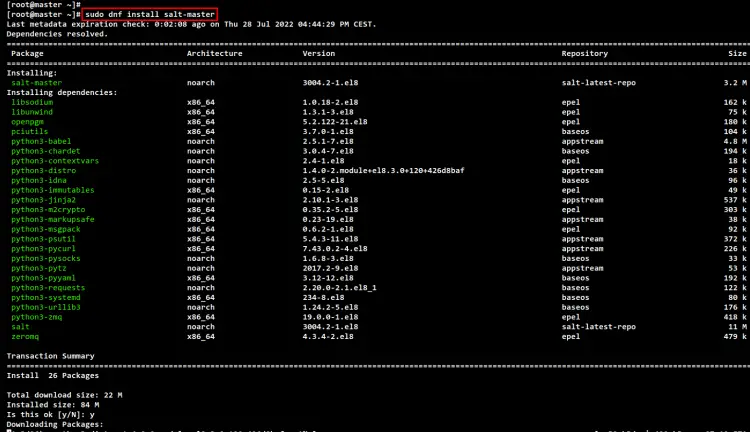
First, run the DNF command below to install the "salt-master" package. This package is the main package for setting up the SaltStack Master.
Input Y to confirm the installation and press ENTER, and the installation will begin.
sudo dnf install salt-master
After installation is finished, edit the SaltStack Master configuration "/etc/salt/master" using the below command.
sudo nano /etc/salt/master
Uncomment the option "interface:" and change the IP address with your "master" server IP address. In this example, the IP address of SaltStack Master is "192.168.5.10".
interface: 192.168.5.10
Save and close the file when you are finished.
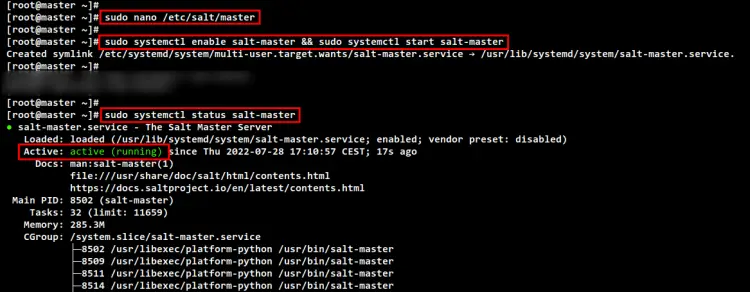
Next, enable the "salt-master" service to run at system boot and start the "salt-master" service. Then, check and verify the "salt-master" service.
You should see the "salt-master" service is enabled and running.
sudo systemctl enable salt-master && sudo systemctl start salt-master
sudo systemctl status salt-master
On the SaltStack Master, you will need to open TCP ports 4505 and 4506, which will be used by the SaltStack Minions connection to the SaltStack Master.
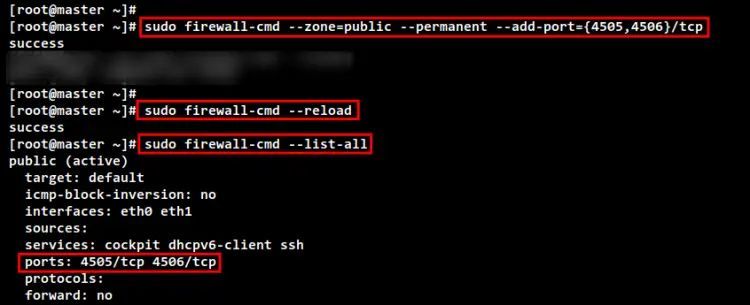
Run the following "firewall-cmd" command below to open ports 4505 and 4506. Then, reload the Firewalld.
sudo firewall-cmd --zone=public --permanent --add-port={4505,4506}/tcp
sudo firewall-cmd --reload
Lastly, check and verify Firewalld rules using the following command. And you should get the port 4505 and 4506 available on the Firewalld.
sudo firewall-cmd --list-all
Installing SaltStack Minion
You have installed and configured the SaltStack Master. Now you will install and set up SaltStack Minion on both "minion1" and "minion2" servers.
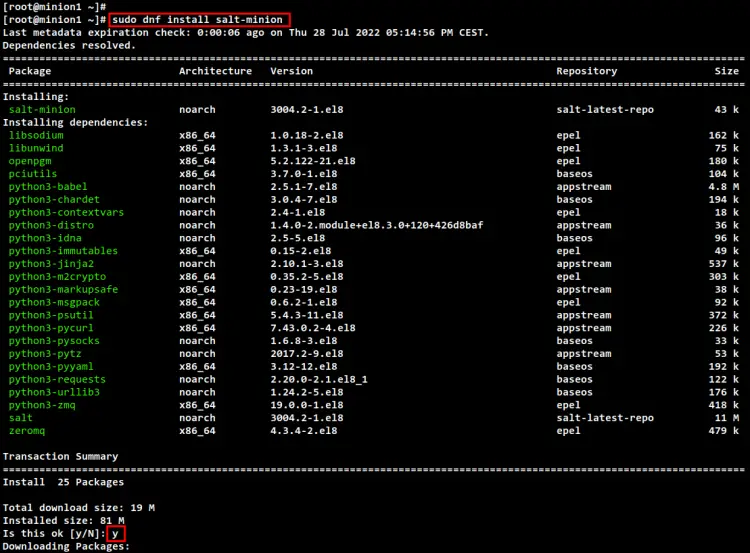
Move the "minion1" and minion2" servers, then run the DNF command below to install the "salt-minion" package. This package must be installed on all SaltStack Minion hosts.
Input Y to confirm the installation and press ENTER. And the "salt-minion" installation will begin.
sudo dnf install salt-minion
After you have finished the installation, edit the SaltStack Minion config file "/etc/salt/minion" using the below command.
sudo nano /etc/salt/minion
Uncomment the option "master:" and add the SaltStack Master IP address or hostname. In this example, the SaltStack master is running on the server IP address "192.168.5.10".
master: 192.168.5.10
Save and close the file when you are finished.
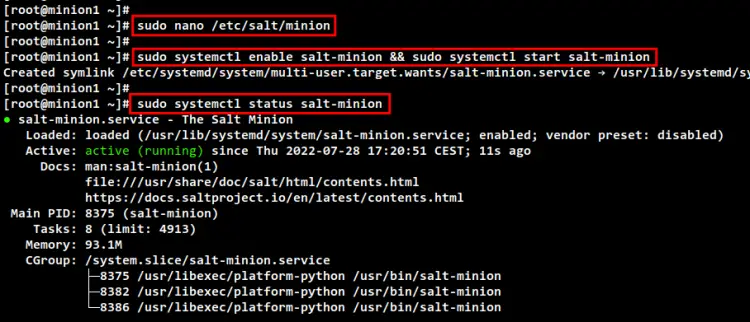
Next, run the following command to enable the "salt-minion" service and start the service. Then, check and verify the "salt-minion" service.
You should see the "salt-minion" service is enabled and will automatically be run at system startup. And the current status of the "salt-minion" service is running.
sudo systemctl enable salt-minion && sudo systemctl start salt-minion
sudo systemctl status salt-minion
Adding Minion Servers to SaltStack Master
You have now finished the installation of SaltStack Master on the "master" server and the SaltStack Minion on "minion1" and "minion2" servers. To add SaltStack Minions to the SaltStack Master, you will accept the key fingerprint of both the "minion1" and "minion2" server from the "master" server.
Back to the "master" server and run the salt command below to check all available key fingerprints. You should see there are two "Unaccepted Keys" from the "minion1" and "minion2" servers.
salt-key --finger-all
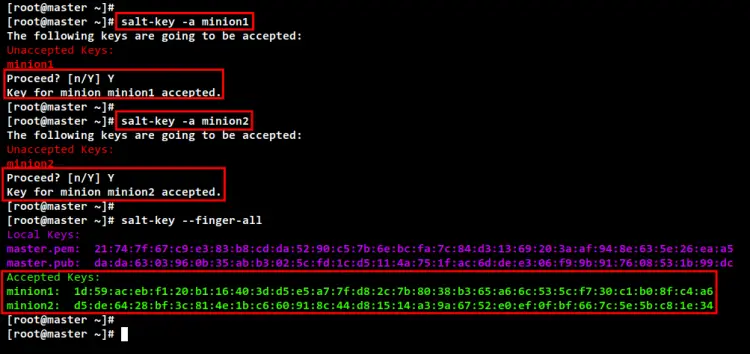
To accept the key fingerprint of the "minion1" and "minion2" server, run the salt-key command below. And you will be prompted to accept the key fingerprint, Input Y to confirm and add the key.
salt-key -a minion1
salt-key -a minion2
Next, check and verify all available key fingerprints using the below command. And you should get both fingerprint keys of the "minion1" and "minion2" server added to the SaltStack master. Both key fingerprints are available in the "Accepted Keys" section.
salt-key --finger-all
After adding SaltStack Minion servers to the SaltStack Master, run the following salt command on the "master" server to test and ping the "minion1" and "minion2" servers.
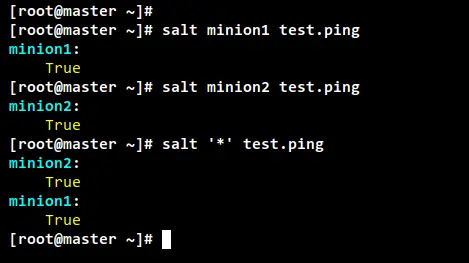
If your configuration is successful, you should the output message "True", which means SaltStack Minion servers are added to the SaltStack Master.
salt minion1 test.ping
salt minion2 test.ping
You can also use an asterisk '*' to target all SaltStack Minion servers.
salt '*' test.ping
You can also check the current SaltStack version installed on both the "minion1" and "minion2" servers using the below command.
At the time of this writing, the latest version of SaltStack software is v3004.2, which is installed on all of the SaltStack servers.
salt '*' test.version
Running Arbitrary Command with SaltStack
Saltstack allows you to execute arbitrary commands from the master server to all minion servers. To do that, you will need to use an execution module provided by Saltstack.
Run the salt command below from the master server. This will execute the command uname -a on all minion servers, and this command is executed through the cmd module.
salt '*' cmd.run 'uname -a'
As you can see on the following screenshot, each minion servers return the output of the command uname -a.
Another example is where you can use the pkg module for managing package installation, repository, and everything related to package management. This supports multiple Linux distributions including RHEL-based distributions such as CentOS and Rocky Linux, and also Debian-based systems such as Ubuntu.
Refresh available repositories on all minion servers.
salt '*' pkg.refresh_db
Check the package bash using the salt command below.
salt '*' pkg.show bash
Install package named chrony on all minion servers.
salt '*' pkg.install chrony
Check the list of repositories on all server minions.
salt '*' pkg.list_repos
Check the list of available package updates on all minion servers.
salt '*' pkg.list_upgrades
Another great example here is the service module that allows you to manage services on multiple Linux distributions, including distribution with systemd.
Check if the chronyd service is available or not.
salt '*' service.available chronyd
Enable the chronyd service to start at system startup on all minion servers.
salt '*' service.enabled chronyd
Checking the list of running services on all servers.
salt '*' service.get_running
Check the ExecStart= command for every service available on all servers.
salt '*' service.execs
Installing LEMP Stack with SaltStack State
You have learned the basic salt command to run an arbitrary command against all SaltStack Minion servers. You will now create a new SaltStack state file for installing the basic LEMP Stack (Linux, Nginx, MariaDB, and the PHP-FPM). This is where you can use SaltStack as the configuration management for your server infrastructure and automatic application deployments.
The Rocky Linux repository provides multiple versions of Nginx, MariaDB, and PHP-FPM packages. To install the latest version of those packages, you will need to enable it via the DNF package manager module.
At the time of this writing, there is no SaltStack model that is equivalent to the "dnf module" command for RHEL-based distribution. So, you will enable the module manually via the SaltStack arbitrary command.
Run the following command to enable the module for Nginx v1.20, MariaDB v10.5, and the PHP packages v8.0.
salt '*' cmd.run 'sudo dnf module enable nginx:1.20 -y'
salt '*' cmd.run 'sudo dnf module enable mariadb:10.5 -y'
salt '*' cmd.run 'sudo dnf module enable php:8.0 -y'
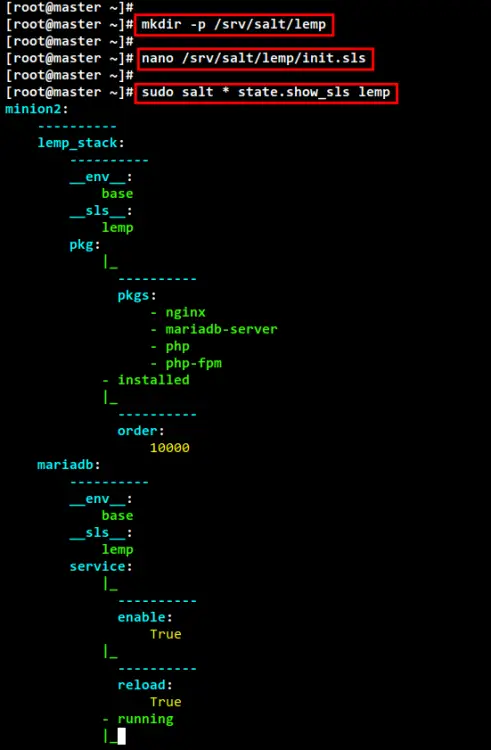
Now create a new central configuration management directory "/srv/salt/lemp" and create a new file "init.sls" using the below command.
mkdir -p /srv/salt/lemp
nano /srv/salt/lemp/init.sls
Add the following configuration to the file. In this example, we will create the Salt state named "lemp" for installing LEMP Stack packages. Also, we will ensure all the LEMP Stack services (Nginx, MariaDB, and PHP-FPM) are enabled and running on all SaltStack Minion servers.
lemp_stack:
 pkg.installed:
   - pkgs:
     - nginx
     - mariadb-server
     - php
     - php-fpm

nginx:
  service.running:
    - enable: True
    - reload: True

mariadb:
  service.running:
    - enable: True
    - reload: True

php-fpm:
  service.running:
    - enable: True
    - reload: True
When you are finished, save and close the file.
Now to verify your Salt state configuration, use the salt command below. This command will test and verify your Salt state configuration against SaltStack Minion servers.
sudo salt * state.show_sls lemp
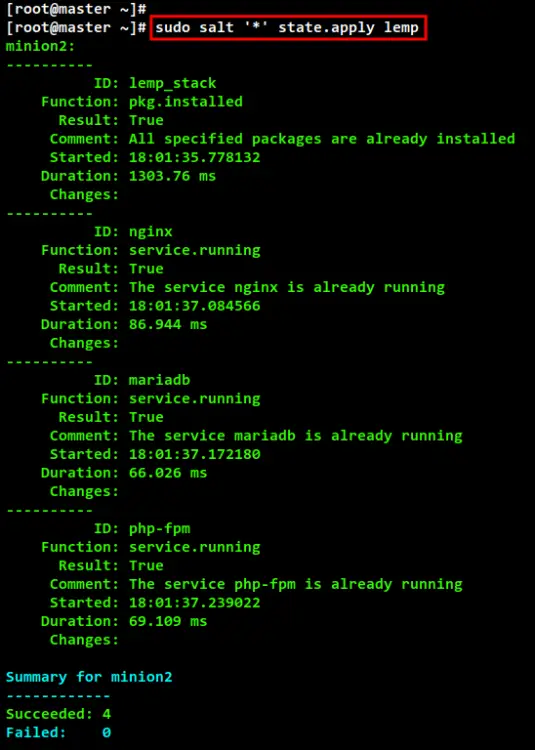
To apply the Salt state to all SaltStack Minion servers, you can use the salt command below. Now the LEMP Stack will be installed automatically on the "minion1" and "minion2" servers.
sudo salt '*' state.apply lemp
In the following screenshot, you can see the LEMP Stack is installed on both "minion1" and "minion2" servers.
Conclusion
In this tutorial, you have finished the installation of SaltStack Master and SaltStack Minion on Rocky Linux servers. You have also learned the basic usage of the salt command to run an arbitrary command against SaltStack Minion. In the end, you also learned how to create a Salt state configuration for installing the LEMP Stack automatically and set up the SaltStack as configuration management for application deployments.


