How to integrate ONLYOFFICE Docs with Odoo
ONLYOFFICE Docs is an open-source office suite that comprises collaborative editors for text documents, spreadsheets, presentations, and digital forms, along with a PDF viewer and converter. The package is distributed under the AGPL v3.0 license. OOXML is used as a core format.
ONLYOFFICE Docs can be integrated with various cloud services such as CMS frameworks (WordPress, Strapi, Drupal), collaboration & content platforms (ONLYOFFICE Workspace, Nextcloud, Seafile, Confluence, Alfresco), issue trackers (Jira, Redmine), e-learning solutions (Moodle, Chamilo, HumHub), and others. You are able to embed the editors into your own web service as well.
Odoo is a suite of open source business apps which cover CRM, e-commerce, billing, accounting, manufacturing, warehouse, project and inventory management. ONLYOFFICE integration into
Odoo allows editing and collaborating on office files within Odoo Documents.
In this tutorial, we’ll learn how to connect the instances of ONLYOFFICE Docs and Odoo using an integration app.
Step 1: Install ONLYOFFICE Docs
To be able to work with office documents within Odoo, you need an instance of ONLYOFFICE Docs (Document Server). The installation way officially recommended by developers is to use Docker. It allows installing the latest version of the editors with all the dependencies running the single command:
sudo docker run -i -t -d -p 8080:80 --restart=always onlyoffice/documentserver
You can find the detailed instructions in this HowtoForge tutorial.
If you are new to Odoo, check this guide which describes how to install it on Ubuntu 22.04.
Step 2: Install integration app
ONLYOFFICE integration app for Odoo is distributed under AGPL-3.
Navigate to the Odoo Apps catalog and select the Odoo version you have installed. Search for ONLYOFFICE and download it.
Put ONLYOFFICE app into /path/to/odoo/addons. Make sure the ONLYOFFICE folder is named as onlyoffice_odoo.
Alternatively, you can add the following lines in the /path/to/odoo/config/odoo.conf file specifying your path to the folder with apps:
[options]
addons_path = /mnt/extra-addons
Then, install the package:
pip install pyjwt
Once ready, switch your Odoo to the developer mode and click Apps -> Update Apps List or just restart your Odoo instance.
Installation from the admin panel is also possible.
Step 3: Configure instance
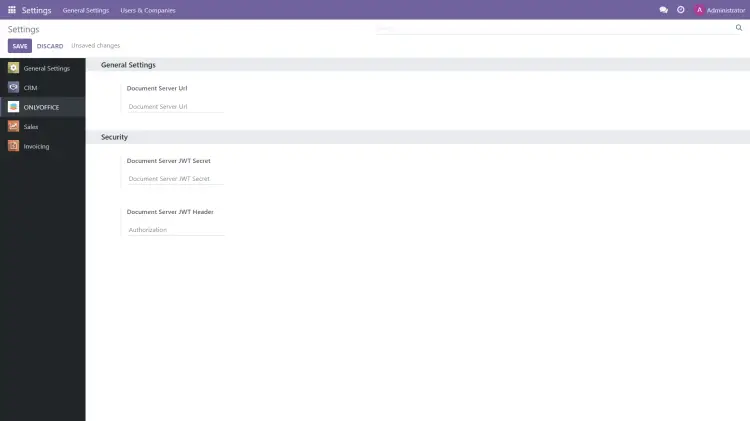
Go to Home menu -> Settings -> ONLYOFFICE within your Odoo and specify the following parameters:
- Document Server URL. Specify the URL of the installed ONLYOFFICE Docs.
- Document Server JWT Secret. JWT is enabled by default and the secret key is generated automatically to control document access on the back-end. You can specify your own secret key in this field. In this case, also specify the same secret key in the ONLYOFFICE Docs config file to enable the validation.
- Document Server JWT Header. Standard JWT header used in ONLYOFFICE is Authorization. In case this header conflicts with your setup, change the header to the custom one.
Step 4: Use ONLYOFFICE Docs in Odoo
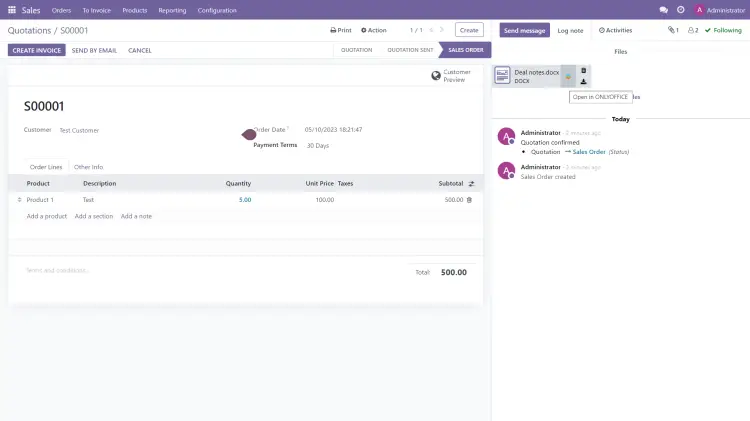
You can launch the editors in any Odoo section where you can upload/attach files.
For example, you are able to open chat attachments in the Discuss section, or edit the attached deal notes in the Sales section:
Available actions and supported file formats:
- edit DOCX, XLSX, PPTX;
- collaborate on documents in real time;
- edit form templates in DOCXF;
- read PDF files;
- open other office file formats for viewing, including RTF, TXT, CSV, etc.
That’s all! Now you can work with office documents uploaded in Odoo using ONLYOFFICE Docs.


