How to Install TYPO3 CMS on Debian 11
This tutorial exists for these OS versions
- Debian 12 (Bookworm)
- Debian 11 (Bullseye)
- Debian 9 (Stretch)
On this page
TYPO3 is a free and open-source Enterprise-grade content management system. It provides many features for enterprise-level use such as scalable CMS with multisite support, multilingual installations, strong security implementation, blazingly fast, and can be run anywhere.
Using TYPO3 CMS allows you to build flexible and reliable websites. The TYPO3 CMS is backend a vibrant professional community. And by design, the TYPO3 CMS is a pluggable content management system, with an adaptable and decoupled architecture.
In this guide, I will show you how to install TYPO3 CMS with the LAMP Stack on the latest Debian 11 Bullseye. Also, we will cover the typical basic installation of TYPO3 CMS.
Prerequisites
- A Linux server Debian 11.
- A root user or non-root user with root privileges.
- A domain name pointed to the server IP address.
Installing LAMP Stack
THE TYPO3 CMS is written in PHP, so you will need to install the LAMP or LEMP Stack for the installation. this guide will show you how to set up LAMP Stack for the TYPO3 CMS.
Before installing some packages, run the apt command below to update your repository and refresh the package index on your Debian system.
sudo apt update
Next, install the basic LAMP Stack packages using the following command.
sudo apt install apache2 mariadb-server php php-common php-mysql libapache2-mod-php php-gd php-curl php-json php-xmlrpc php-intl php-bcmath php-zip php-apcu php-mbstring php-fileinfo php-xml php-soap
Type Y to confirm the installation and press ENTER to continue.
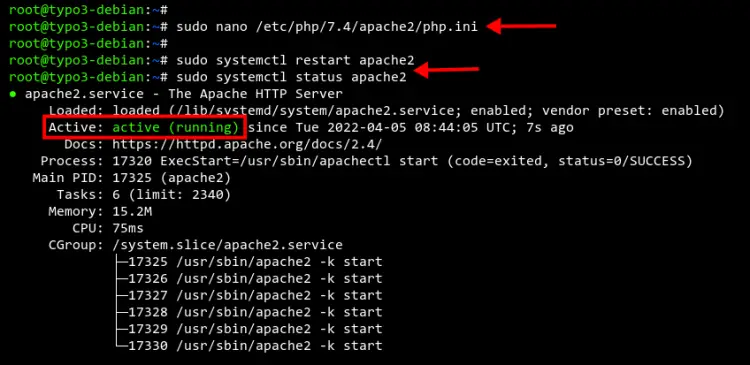
After all packages installation is completed, edit the configuration /etc/php/7.4/apache2/php.ini using nano editor.
sudo nano /etc/php/7.4/apache2/php.ini
Change the default PHP configuration using the following configuration.
memory_limit = 512M
max_execution_time = 240
max_input_vars = 1500

date.timezone = Europe/Amsterdam

post_max_size = 50M
upload_max_filesize = 50
Save the file when you are done.
Lastly, restart the Apache2 service to apply new changes to the PHP configuration and verify the Apache2 service.
sudo systemctl restart apache2
sudo systemctl status apache2
Below you will see the Apache2 service is active (running).
Configuring MariaDB Deployment
You have installed the MariaDB server packages to your server, but are still on default settings. And now, we will show you how to deploy MariaDB server security using the command-line tool mysql_secure_installation.
The mysql_secure_installation command is included in the MariaDB package. it will help you set up the basic security for the MariaDB server, for example setting up the root password, removing default anonymous access, removing the test database, and disabling remote login for the MariaDB root user.
Execute the mysql_secure_installation command below to start configuring the MariaDB deployment.
sudo mysql_secure_installation
Press ENTER when asked for the current root password.
Enter current password for root (enter for none):
OK, successfully used password, moving on...
Now type Y to confirm and switch the local authentication to unix_socket.
Switch to unix_socket authentication [Y/n] Y
Enabled successfully!
Reloading privilege tables..
 ... Success!
Now type Y to confirm and set up a new root password for the MariaDB server. Then input the new password and repeat it. Make sure to have a strong password for the MariaDB root user.
Change the root password? [Y/n] Y
New password:
Re-enter new password:
Password updated successfully!
Reloading privilege tables..
 ... Success!
Now type Y to remove the default anonymous access to the MariaDB database server.
Remove anonymous users? [Y/n] Y
 ... Success!
Type Y to disable the remote login for the MariaDB root user. For remote connections to the MariaDB server, you will need to create another user.
Disallow root login remotely? [Y/n] Y
 ... Success!
Now type Y again to remove the default database test from your MariaDB server.
Remove test database and access to it? [Y/n] Y
 - Dropping test database...
 ... Success!
 - Removing privileges on test database...
 ... Success!
Lastly, type Y again to confirm and reload all tables privileges on your MariaDB server and apply new changes.
Reload privilege tables now? [Y/n] Y
 ... Success!
Now you have completed the basic configuration of the MariaDB database server.
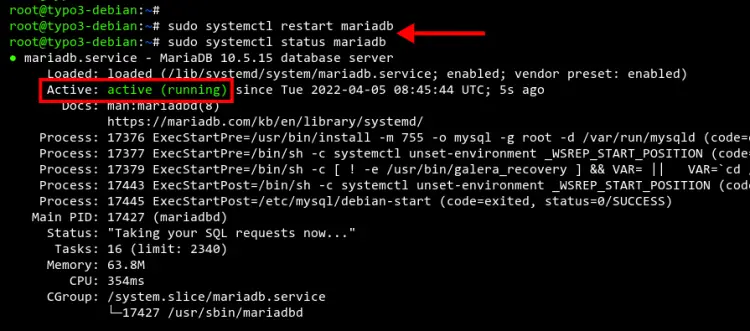
To ensure all changes are being applied to the MariaDB server, run the command below to restart the MariaDB service and verify the service status.
sudo systemctl restart mariadb
sudo systemctl status mariadb
Now you will see the MariaDB server is active (running).
Creating New Database and User for TYPO3 CMS
At this point, you have completed the basic LAMP Stack installation for the TYPO3 CMS installation. Now you will be creating a new MariaDB database and user for the TYPO3 CMS.
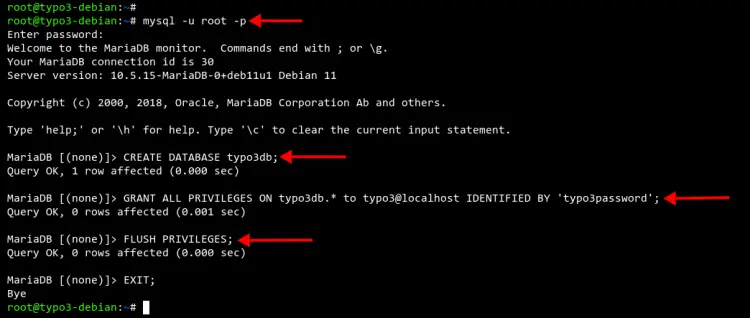
Login to the MariaDB shell using the mysql command below. You will be asked to input the MariaDB root password.
mysql -u root -p
Now run the following MariaDB queries to create a new database typo3db with the user typo3 and password is typo3password.
CREATE DATABASE typo3db;
GRANT ALL PRIVILEGES ON typo3db.* to typo3@localhost IDENTIFIED BY 'typo3password';
FLUSH PRIVILEGES;
EXIT;
Now type EXIT to log out from the MariaDB shell and continue to the TYPO3 CMS installation.
Installing Composer
The TYPO3 CMS can be installed in different ways. In this guide, you will be installing the TYPO3 CMS using the Composer. So now you will be installing COmposer on your Debian 11 server.
First, run the below command to download the PHP Composer installer and verify the installer file.
php -r "copy('https://getcomposer.org/installer', 'composer-setup.php');"
php -r "if (hash_file('sha384', 'composer-setup.php') === '906a84df04cea2aa72f40b5f787e49f22d4c2f19492ac310e8cba5b96ac8b64115ac402c8cd292b8a03482574915d1a8') { echo 'Installer verified'; } else { echo 'Installer corrupt'; unlink('composer-setup.php'); } echo PHP_EOL;"
Be sure you get the output message "Installer verified", which means the installer file is the correct one.
Next, run the Composer installer script to download the Composer. If the download is completed, remove the installer script.
php composer-setup.php
php -r "unlink('composer-setup.php');"
Now move the file composer.phar to the /usr/local/bin directory to allow users on the Debian system to run the Composer.
sudo mv composer.phar /usr/local/bin/composer
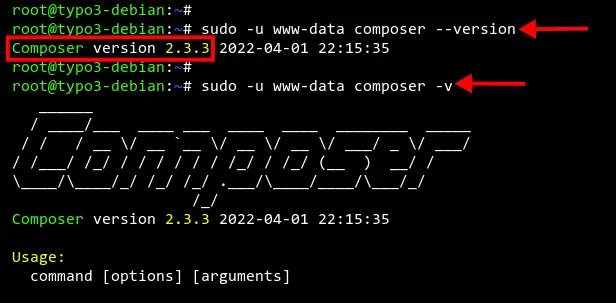
Lastly, verify the Composer installation using the following command.
sudo -u www-data composer --version
sudo -u www-data composer -v
You will see the PHP composer v2.3.3 installed on your Debian 11 system, and you're ready to install the TYPO3 CMS.
Downloading TYPO3 CMS with Composer
To start the TYPO3 CMS installation, create a new directory /var/www/typo3 using the following command.
mkdir -p /var/www/typo3
Change the ownership of the /var/www/typo3 directory to the user www-data and allow the www-data user to write into that directory.
sudo chown -R www-data:www-data /var/www/typo3
sudo chmod u+rw /var/www/typo3
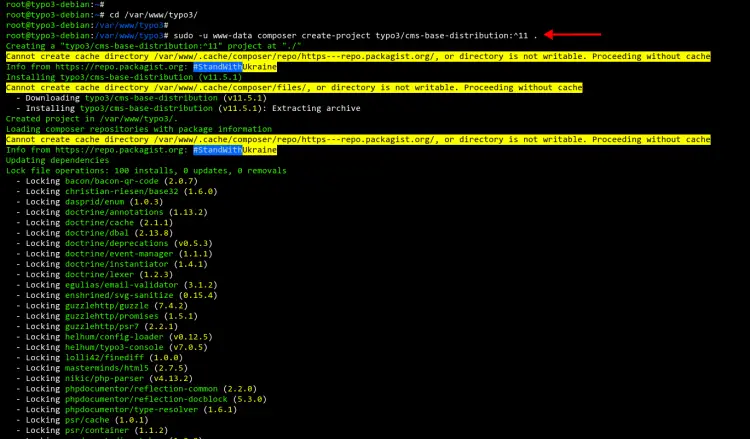
Next, go to the /var/www/typo3 directory and run the Composer command below to install the TYPO3 CMS to your server.
cd /var/www/typo3
sudo -u www-data composer create-project typo3/cms-base-distribution:^11 .
The Composer will download the TYPO3 CMS and PHP dependencies.
Once the installation is completed, run the ls command to verify all available files and directories under the /var/www/typo3.
ls
You will see the directory named public, which is the default actual source for the TYPO3 CMS and it will be used as the DocuemtRoot for the virtual host configuration.
Setting up Apache Virtual host
After you downloaded the TYPO3 CMS using the Composer, you will now be creating a new virtual host configuration for the TYPO3 CMS installation.
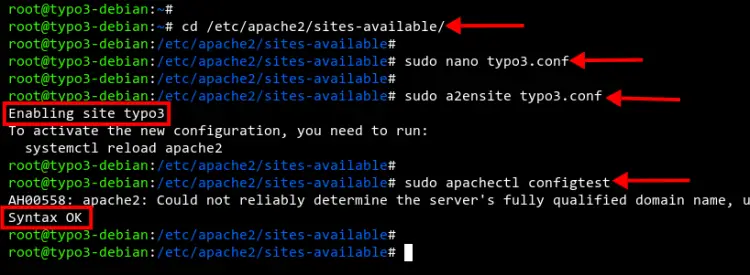
Go to the /etc/apache2/sites-available directory and create a new virtual host configuration typo3.conf using nano editor.
cd /etc/apache2/sites-available/
sudo nano typo3.conf
Add the following configuration to the new virtual host typo3.conf. Make sure to change the domain name and path of the SSL certificates.
<VirtualHost *:80>
    ServerName example.io
    Redirect permanent / https://example.io/
</VirtualHost>

<VirtualHost *:443>
    ServerAdmin [email protected]
    DocumentRoot /var/www/typo3/public
    ServerName example.io

    Protocols h2 http/1.1

    SSLEngine On
    SSLCertificateFile /etc/letsencrypt/live/example.io/fullchain.pem
    SSLCertificateKeyFile /etc/letsencrypt/live/example.io/privkey.pem

     <Directory /var/www/typo3/public/>
          Options FollowSymlinks
          AllowOverride All
          Require all granted
     </Directory>

     ErrorLog ${APACHE_LOG_DIR}/error.log
     CustomLog ${APACHE_LOG_DIR}/access.log combined

     <Directory /var/www/typo3/public/>
            RewriteEngine on
            RewriteBase /
            RewriteCond %{REQUEST_FILENAME} !-f
            RewriteRule ^(.*) index.php [PT,L]
    </Directory>
</VirtualHost>
Save the file when you are done.
Next, activate some Apache2 modules using the command below.
sudo a2enmod ssl rewrite headers
After that, activate the virtual host configuration typo3.conf and verify all Apache2 configurations.
sudo a2ensite typo3.conf
sudo apachectl configtest
Make sure you get the message Syntax OK, which means the Apache configuration is correct.
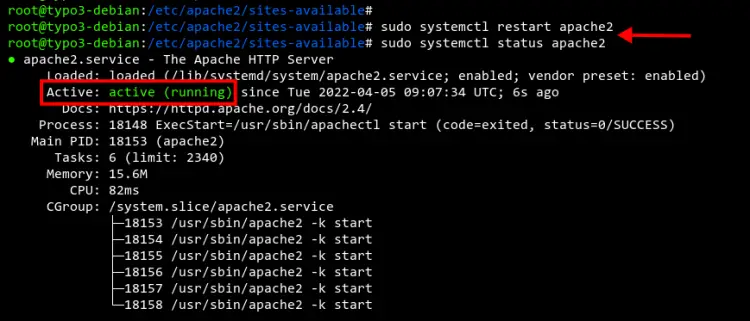
Lastly, run the following command to restart and verify the Apache2 service. And make sure the status of the Apache2 service is active (running).
sudo systemctl restart apache2
sudo systemctl status apache2
Now you have completed the configuration of the Apache2 virtual host for the TYPO3 CMS installation.
Installing TYPO3 CMS
Before you begin the TYPO3 CMS installation, you will need to create a new blank file FIRST_INSTALL inside the public directory. This will point out that you are installing the TYPO3 CMS first time on this server.
Create a new file FIRST_INSTALL under the public directory using the following command.
sudo -u www-data touch /var/www//typo3/public/FIRST_INSTALL
Next, open up your web browser and type the domain name of your TYPO3 CMS installation.
https://example.io/
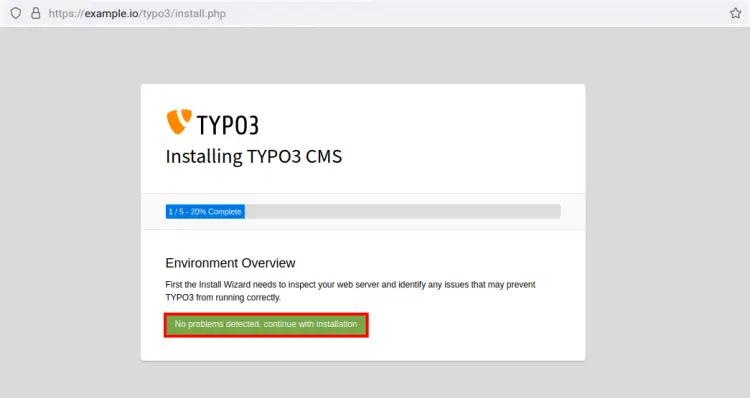
Now you will see the first page of the TYPO3 CMS installation. Make sure your installation environment has no problem. Then click the green button to continue.
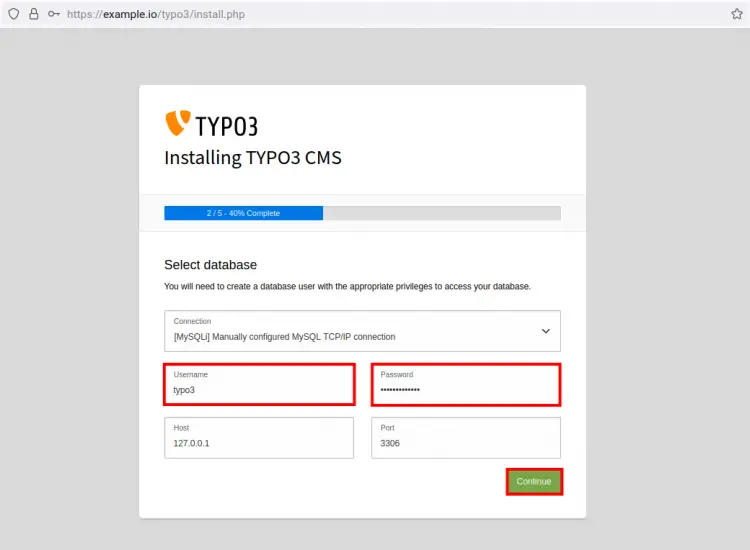
For the database configuration, input the database username and password, then click Continue.
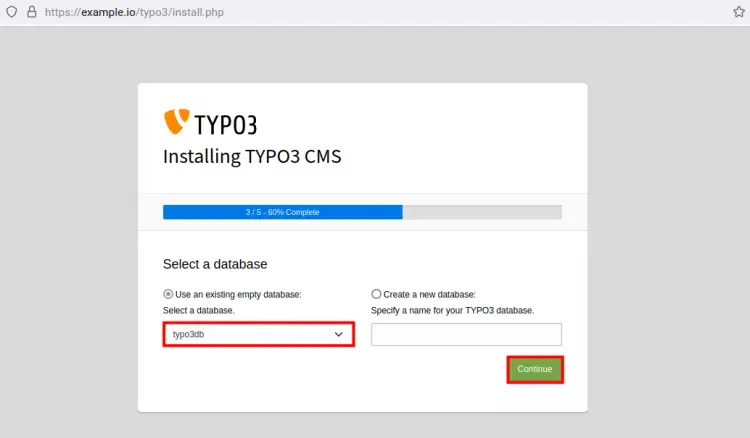
Now select the option Use an existing empty database and select the database typo3db, then click Continue.
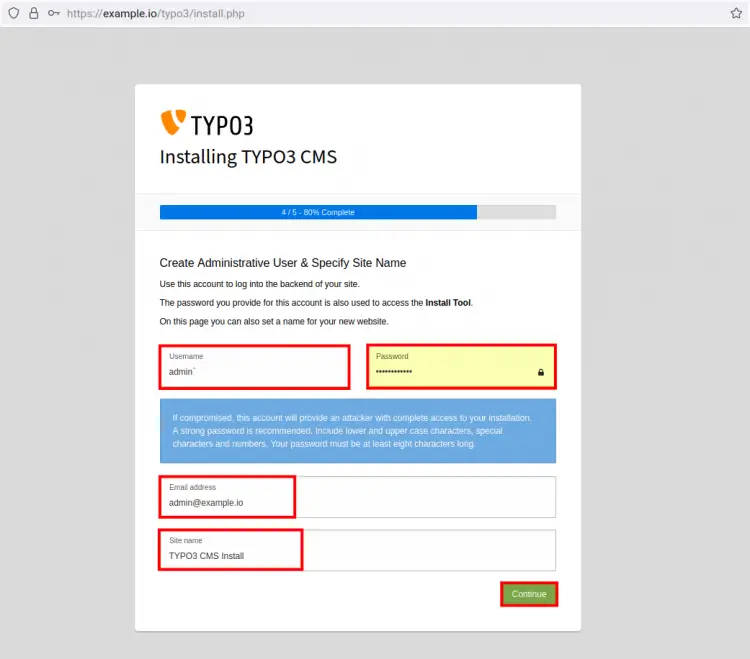
Now you will need to create an admin user and password for the YUPO3 CMS and click Continue to complete the installation.
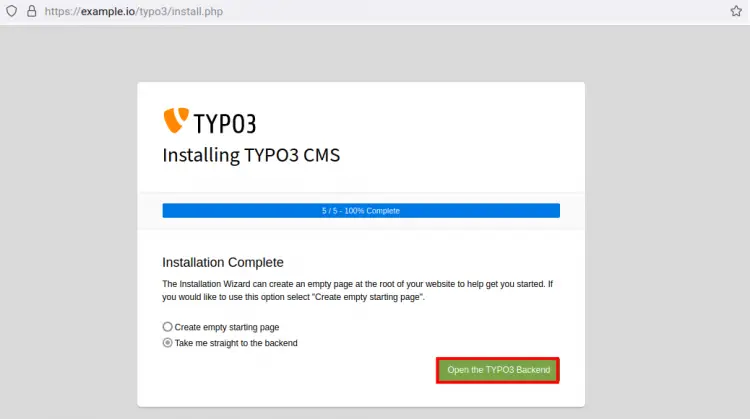
The TYPO3 CMS installation is now completed, click the button Open the TYPO3 Backend.
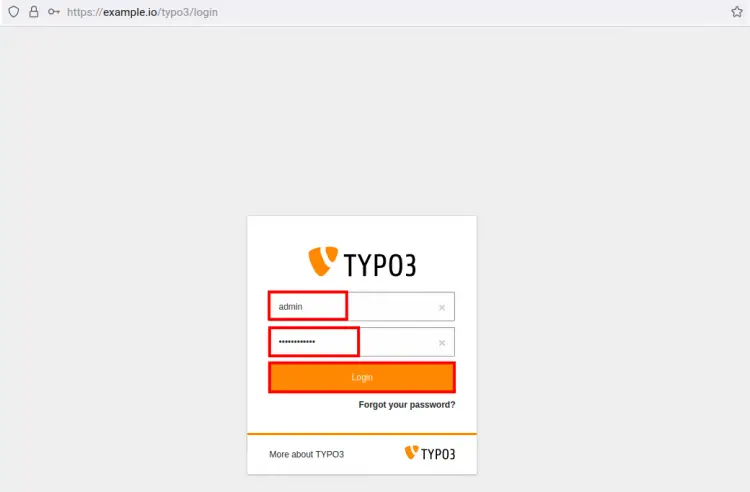
You will be redirected to the TYPO3 CMS login page. Input your admin user and password, then click Login.
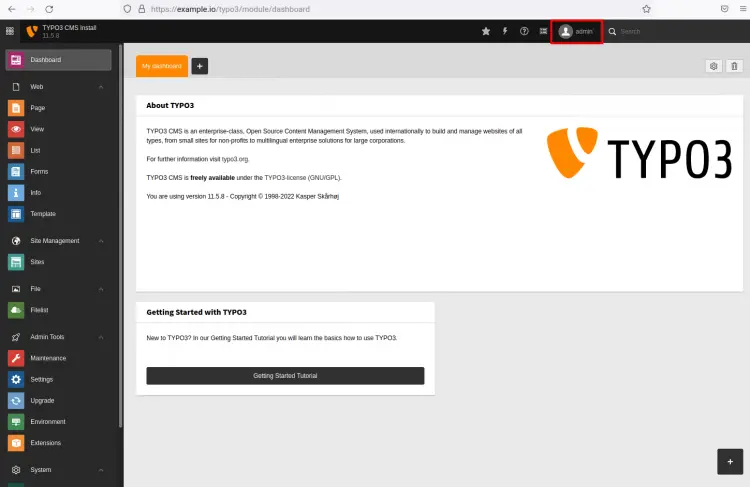
Once the username and password are correct, you will see the TYPO3 CMS administration dashboard.
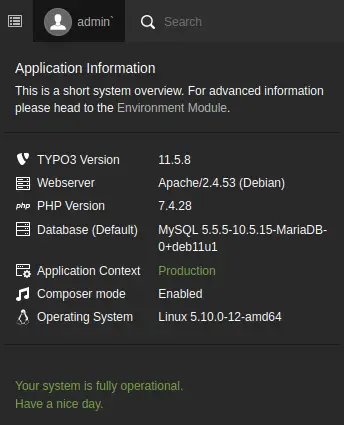
Inside the Admin user icon, you will see the rectangle menu. Click it and you will see detailed environment of your TYPO3 CMS installation.
Conclusion
Congratulation! You have now successfully installed the TYPO3 CMS with the LAMP Stack on the latest Debian 11 Bullseye. Now you can create a custom index for your TYPO3 CMS and explore some extensions to extend the TYPO3 CMS usage in your environment.


