How to Install Redmine on Rocky Linux
Redmine is a free and open-source project management and issue-tracking program. It is a web-based application software written mainly in Ruby on Rails. It is cross-platform and supports multiple databases and languages.
Redmine is flexible and can be used for different types of organizations and projects, from small to medium to large organizations. With Redmine, you can create and manage multiple projects, each with its own wiki, forums, issue tracking, etc. You can also create custom roles tailored to your organization's needs and much more.
Redmine is released under the GNU GPL v2 license and can be installed on any operating system, such as Linux, Windows, or macOS. It supports different databases, including PostgreSQL, MySQL and SQLite (standard).
Below main features of Redmine:
- Multi projects support
- Per project Wiki and Forums
- Documents and files management
- News and feeds and email notifications
- Time tracking
- Supports multiple SCM (SVN, Git, CVS, Mercurial, Bazaar)
- Provides around 49 languages supports
- Support LDAP authentication
- etc
Prerequisites
In this guide, you will learn how to deploy the Redmine project management and issue tracking tool on the Rocky Linux system with the PostgreSQL database and Apache/httpd web server.
Below is the environment for this example:
- Operating system: Rocky Linux 8.4 (Green Obisidian)
- IP address: 192.168.1.10
- Root privileges
- Domain name: redmine.example.com
The objective you'll learn in this guide:
- Installing Ruby with RVM (Ruby Version Manager)
- Setting up PostgreSQL database
- Installing Passenger
- Setting up Apache/httpd virtual host for Redmine (with or without SSL)
- Installation and configuration of Redmine
Before you start using this guide, it's recommended for you to complete the PostgreSQL installation on the Rocky Linux system.
How to Install PostgreSQL on Rocky Linux
Install Dependencies
At first, you must be installing the following dependencies. All of the packages below are needed for the Redmine installation, and make sure to execute all commands below using the sudo or root privileges.
1. Add EPEL (Extra Packages for Enterprise Linux) repository to your system.
sudo dnf install epel-release -y
2. After EPEL installations are complete, install packages using the DNF command below.
sudo dnf install curl gpg gnupg2 gcc gcc-c++ make patch autoconf automake bison ImageMagick libffi-devel libtool patch redhat-rpm-config readline-devel postgresql-devel zlib-devel openssl-devel -y
3. Next, install the apache/httpd web server on your Rocky Linux system by executing the DNF command as below.
sudo dnf install libcurl-devel httpd-devel httpd apr-devel apr-util-devel -y
If the httpd packages installation completes, start and enable the httpd service.
sudo systemctl enable --now httpd
Now verify the httpd and make sure it's active and running.
sudo systemctl status httpd
Basic packages for Redmine installation are installed, move to the next step for installing RVM and Ruby.
Installing RVM and Ruby
The latest version of Redmine requires Ruby version 2.7 for its installation. In this step, you will be installing Ruby version 2.7 on the Rocky Linux system using the RVM or Ruby Version Manager.
So, you will be installing the RVM, then installing Ruby.
1. Firstly, import the GPG keys of the rvm developer to your system.
curl -sSL https://rvm.io/mpapis.asc | gpg2 --import -
curl -sSL https://rvm.io/pkuczynski.asc | gpg2 --import -
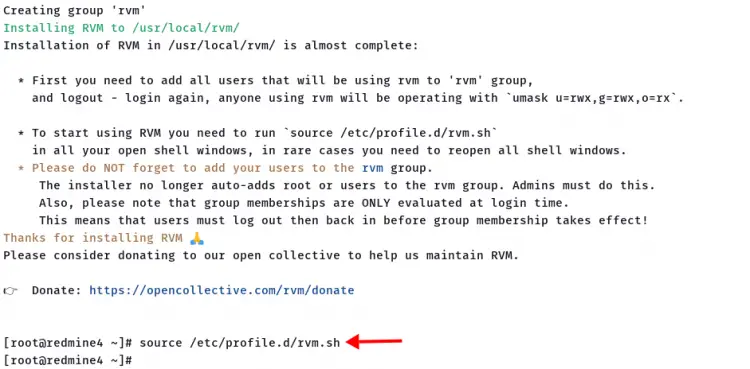
2. Now install the rvm stable version and load the rvm environment using the following commands.
curl -L get.rvm.io | bash -s stable
source /etc/profile.d/rvm.sh
After that, reload the rvm source again and install all system requirements for the rvm.
rvm reload
rvm requirements run
If all processes are completed, you're ready to install Ruby.
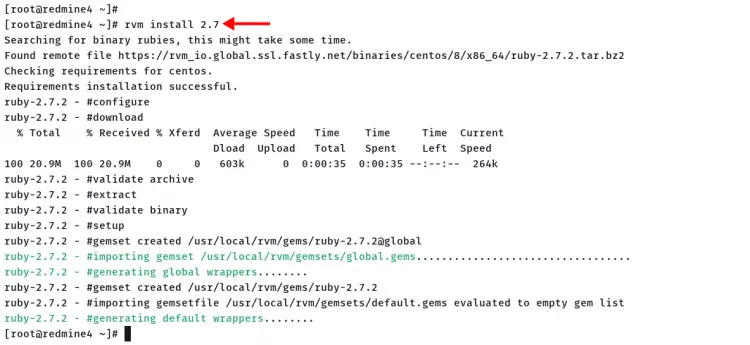
3. Execute the rvm command below to install Ruby version 2.7 on the Rocky Linux system.
rvm install 2.7
Wait for the installation to complete.
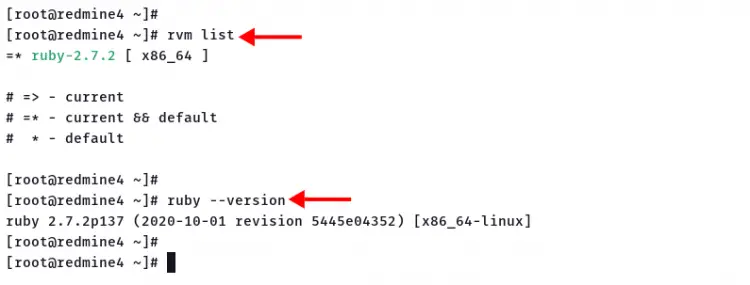
Now check the available Ruby version on your system and check the current Ruby version on your system.
rvm list
ruby --version
And you will see a similar output as below.
There is only one version of Ruby installed on your system, the ruby 2.7.2. And it is currently used on your system.
Now move to the next stage for setting up the PostgreSQL database for Redmine installation.
Setting up PostgreSQL Database
Before going any further, ensure you've completed the PostgreSQL installation as below.
How to Install PostgreSQL on Rocky Linux
After that, you will be creating a new PostgreSQL database and user for Redmine.
1. Log in to the PostgreSQL shell using the following command.
sudo -u postgres psql
2. Create a new PostgreSQL user 'redmine' and the database 'redminedb' using the following query. And make sure to change the password with your strong password.
CREATE ROLE redmine LOGIN ENCRYPTED PASSWORD 'StrongPasswordRedmine' NOINHERIT VALID UNTIL 'infinity';
CREATE DATABASE redminedb WITH ENCODING='UTF8' OWNER=redmine;
Type '\q' and press 'Enter' to exit from the PostgreSQL shell.
Now you're ready to install Redmine on your system.
Installing and Configuring Redmine
For this step, you will be installing Redmine version 4.2.3, which is the latest version at this time. The Redmine installation will be available at the '/var/www/redmine'.
1. Change the current working directory to '/var/www' and download the Redmine 4.2.3 source code.
cd /var/www/
wget https://www.redmine.org/releases/redmine-4.2.3.tar.gz
Now extract the Redmine source code and rename the directory to 'redmine'.
tar -xzvf redmine-4.2.3.tar.gz
mv redmine-*/ redmine
2. Next, you will create a new Redmine database configuration.
Change your working directory to the '/var/www/redmine' directory.
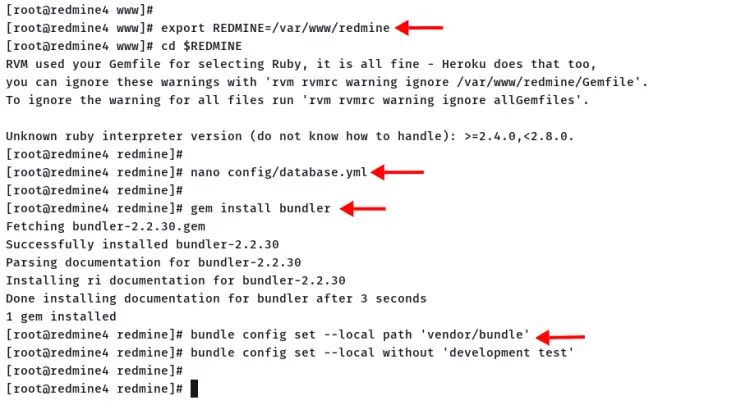
export REDMINE=/var/www/redmine
cd $REDMINE
Create new database configuration 'config/database.yml' using nano editor.
nano config/database.yml
Copy and paste the following configuration into it. And make sure to change the database name, user, and password with your information.
production:
  adapter: postgresql
  database: redminedb
  host: localhost
  username: redmine
  password: "StrongPasswordRedmine"
  encoding: utf8
Save the configuration and exit.
3. After configuring the database for Redmine, you will be installing some ruby dependencies. You must run the following commands on the Redmine installation directory '/var/www/redmine'.
First, install a bundler using the ruby gem command below.
gem install bundler
Now execute the 'bundle' command below to configure your Redmine installation.
bundle config set --local path 'vendor/bundle'
bundle config set --local without 'development test'
Now install ruby packages dependencies for Redmine using the bundle command below.
bundle install
Depending on your internet connection and machine/system, the command will take some time. if you don't get any errors, move to the next step.
4. After installation of all ruby dependencies is complete, generate the secret token and migrate the database using the following command.
bundle exec rake generate_secret_token
RAILS_ENV=production bundle exec rake db:migrate
5. After that, change the ownership of the Redmine installation directory to user 'apache'.
sudo chown -R apache:apache $REDMINE
And the Redmine installation and configuration are completed, move to the next step for setting up passenger and httpd web server.
Installing and Configuring Passenger
Passenger or Phusion Passenger is a web application server written in Ruby. In the production environment, it's often used as the front-end of your Rails applications. And for this guide, your Redmine will run behind the passenger and httpd web server.
Passenger can be installed through the RubyGem repository. And also it can be integrated with Apache/httpd and Nginx webserver to handle Ruby applications, including Rails.
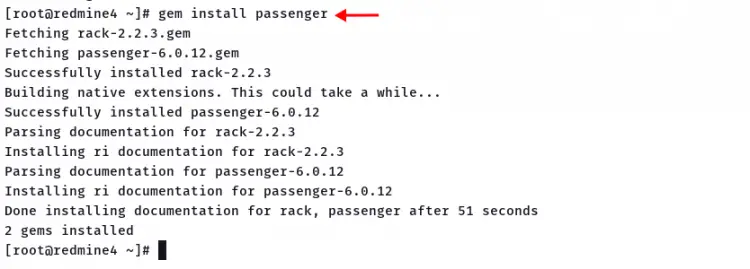
1. To install passenger on system-wide, execute gem command below
gem install passenger
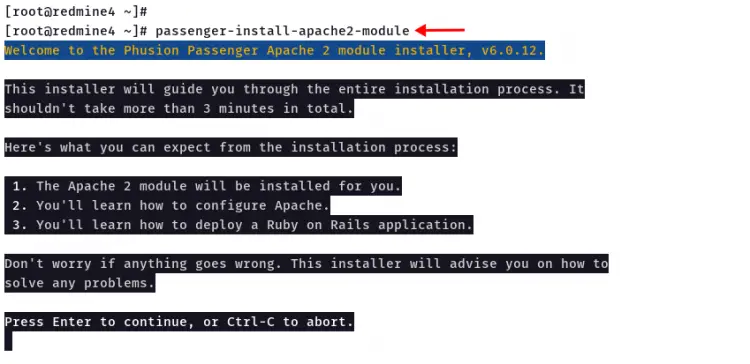
2. After passenger installation completes, execute the following command to install the passenger Apache module.
passenger-install-apache2-module
The installer will describe all that you're going to do, and press 'Enter' when you read all points about the installation.
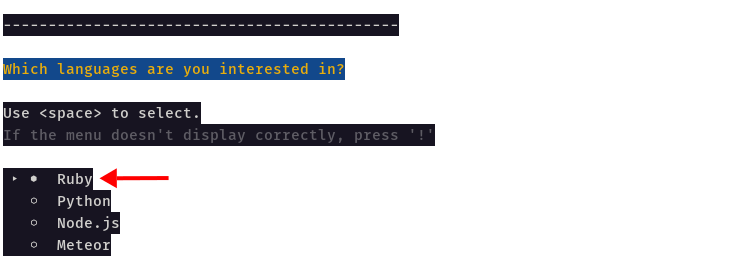
Select 'Ruby' as your application and press 'Enter' to continue.
Now the installer tells you to add some configuration to the Apache/httpd as you can see on the screenshot below.
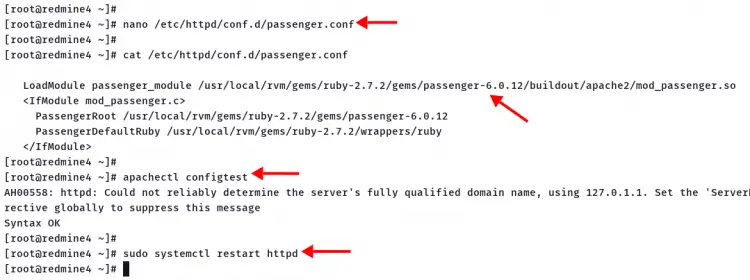
Open new terminal shell, connect to your server, then create new httpd confoiguration '/etc/httpd/conf.d/passenger.conf' using nano editor.
nano /etc/httpd/conf.d/passenger.conf
Paste the configuration that shows your screen. Below is the configuration from the screenshot on top.
   LoadModule passenger_module /usr/local/rvm/gems/ruby-2.7.2/gems/passenger-6.0.12/buildout/apache2/mod_passenger.so
   <IfModule mod_passenger.c>
     PassengerRoot /usr/local/rvm/gems/ruby-2.7.2/gems/passenger-6.0.12
     PassengerDefaultRuby /usr/local/rvm/gems/ruby-2.7.2/wrappers/ruby
   </IfModule>
Save the configuration and exit.
Next, restart the httpd service to apply a new configuration.
sudo systemctl restart httpd
Then back to the previous shell, then press 'Enter' to continue.
After that, the installer will check the apache module installation, and make sure you don't get any errors.
If you're not getting any errors, you will see similar output as below.
The installation of Passenger and its Apache 2 module is completed. And you're ready to set up the httpd virtual host for Redmine.
Configuring httpd for Redmine
In this step, you will e creating a new httpd virtual host configuration for your Redmine installation.
1. Create new virtual host configuration '/etc/httpd/conf.d/redmine.conf' using nano editor.
nano /etc/httpd/conf.d/redmine.conf
Copy and paste the following configuration, and make sure to change the domain name with your domain.
PassengerRuby /usr/local/rvm/gems/ruby-2.7.2/wrappers/ruby

<VirtualHost *:80>
    ServerName redmine.example.io
    DocumentRoot "/var/www/redmine/public"

    ErrorLog logs/redmine_error_log
    LogLevel warn

    <Directory "/var/www/redmine/public">
        Options Indexes ExecCGI FollowSymLinks
        Require all granted
        AllowOverride all
    </Directory>
</VirtualHost>
Save the configuration and exit.
For the HTTPS Redmine configuration, copy and paste the following configuration. And make sure to change the domain name and SSL path with your details. Also, don't forget to enable the Apache mod_ssl module to get the HTTPS working on your system.
PassengerRuby /usr/local/rvm/gems/ruby-2.7.2/wrappers/ruby

<VirtualHost *:80>

  ServerName redmine.example.io
  Redirect permanent / https://redmine.example.io/

</VirtualHost>

<VirtualHost *:443>
  ServerName redmine.example.io

  Protocols h2 http/1.1

  <If "%{HTTP_HOST} == 'www.redmine.example.io'">
    Redirect permanent / https://redmine.example.io/
  </If>

  DocumentRoot "/var/www/redmine/public"

  ErrorLog /var/log/httpd/redmine.example.io-error.log
  CustomLog /var/log/httpd/redmine.example.io-access.log combined

  SSLEngine On
  SSLCertificateFile /etc/letsencrypt/live/redmine.example.io/fullchain.pem
  SSLCertificateKeyFile /etc/letsencrypt/live/redmine.example.io/privkey.pem

  <Directory /var/www/redmine/public>
    Options Indexes ExecCGI FollowSymLinks
    Require all granted
    AllowOverride all
  </Directory>

</VirtualHost>
2. Next, verify the httpd configuration and make sure there is no error. Then restart the httpd service to apply a new virtual host configuration.
apachectl configtest
sudo systemctl restart httpd
Now you're ready to access your Redmine installation.
Verify Redmine Installation
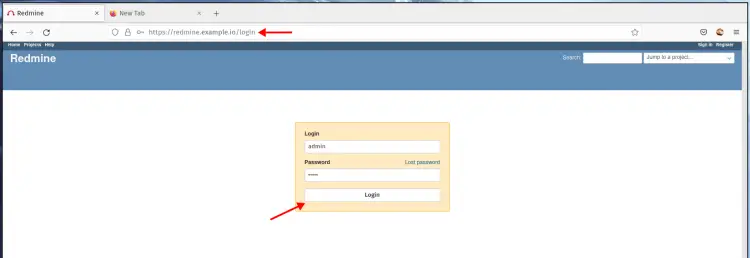
Open your web browser and type the domain name of your Redmine installation with the path '/login' on the address bar.
https://redmine.example.io/login
1. On the Redmine login page, type default user 'admin' and password 'admin', then click the 'Login' button.
2. Now you must reset the default admin password.
Type the old password 'admin', and type the new strong password, then click 'Apply'.
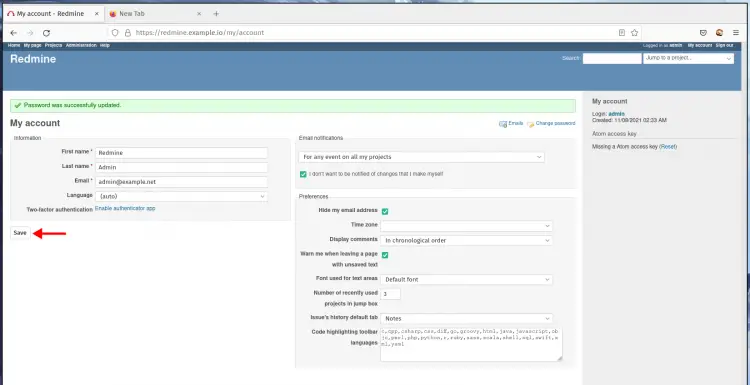
3. And you will see your account details.
Edit all information with your details, or just leave it as default, then click the 'Save' button.
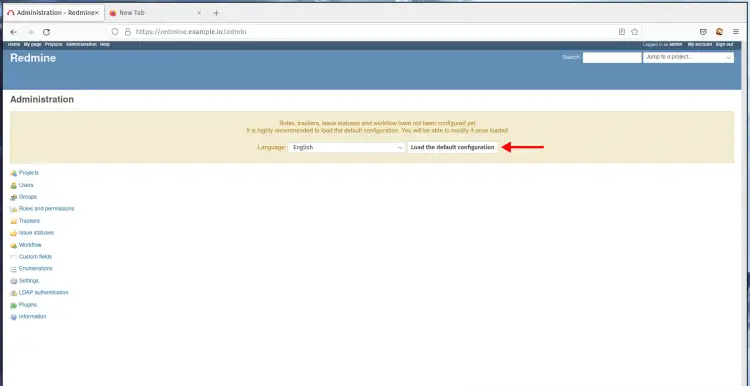
4. And you will see the Redmine administration page as below.
At first installation, you must load the default language for your Redmine installation.
Choose your language and click the button 'Load the default configuration'.
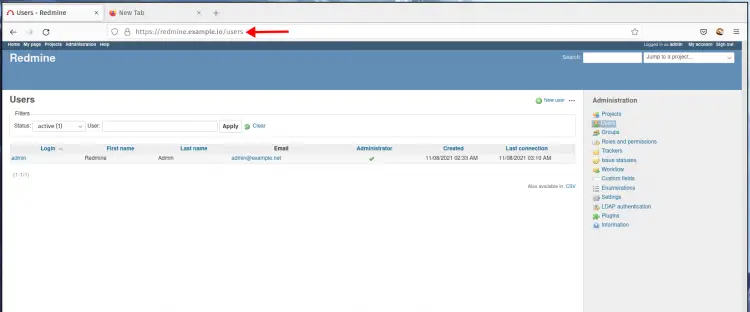
5. On the left menu, click the 'Users' menu to see all registered users on your Redmine.
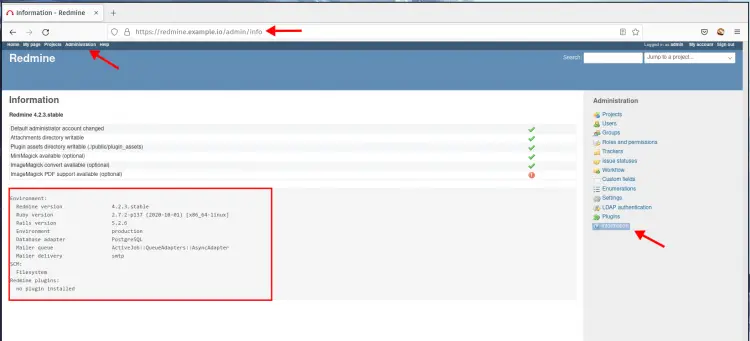
6. Now move to the 'Information' menu to see all of your details Redmine installation.
Below is the similar output you will get.
As you can see, the Redmine installation is completed. You just have installed Redmine version 4.2.3 stable with Ruby 2.7 and the PostgreSQL database on the production environment.
Conclusion
Congratulations! You've learned how to install Redmine with the PostgreSQL database and Apache/httpd web server on the Rocky Linux system. Also, you've learned how to install the Phusion Passenger and its integration with the Apache webserver.
For the next step, you can add additional plugins to your Redmine installation and add an SMTP server, etc.


