How to Install Passbolt Password Manager on Rocky Linux
Passbolt is a free and open-source password manager based on PHP, MySQL, and OpenPGP. It is a self-hosted application server, you can install it on your server. Passbolt is primarily designed for teams, but you can also use it as a personal password manager.
Passbolt is built on OpenPGP and has an extensible API. On the client-side, you can use the Passbolt browser extension, which builds on OpenPGP.js for encryption functionality. On the server-side, Passbolt uses the GnuPG PHP extension and openpgp-php to perform key validation and user authentication. Passbolt uses the GPGAuth protocol for user authentication.
Prerequisites
In this article, you will learn how to install Passbolt self-hosted password manager on the Rocky Linux server. You will be installing Passbolt with PHP 7.4, MariaDB server, and Nginx web server.
For this example, we will use the following server details:
- Operating System: Rocky Linux 8.4 (green obsidian)
- IP Address: 192.168.1.10
- Domain Name, in this example I'll use: https://pass.example.io
Now let's start the Passbolt installation.
Install Packages Dependencies
Firstly, you will be adding new repositories and installing some packages dependencies to the Rocky Linux system.
1. Execute the following command to enable the 'PowerTools' repository and install the Extra Packages for Enterprise Linux (EPEL) repository.
sudo dnf config-manager --set-enabled powertools
sudo dnf install epel-release -y
2. Execute the following command to enable the PHP 7.4 repository.
sudo dnf module enable php:7.4 -y
3. Next, install PHP-FPM, MariaDB, Nginx, and some additional packages using the DNF command below.
sudo dnf install -y nginx mariadb-server mariadb php php-intl php-gd php-mysqlnd php-pear php-devel php-mbstring php-fpm php-json php-ldap gcc gpgme gpgme-devel git policycoreutils-python-utils unzip haveged make gcc
4. After all installation completes, execute the following command to download the PHP composer installer script.
php -r "copy('https://getcomposer.org/installer', 'composer-setup.php');"
php -r "if (hash_file('sha384', 'composer-setup.php') === '906a84df04cea2aa72f40b5f787e49f22d4c2f19492ac310e8cba5b96ac8b64115ac402c8cd292b8a03482574915d1a8') { echo 'Installer verified'; } else { echo 'Installer corrupt'; unlink('composer-setup.php'); } echo PHP_EOL;"
Now execute again the following command to install the PHP composer on the system-wide environment.
php composer-setup.php
sudo mv composer.phar /usr/bin/composer
Check the PHP composer command as below.
sudo -u nginx composer --version
You will get a similar output as below.
Composer version 2.1.12 2021-11-09 16:02:04
5. Next, install the GnuPG PHP Extensions from the PHP Extension Community Library (PECL) repository.
pecl install gnupg
After that, enable the GnuPG PHP Extension using the following command.
echo "extension=gnupg.so" > /etc/php.d/gnupg.ini
6. Now start and enable some services using the systemctl command below.
sudo systemctl enable --now nginx
sudo systemctl enable --now mariadb
sudo systemctl enable --now php-fpm
sudo systemctl enable --now haveged
Now you've completed the installation of packages dependencies for Passbolt.
Configuring MariaDB and PHP-FPM
In this step, you will be setting up the MariaDB root password and PHP-FPM service.
1. Execute the following command to set up the MariaDB root password.
mysql_secure_installation
Type a new strong password for the MariaDB root user and repeat, then type 'Y' to agree for all MariaDB configurations.
2. Next, edit the '/etc/php.ini' configuration file using nano editor.
nano /etc/php.ini
Uncomment the 'date.timezone' option and change the value with your server timezone.
date.timezone = Europe/Paris
Save the configuration and exit.
3. Edit the PHP-FPM configuration '/etc/php-fpm.d/www.conf' using nano editor.
nano /etc/php-fpm.d/www.conf
Change default user and group for PHP-FPM to 'nginx'.
user = nginx
group = nginx
Uncomment the 'listen.owner' and 'listen.group', and change the value to user 'nginx'.
listen.owner = nginx
listen.group = nginx
Save the configuration and exit.
Now apply the new PHP-FPM configuration by restarting the PHP-FPM service using the systemctl command below.
sudo systemctl restart php-fpm
And you've completed the basic configuration of PHP-FPM and created a new password for the MariaDB root user.
Create New Database for Passbolt
To create a new database for the Passbolt installation, log in to the MariaDB shell using the 'mysql' command below.
mysql -u root -p
1. Create a new database 'passdb' using the following query.
CREATE DATABASE passdb;
2. Grant all privileges on the database 'passdb' to the new user. The following query will automatically create a new MariaDB user 'passbolt'.
GRANT ALL ON passdb.* to passbolt@localhost IDENTIFIED BY 'PassboltdbPass';
3. Reload all tables privileges.
FLUSH PRIVILEGES;
Now type 'EXIT' and press 'Enter' to log out from the MariaDB shell.
Move to the next step to start the Passbolt installation.
Download Passbolt and Install PHP Dependencies
For this step, you will be downloading the Passbolt source code to your server and installing PHP dependencies using the PHP composer.
1. Change the current working directory to '/var/www' and clone the Passbolt source using the command as below.
cd /var/www/
git clone https://github.com/passbolt/passbolt_api.git passbolt
The passbolt installation is '/var/www/passbolt'
2. Change the ownership of the Passbolt installation directory to user 'nginx'.
sudo chown -R nginx:nginx /var/www/passbolt
3. Move to the Passbolt installation directory and install PHP dependencies using the PHP composer command. And make sure to run the PHP composer command as a user 'nginx'.
cd /var/www/passbolt
sudo -u nginx composer install --no-dev
If all PHP dependencies installation completes, go to the next step to generate the GPG key.
Generate GPG Key for Server
In this step, you will be generating a new GPG key for the Passbolt server.
The current PHP extension openpgp-php and GnuPG PHP still do not support passphrases, so you will be creating a new GPG key without a passphrase.
1. To generate the GPG key, execute the gpg command below.
gpg --gen-key
Type your name and email address, and do not use a passphrase.
gpg (GnuPG) 2.2.20; Copyright (C) 2020 Free Software Foundation, Inc.
This is free software: you are free to change and redistribute it.
There is NO WARRANTY, to the extent permitted by law.

Note: Use "gpg --full-generate-key" for a full featured key generation dialog.

GnuPG needs to construct a user ID to identify your key.

Real name: johndoe
Email address: [email protected]
You selected this USER-ID:
    "johndoe <[email protected]>"

Change (N)ame, (E)mail, or (O)kay/(Q)uit? O
We need to generate a lot of random bytes. It is a good idea to perform
some other action (type on the keyboard, move the mouse, utilize the
disks) during the prime generation; this gives the random number
generator a better chance to gain enough entropy.
We need to generate a lot of random bytes. It is a good idea to perform
some other action (type on the keyboard, move the mouse, utilize the
disks) during the prime generation; this gives the random number
generator a better chance to gain enough entropy.
gpg: key 14F31ED1FBEBAD9A marked as ultimately trusted
gpg: revocation certificate stored as '/root/.gnupg/openpgp-revocs.d/BCD52DF829FF8F9408A2F1B214F31ED1FBEBAD9A.rev'
public and secret key created and signed.

pub   rsa2048 2021-11-16 [SC] [expires: 2023-11-16]
      BCD52DF829FF8F9408A2F1B214F31ED1FBEBAD9A
uid                      johndoe <[email protected]>
sub   rsa2048 2021-11-16 [E] [expires: 2023-11-16]
Also, take a note of the fingerprint of your new key. For this example, the fingerprint of the key is 'BCD52DF829FF8F9408A2F1B214F31ED1FBEBAD9A'.
2. Next, export the GPG key to the passbolt installation directory '/var/www/passbolt/config/gpg/'.
gpg --armor --export-secret-keys [email protected] > /var/www/passbolt/config/gpg/serverkey_private.asc
gpg --armor --export [email protected] > /var/www/passbolt/config/gpg/serverkey.asc
At to this point, you must take a note about your GPG key information such as below.
- Fingerprint: BCD52DF829FF8F9408A2F1B214F31ED1FBEBAD9A
- Email: [email protected]
- Public key: serverkey.asc
- Private key: serverkey_private.asc
3. Next, you must generate the GNUPG directory for the user nginx using the following command.
sudo su -s /bin/bash -c "gpg --list-keys" nginx
You will see a similar output as below.
gpg: directory '/var/lib/nginx/.gnupg' created
gpg: keybox '/var/lib/nginx/.gnupg/pubring.kbx' created
gpg: /var/lib/nginx/.gnupg/trustdb.gpg: trustdb created
Nou you have completes the GPG key configuration for Passbolt. Go to the next step for the Passbolt configuration.
Configuring Passbolt and Nginx Server Blocks
In this step, you will be configuring the Passbolt installation domain name, database, and the GPG key.
Before you start, change your working directory to the '/var/www/passbolt' directory.
export PASSBOLT=/var/www/passbolt/
cd $PASSBOLT
1. Copy the default configuration to the 'passbolt.php', then edit it using nano editor.
cp config/passbolt.default.php config/passbolt.php
nano config/passbolt.php
Change the 'fullBaseUrl' option with your Passbolt domain name installation. For this example is 'https://pass.example.io'
    'App' => [
        // comment

        'fullBaseUrl' => 'https://pass.example.io',

        // comment..
    ],
Change database configuration with your MariaDB user and password below.
    // Database configuration.
    'Datasources' => [
        'default' => [
            'host' => 'localhost',
            //'port' => 'non_standard_port_number',
            'username' => 'passbolt',
            'password' => 'PassboltdbPass',
            'database' => 'passdb',
        ],
    ],
Copy and paste your GPG fingerprint and uncomment the 'public' and 'private' options.
        'gpg' => [
            //
            // COMMENT REMOVED
            //
            'serverKey' => [
                // Server private key fingerprint.
                'fingerprint' => '38E3736DD02860F8CBA57BB99C8B82A2C3A6959F',
                'public' => CONFIG . 'gpg' . DS . 'serverkey.asc',
                'private' => CONFIG . 'gpg' . DS . 'serverkey_private.asc',
            ],
Save the configuration and exit.
2. Next, create new Nginx server blocks configuration '/etc/nginx/conf.d/passbolt.conf' using nano editor.
nano /etc/nginx/conf.d/passbolt.conf
Copy and paste the following configuration, and make sure to change the domain name and path of the SSL certificates.
server {
    listen 80;

    server_name pass.example.io;

    return 302 https://$server_name$request_uri;
}

server {
  listen 443 ssl http2;

  server_name pass.example.io;
  root /var/www/passbolt;

  ssl_certificate /etc/letsencrypt/live/pass.example.io/fullchain.pem;
  ssl_certificate_key /etc/letsencrypt/live/pass.example.io/privkey.pem;

  ssl_protocols TLSv1.2;
  ssl_prefer_server_ciphers on;
  ssl_ciphers ECDHE-RSA-AES256-GCM-SHA512:DHE-RSA-AES256-GCM-SHA512:ECDHE-RSA-AES256-GCM-SHA384:DHE-RSA-AES256-GCM-SHA384:ECDHE-RSA-AES256-SHA384;
  ssl_ecdh_curve secp384r1; # Requires nginx >= 1.1.0
  ssl_session_timeout  10m;
  ssl_session_cache shared:SSL:10m;
  ssl_session_tickets off; # Requires nginx >= 1.5.9
  # ssl_stapling on; # Requires nginx >= 1.3.7
  # ssl_stapling_verify on; # Requires nginx => 1.3.7
  resolver 8.8.8.8 8.8.4.4 valid=300s;
  resolver_timeout 5s;
  add_header X-Frame-Options DENY;
  add_header X-Content-Type-Options nosniff;
  add_header X-XSS-Protection "1; mode=block";

  location / {
    try_files $uri $uri/ /index.php?$args;
    index index.php;
  }

  location ~ \.php$ {
    fastcgi_index           index.php;
    fastcgi_pass            unix:/var/run/php-fpm/www.sock;
    fastcgi_split_path_info ^(.+\.php)(.+)$;
    include                 fastcgi_params;
    fastcgi_param           SCRIPT_FILENAME $document_root$fastcgi_script_name;
    fastcgi_param           SERVER_NAME $http_host;
  }

  location ~* \.(jpe?g|woff|woff2|ttf|gif|png|bmp|ico|css|js|json|pdf|zip|htm|html|docx?|xlsx?|pptx?|txt|wav|swf|svg|avi|mp\d)$ {
    access_log off;
    log_not_found off;
    try_files $uri /webroot/$uri /index.php?$args;
  }
}
Save the configuration and exit.
Now verify the Nginx configuration and make sure you don' get any error, then restart the Nginx service.
nginx -t
sudo systemctl restart nginx
3. Next, change the working directory to the '/var/www/passbolt' and start the Passbolt installation using the command as below.
cd /var/www/passbolt
sudo su -s /bin/bash -c "./bin/cake passbolt install" nginx
At the end of the Passbolt installation process, you will be creating a new admin user for Passbolt.
Type your email address, first name, and last name. Then copy your Passbolt installation link.
Accessing Passbolt from Web Browser
Open your web browser and paste the Passbolt installation link generates by the Passbolt installer to the address bar.
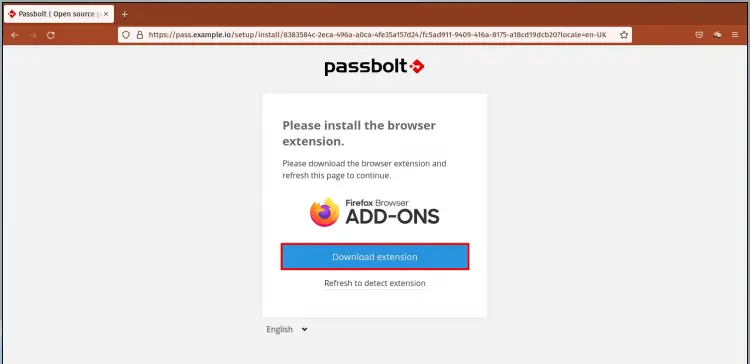
1. Passbolt will automatically detect your web browser and show the installation link of the Passbolt browser extension.
Click the button 'Download extension', and install the Passbolt browser extension.
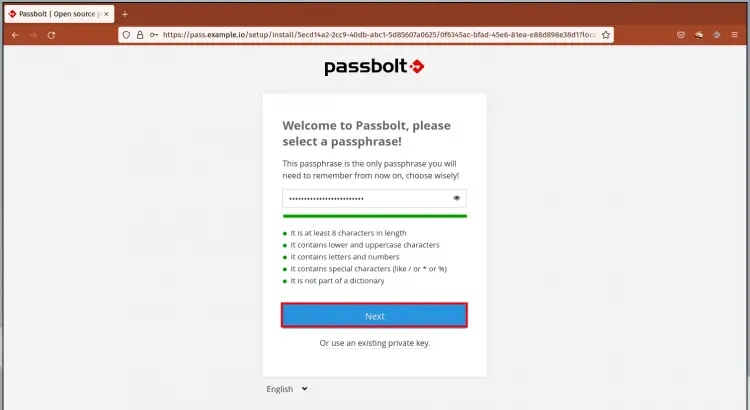
2. Type a new strong passphrase and click the 'Next' button.
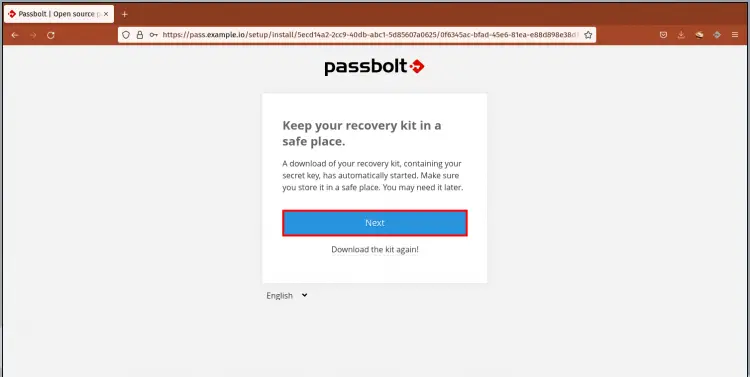
3. Download the recovery kit to your local computer and click the 'Next' button. You can use the recovery kit to reset your Passbolt passphrase.
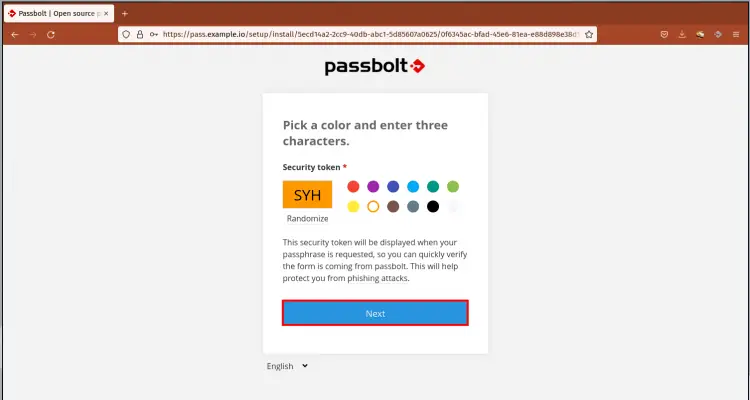
4. Pick the color for your Passbolt security token, and make sure to remember those three letters. Click the 'Next' button again.
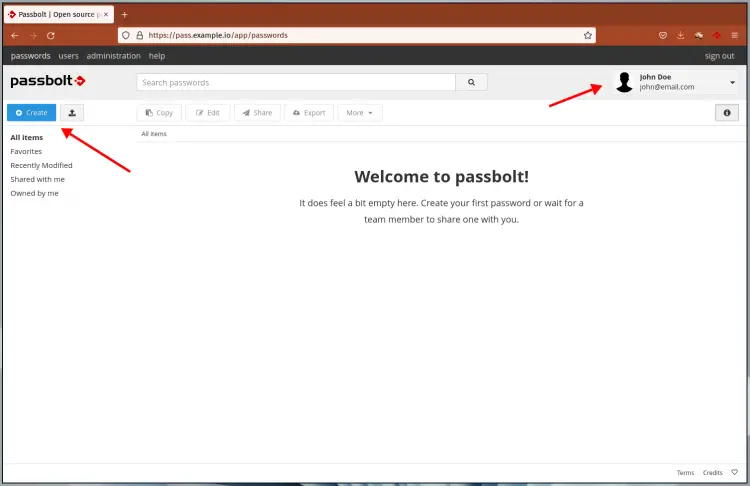
5. Now you will be redirected to the Passbolt user dashboard as below.
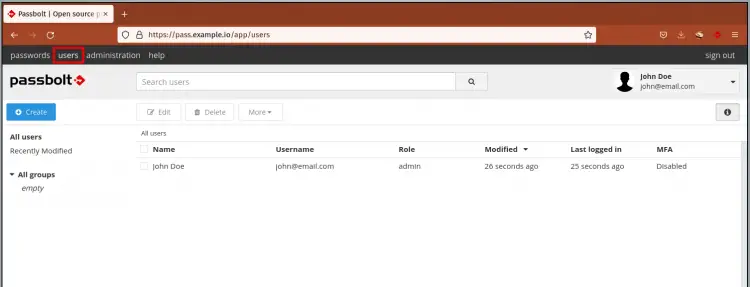
6. Passbolt list users.
And you have completes the Passbolt password manager installation.
Conclusion
Congratulation! You've successfully installed the Passbolt password manager with PHP-FPM, MariaDB server, and Nginx web server on the Rocky Linux.
For the next step, you can create new passbolt users for your team.


