How to Install Kuma - Self-hosted Uptime Robot Alternative on Ubuntu 20.04
Uptime-Kuma is an open-source monitoring tool like "Uptime Robot" written in Nodejs. It's a self-hosted monitoring tool with a fancy, beautiful dashboard and supports multiple notification methods. The Uptime-Kuma will monitor the uptime of hosts or servers via protocol HTTP(s), TCP, and Ping. If hosts cannot be reached through these protocols at intervals, the uptime hosts will send notifications via Webhooks, Telegram, Discord, Gotify, Slack, Pushover, Email (SMTP), etc.
In this guide, you will learn how to install Uptime-Kuma on a Ubuntu server and use the Apache web server as a reverse proxy with a free Let's Encrypt SSL Certificate in front of it. During the installation, you will also learn about the nodejs installation through nvm (node version manager).
Prerequisites
- An Ubuntu server 20.04.
- A user with root privileges. You will use this user for installing new packages and modifying system settings.
Adding New User
First thing, you will add a new user to the Ubuntu system. For security reasons, the application Uptime-Kuma will be running as a non-root user.
1. Add a new user by executing the command below. For this example, we will use the username "johndoe". make sure to change the username with your own.
useradd -m -s /bin/bash johndoe
Options you must know:
- -m = automatically create the home directory for the username, which will be available under the '/home' directory.
- -s = define the path of the shell for the user, most Linux has the `/bin/bash shell.
2. After that, run the following command to set up the password for user "johndoe".
passwd johndoe
Now type a new strong password and repeat, then press "Enter" to confirm.
3. Next, add the user "johndoe" to the group "sudo" using the command below.
usermod -aG sudo johndoe
By adding users to the "sudo" group, it will allow users to execute the "sudo su" command and get the root privileges.
Install NVM (Node Version Manager)
NVM or Node Version Manager is a command-line tool for installing multiple nodejs versions on one system. This tool enable you to install specific nodejs version for your applications, makes your development and deployments environment flexible.
For this phase, you will be installing the nvm under non-root user "johndoe".
1. From your root shell, log in to the user "johndoe" using the following command.
su - johndoe
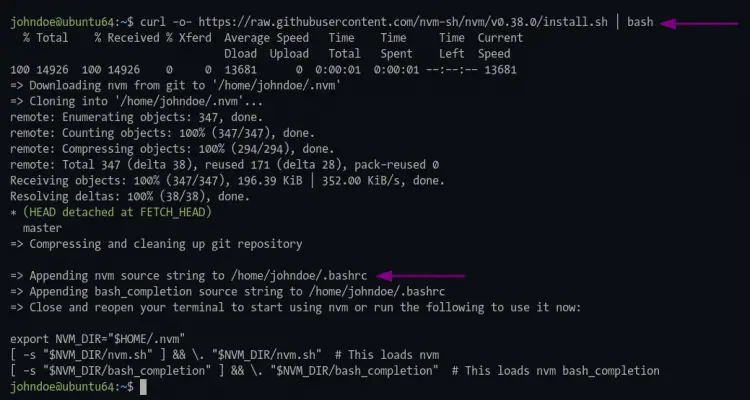
2. Download and execute the nvm installer script as follow.
curl -o- https://raw.githubusercontent.com/nvm-sh/nvm/v0.38.0/install.sh | bash
3. After succeeding, reload the bash environment using the command below.
source ~/.bashrc
4. Now verify the "nvm" installation by running the command below.
command -v nvm
If your installation is successful, you will see the result "nvm". Otherwise, you will see nothing or a blank result.
Now execute the nvm command as below.
nvm --help
And you will see the manual help page of the nvm command.
Node Version Manager (v0.38.0)

Note: <version> refers to any version-like string nvm understands. This includes:
  - full or partial version numbers, starting with an optional "v" (0.10, v0.1.2, v1)
  - default (built-in) aliases: node, stable, unstable, iojs, system
  - custom aliases you define with `nvm alias foo`

 Any options that produce colorized output should respect the `--no-colors` option.

Usage:
  nvm --help                                  Show this message
    --no-colors                               Suppress colored output

.....

Note:
  to remove, delete, or uninstall nvm - just remove the `$NVM_DIR` folder (usually `~/.nvm`)
Install Nodejs LTS Version
To install the uptime-Kuma application, you need to install the nodejs >= 14, git, and pm2. For this point, you will be installing the nodejs LTS latest version using the nvm command.
1. Execute the nvm command below to install nodejs LTS latest version.
nvm install --lts
Once the installation succeeds, you will see similar output as below.
The first nodejs version you install becomes the default version on your development environment.
2. Now run the following command to verify the nodejs installation.
node --version
npm --version
If your installation succeeds, you will see a similar output as the one below.
# nodejs version
v14.17.4

# npm version
6.14.14
Download and Install Uptime-Kuma
At this point, you're ready to install the Uptime-Kuma application.
1. Clone the uptime-Kuma source code using the git command below.
git clone https://github.com/louislam/uptime-kuma.git
2. After that, change the working directory to "uptime-kuma/" and execute the npm command to install all necessary packages for uptime-kuma.
cd uptime-kuma/
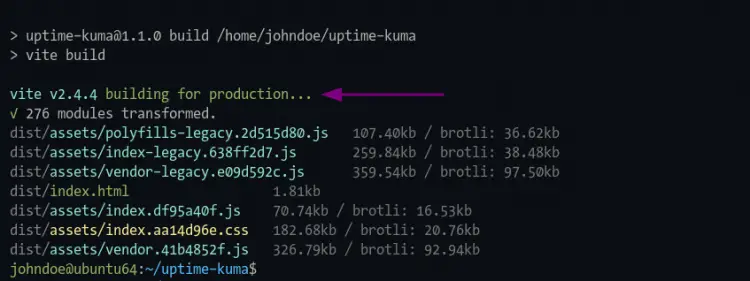
npm run setup
And you will see similar output as below.
Setting up Uptime-Kuma with pm2
What is pm2? It's a nodejs process manager that will help you manage and keep your nodejs application alive forever. pm2 has some built-in features that make the nodejs application deployment easy, it allows you to monitor your application status, logs, and even setting up the service file for your application.
1. Install the pm2 package using the npm command below.
npm install pm2
2. Once installation is complete, execute the pm2 command below to start the uptime-kuma application.
pm2 start npm --name uptime-kuma -- run start-server -- --port=3001 --hostname=127.0.0.1
And you will see the output messages as below.
As seen in the picture, the application name "uptime-kuma" is running with the status "online".
3. To check the status of your application on pm2, run the following commands below.
Check nodejs application status.
pm2 status
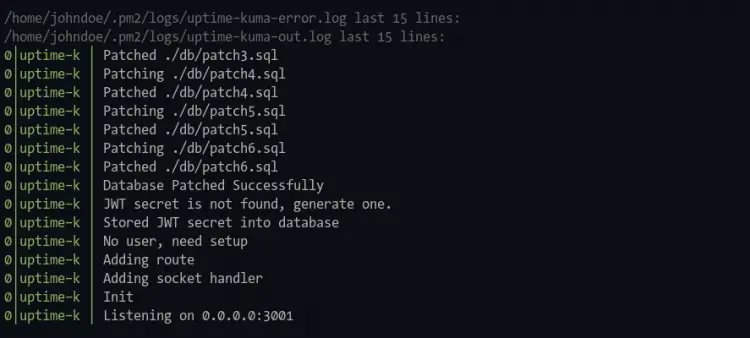
Check nodejs application logs.
pm2 logs
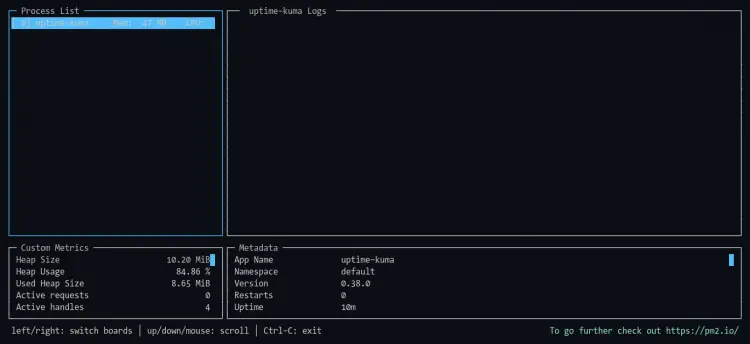
Realtime nodejs application monitoring.
pm2 monit
4. Next, execute the following pm2 command to generate the service file for the uptime-kuma application.
pm2 startup
After that, you should run the command as ordered on the output.
sudo env PATH=$PATH:/home/johndoe/.nvm/versions/node/v14.17.4/bin /home/johndoe/.nvm/versions/node/v14.17.4/lib/node_modules/pm2/bin/pm2 startup systemd -u johndoe --hp /home/johndoe
Be sure to use the "sudo" command and enter the right password for your user to get the root privileges.
Once the command is complete, you will see the following output.
As seen on the screenshot, the pm2 generates a systemd service based on the user, for this example is "pm2-johndoe.service".
Now execute the following command to generate and save the uptime-kuma application state. This command is important to make the uptime-kuma application always running in the background, even after system boot.
pm2 save
5. To verify the service 'pm2-johndoe', run the command below.
sudo systemctl is-enabled pm2-johndoe
You will see the output `enabled`, which means the uptime-kuma application will automatically running after system boot.
Additionally, you can try to reboot your system and log in again to the server, then check the uptime-kuma service.
sudo systemctl status pm2-johndoe
You should see a similar output as below.
? pm2-johndoe.service - PM2 process manager
     Loaded: loaded (/etc/systemd/system/pm2-johndoe.service; enabled; vendor preset: enabled)
     Active: active (running) since Tue 2021-08-10 01:52:37 UTC; 3min 57s ago
       Docs: https://pm2.keymetrics.io/
   Main PID: 745 (PM2 v5.1.0: God)
      Tasks: 34 (limit: 2343)
     Memory: 120.4M
     CGroup: /system.slice/pm2-johndoe.service
             ??745 PM2 v5.1.0: God Daemon (/home/johndoe/.pm2)
             ??772 npm
             ??873 sh -c node server/server.js "--port=3001" "--hostname=127.0.0.1"
             ??874 node server/server.js --port=3001 --hostname=127.0.0.1

Aug 10 01:52:36 ubuntu64 pm2[633]: [PM2] Spawning PM2 daemon with pm2_home=/home/johndoe/.pm2
Aug 10 01:52:37 ubuntu64 pm2[633]: [PM2] PM2 Successfully daemonized
Aug 10 01:52:37 ubuntu64 pm2[633]: [PM2] Resurrecting
Aug 10 01:52:37 ubuntu64 pm2[633]: [PM2] Restoring processes located in /home/johndoe/.pm2/dump.pm2
Aug 10 01:52:37 ubuntu64 pm2[633]: [PM2] Process /home/johndoe/.nvm/versions/node/v14.17.4/bin/npm restored
The "pm2-johndoe.service" is up and running at the system boot.
Setup Apache as a Reverse Proxy
For this guide, you will be installing and configuring the Apache web server as a reverse proxy for the uptime-Kuma application.
1. Execute the following command to install apache web server packages.
sudo apt install apache2
Type "y" and press "Enter" to install the apache web server.
2. After that, enable some apache modules using the command below.
sudo a2enmod ssl proxy proxy_ajp proxy_wstunnel proxy_http rewrite deflate headers proxy_balancer proxy_connect proxy_html
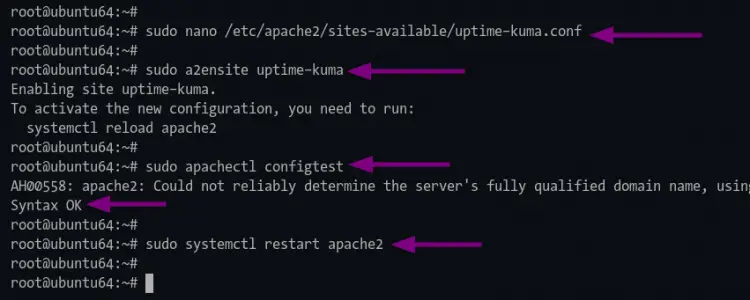
3. Next, create a new virtual-host configuration 'uptime-kuma.conf' using the nano editor command below.
sudo nano /etc/apache2/sites-available/uptime-kuma.conf
Paste the following configuration to your terminal shell and change the domain name "uptime.example.net" with your domain such as "domain.com".
<VirtualHost *:80>
  ServerName uptime.example.net

  ProxyPass / http://localhost:3001/
  RewriteEngine on
  RewriteCond %{HTTP:Upgrade} websocket [NC]
  RewriteCond %{HTTP:Connection} upgrade [NC]
  RewriteRule ^/?(.*) "ws://localhost:3001/$1" [P,L]
</VirtualHost>
Press "Ctrl+x" and type "Y" to save the configuration.
4. Now activate the apache virtual-host configuration "uptime-kuma" using the command below.
sudo a2ensite uptime-kuma
After that, execute the following command to verify the apache configuration and make sure you dont have any error.
sudo apachectl configtest
5. Now apply the new configuration by restarting the apache service using the command below.
sudo systemctl restart apache2
Securing Uptime-kuma with SSL Letsencrypt
To secure the Uptime-Kuma access, you will set up the SSL from Letsencrypt for the apache web server.
1. First of all, install the certbot tool by running the following command.
sudo apt install python3-certbot-apache
Type "y" and press "Enter" to start the installation.
2. After installation, generate the SSL Let's encrypt using the certbot command as below.
sudo certbot --apache yourdomain.com
Type your email address to register to Letsencrypt and press "Enter" to continue. Letsencrypt will be sending emails to your email address whenever your SSL certificates expire.
```
Saving debug log to /var/log/letsencrypt/letsencrypt.log
Plugins selected: Authenticator apache, Installer apache
Enter email address (used for urgent renewal and security notices) (Enter 'c' to
cancel): [email protected]
For the Letsencrypt TOS (Terms of Service), type "A" to agree and press "Enter" to continue.
- - - - - - - - - - - - - - - - - - - - - - - - - - - - - - - - - - - - - - - -
Please read the Terms of Service at
https://letsencrypt.org/documents/LE-SA-v1.2-November-15-2017.pdf. You must
agree in order to register with the ACME server at
https://acme-v02.api.letsencrypt.org/directory
- - - - - - - - - - - - - - - - - - - - - - - - - - - - - - - - - - - - - - - -
(A)gree/(C)ancel: A
For the email sharing with EFF (Electronic Frontier Foundation), you can type "Y" for yes and "N" for no. For this example, we will not share an email address with EFF.
Would you be willing to share your email address with the Electronic Frontier
Foundation, a founding partner of the Let's Encrypt project and the non-profit
organization that develops Certbot? We'd like to send you email about our work
encrypting the web, EFF news, campaigns, and ways to support digital freedom.
- - - - - - - - - - - - - - - - - - - - - - - - - - - - - - - - - - - - - - - -
(Y)es/(N)o: N
Now the certbot tool will generate SSL Letsencrypt for the Uptime-Kuma domain name. Also, it will add some additional configurations for the apache virtual host configuration.
You will be asked to set up the auto-redirect from HTTP to HTTPS. Type number "2" to set up apache auto-redirect HTTP to HTTPS and press "Enter".
```
Please choose whether or not to redirect HTTP traffic to HTTPS, removing HTTP access.
- - - - - - - - - - - - - - - - - - - - - - - - - - - - - - - - - - - - - - - -
1: No redirect - Make no further changes to the webserver configuration.
2: Redirect - Make all requests redirect to secure HTTPS access. Choose this for
new sites, or if you're confident your site works on HTTPS. You can undo this
change by editing your web server's configuration.
- - - - - - - - - - - - - - - - - - - - - - - - - - - - - - - - - - - - - - - -
Select the appropriate number [1-2] then [enter] (press 'c' to cancel): 2
Once the deploying process is successful, you will see a similar output as below.
- - - - - - - - - - - - - - - - - - - - - - - - - - - - - - - - - - - - - - - -
Congratulations! You have successfully enabled https://uptime.example.net

You should test your configuration at:
https://www.ssllabs.com/ssltest/analyze.html?d=uptime.example.net
- - - - - - - - - - - - - - - - - - - - - - - - - - - - - - - - - - - - - - - -

IMPORTANT NOTES:
 - Congratulations! Your certificate and chain have been saved at:
   /etc/letsencrypt/live/uptime.example.net/fullchain.pem
   Your key file has been saved at:
   /etc/letsencrypt/live/uptime.example.net/privkey.pem
   Your cert will expire on 2021-10-10. To obtain a new or tweaked
   version of this certificate in the future, simply run certbot again
   with the "certonly" option. To non-interactively renew *all* of
   your certificates, run "certbot renew"
 - Your account credentials have been saved in your Certbot
   configuration directory at /etc/letsencrypt. You should make a
   secure backup of this folder now. This configuration directory will
   also contain certificates and private keys obtained by Certbot so
   making regular backups of this folder is ideal.
 - If you like Certbot, please consider supporting our work by:

   Donating to ISRG / Let's Encrypt:   https://letsencrypt.org/donate
   Donating to EFF:                    https://eff.org/donate-le

 - We were unable to subscribe you the EFF mailing list because your
   e-mail address appears to be invalid. You can try again later by
   visiting https://act.eff.org.
Verify Uptime-Kuma Installation
1. Open your web browser and type the Uptime-Kuma URL installation on the address bar.
https://uptime.example.net/
You will be redirected to the HTTPS secure connection.
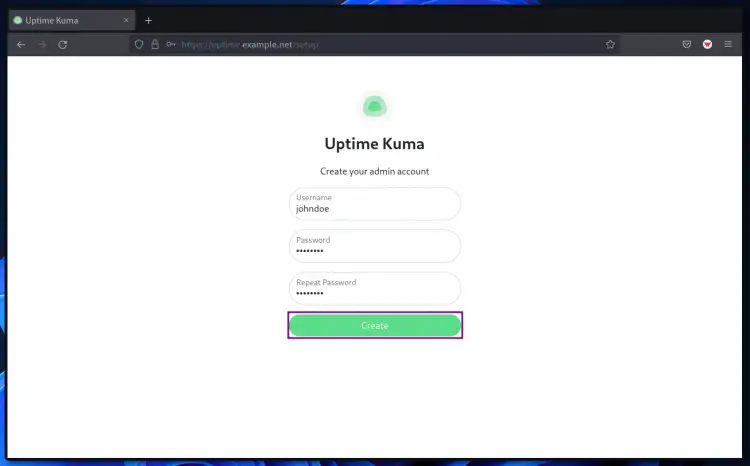
2. create a new admin user for Uptime-kuma on the first page. Type your admin user and password, then click the "Create" button
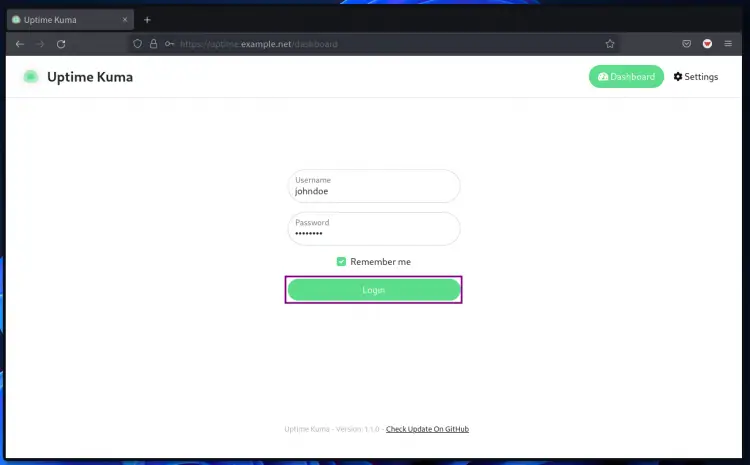
3. After that, log in with your new username and password, then click the "Login" button.
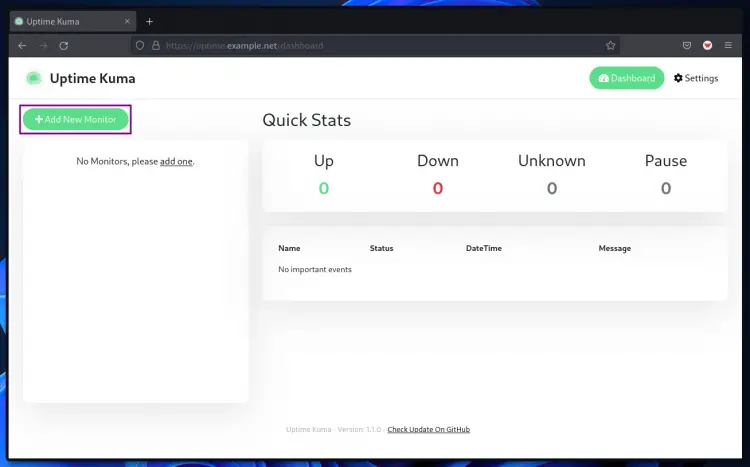
Now, you will see the uptime-kuma dashboard.
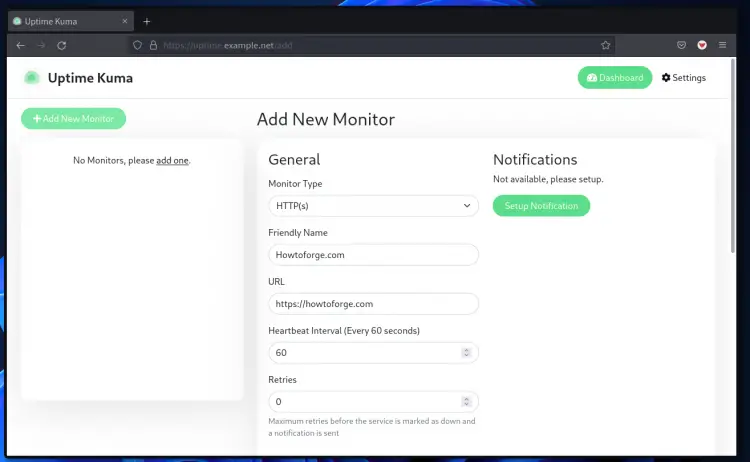
4. To add a new host to the monitor, click the button "Add New Monitor".
5. For this example, you will be monitoring the website, so choose the "Monitor Type" as "HTTP(s)", type the URL address of the website, click the "Setup Notification" for notification support, and then you click the "Save" button at the bottom of the page.
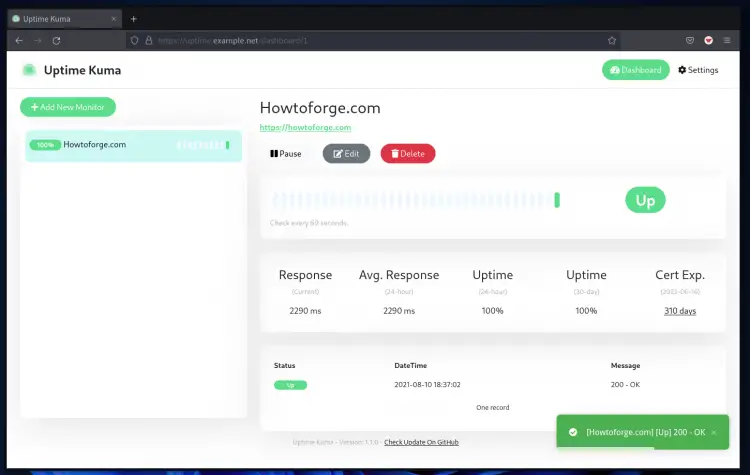
6. You will be redirected to the uptime-Kuma dashboard and see your host on the dashboard page.
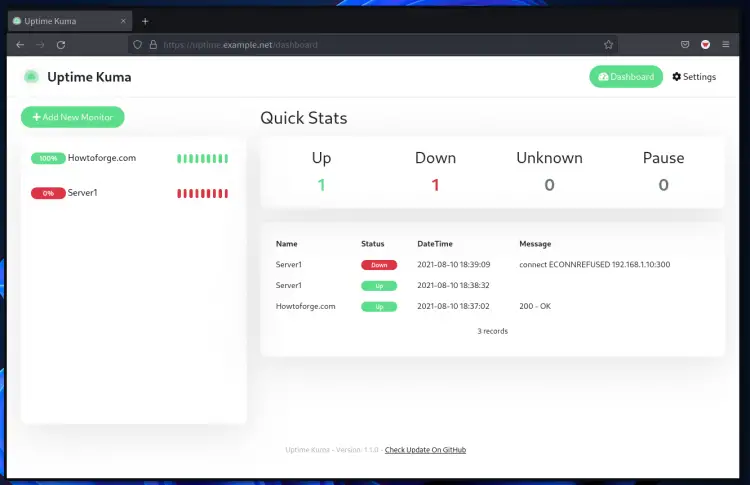
Below is another example after adding the new type "TCP/IP" with closed ports, and the result is "ENCONNREFUSED" or connection error because the port is refused/closed.
Conclusion
Congratulations! You've successfully installed Uptime-Kuma with Apache web server as a reverse proxy and secured the Uptime-Kuma deployment with SSL Letsencrypt. For the next phase, you can add your hosts and activate the notification for any down incident.

