How to Add a Rocky Linux system to an OpenLDAP Server
After you've completed the OpenLDAP installation, you will also need to add a client machine to authenticate against your OpenLDAP server.
There are many ways to add a client machine to the OpenLDAP server, one of them is by using the SSSD service. The SSSD service is available on almost Linux distros repositories (with a different name of the package), which makes administration easier and speeds up the provisioning of OpenLDAP client machines.
In this tutorial, you will learn how to set up and add the Rocky Linux system to the OpenLDAP server using the SSSD service.
Prerequisites
- A server with OpenLDAP is installed and configured.
- A Rocky Linux client. This example uses the Rocky Linux 8.5.
- A non-root user with the root privileges configured.
Checking OpenLDAP Users
At first, you will be checking the list of available users on the OpenLDAP server. So ensure to run the following command on your OpenLDAP server.
In this example, the OpenLDAP server is running under the domain name 'ldap.mydomain.io'.
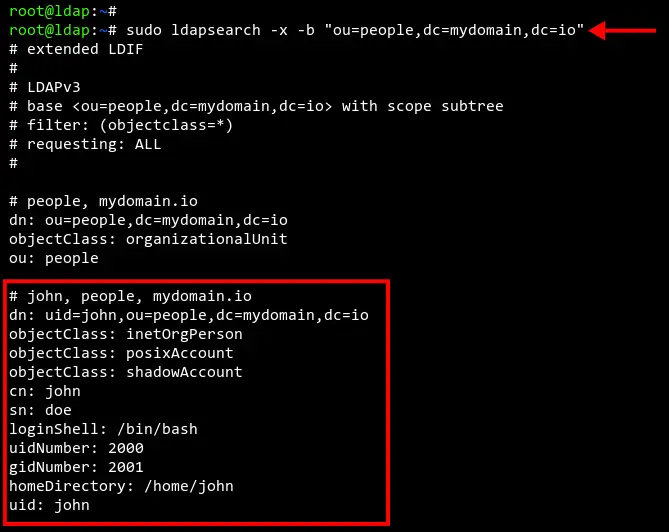
Check the list of available users on the OpenLDAP using the 'ldapsearch' command below.
sudo ldapsearch -x -b "ou=people,dc=mydomain,dc=io"
Now you should see a list of users on the OpenLDAP server. In the below screenshot, there is an OpenLDAP user named 'john' that will be used for testing.
Setting up Hosts file and FQDN
Before installing any packages, you will be setting up the Rocky Linux machine FQDN (Fully Qualified Domain Name) and the set up the '/etc/hosts' file for defining the OpenLDAP server domain.
In this example, the 'ldap.mydomain.io' is running on the IP address '192.168.10.50'. And the Rocky Linux client is running with IP address '192.168.10.80'.
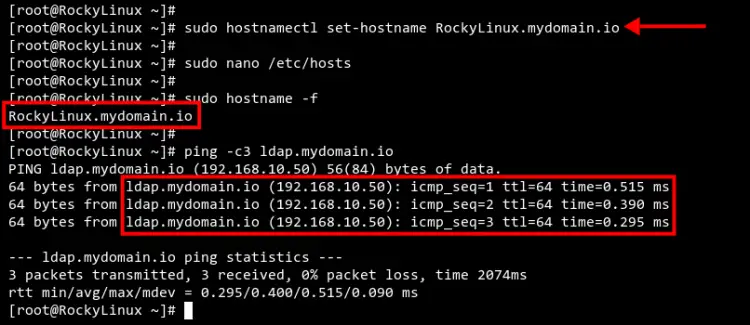
Execute the 'hostnamectl' command below to set up the Rocky Linux FQDN to 'RockyLinux.mydomain.io'.
sudo hostnamectl set-hostname RockyLinux.mydomain.io
Now edit the configuration '/etc/hosts' using nano editor.
sudo nano /etc/hosts
Add the OpenLDAP server domain name and IP address followed by the Rocky Linux client details as below.
192.168.10.50 ldap.mydomain.io ldap
192.168.10.80 RockyLinux.mydomain.io RockyLinux
Save and close the file when you are done.
Next, execute the following command to verify the FQDN of the Rocky Linux system and verify the connection between the Rocky Linux system and the OpenLDAP server.
sudo hostname -f
sudo ping -c3 ldap.mydomain.io
You should receive output like the screenshot below. The FQDN of the Rocky Linux system is 'RockyLinux.mydomain.io' and the connection to the OpenLDAP server is successful.
Installing OpenLDAP Client and SSSD Packages
After you have configured the FQDN and Hosts file on the Rocky Linux system. Now you will need to install the OpenLDAP client and the SSSD to the Rocky Linux machine.
The OpenLDAP client must be installed on the client machine, and the SSSD service will handle all authentication to the OpenLDAP server.
The SSSD or System Security Service Daemon is often used to enroll Linux machines to the IPA Server, Active Directory, and LDAP domain.
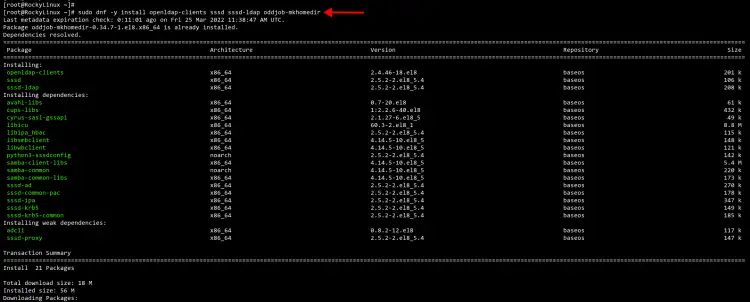
Execute the 'dnf' command below to install the OpenLDAP client package, the SSSD service package with additional LDAP support, and the oddjob-mkhomedir package to automatically create the home directory for OpenLDAP users.
sudo dnf -y install openldap-clients sssd sssd-ldap oddjob-mkhomedir
Wait for all packages installation completed.
Changing Authentication Profile to SSSD
After you've installed OpenLDAP client packages and SSSD packages, you will now set up the system authentication and identity source to the SSSD service.
And this can be done by using the 'authselect' command, which makes administrators easier to manage the default authentication and identity source for RHEL based systems, including the Rocky Linux.
Execute the 'authselect' command below to list available authentication and identity profiles.
authselect list
You should see multiple authentication and identity source such as NIS, SSSD, and Winbind.
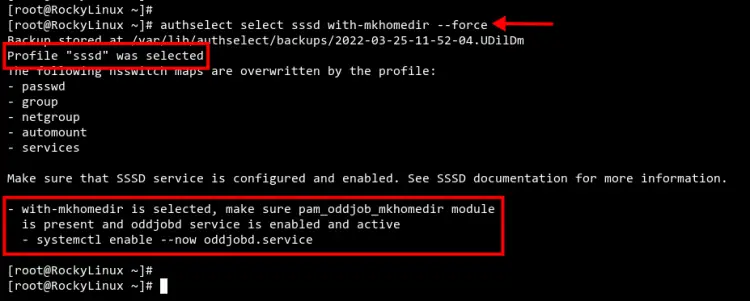
Change the default authentication and identity profile to 'sssd' using the 'authselect' command below. Also, the option 'with-mkhomedir' is needed to set up automatically to create the home directory for all users.
authselect select sssd with-mkhomedir --force
Now you should get the output like the screenshot below. The authentication profile 'sssd' is selected as the default profile on your Rocky Linux machine.
Also, you will need to start and enable the 'oddjobd' service using the below command.
sudo systemctl enable --now oddjobd.service
Now check and verify the 'oddjobd' service to make sure it's up and running.
sudo systemctl status oddjobd.service
You should see the output like the screenshot below.
Configuring OpenLDAP Client and SSSD Services
Now it's time to configure the OpenLDAP client and set up the SSSD service.
Edit the OpenLDAP client configuration '/etc/openldap/ldap.conf' using nano editor.
sudo nano /etc/openldap/ldap.conf
Define the OpenLDAP server and the base search domain name. Be sure to change the domain name with your domain.
URI ldap://ldap.mydomain.io/
BASE dc=mydomain,dc=io
Save and close the file when you are done.
Next, create a new SSSD service configuration '/etc/sssd/sssd.conf' using nano editor.
sudo nano /etc/sssd/sssd.conf
Copy the following configuration and make sure to change the 'ldap_uri' and 'ldap_search_base' with your OpenLDAP server. Then paste the configuration.
[domain/default]
id_provider = ldap
autofs_provider = ldap
auth_provider = ldap
chpass_provider = ldap
ldap_uri = ldap://ldap.mydomain.io/
ldap_search_base = dc=mydomain,dc=io
ldap_id_use_start_tls = True
ldap_tls_cacertdir = /etc/openldap/certs
cache_credentials = True
ldap_tls_reqcert = allow

[sssd]
services = nss, pam, autofs
domains = default

[nss]
homedir_substring = /home
Save and close the file.
Now change the permission of the SSSD service configuration to '0600'. This will secure the configuration and make it accessible to the owner only.
sudo chmod 0600 /etc/sssd/sssd.conf
Finally, restart and verify the SSSD service to apply a new configuration using the 'systemctl' command below.
sudo systemctl restart sssd
sudo systemctl status sssd
You should see the current status of the SSSD service is 'active (running)'.
Testing
At this point, you have added the Rocky Linux machine to the OpenLDAP server using the SSSD service. Now let's verify our configuration.
In this example, we will test the installation by logging in to the Rocky Linux client machine with the OpenLDAP user 'john'.
In the below example, we're logged to the Rocky Linux client machine with the user 'john'. You can see the defined uid and gid number is matched with the user 'john' on the OpenLDAP server.
Optionally, you can also be trying to log in to the Rocky Linux client machine through the SSH connection, but still using the OpenLDAP user.
Below the user 'john' is successfully connected to the Rocky Linux machine through an SSH connection.
ssh [email protected]
Conclusion
Congratulation! You've now successfully added the Rocky Linux client machine to the OpenLDAP server through the SSSD service. This guide also can be applied to general RHEL-based distributions such as CentOS, AlmaLinux, and Fedora.


