Configuring SSH To Use Freeradius And WiKID For Two-Factor Authentication
Radius is a great standard. It is powerful enough to accomplish a great deal and simple enough to be easy to handle. Freeradius is an excellent, open source radius server that ships with many Linux variants. It is well documented and well supported. The WiKID Strong Authentication server is a commercial/open source two-factor authentication system that uses public key encryption to transmit PINs and one-time passcodes securely to software tokens running on Blackberries, cell phones, Palms, PocketPCs or, using the J2SE client, Linux, Macs and Windows PCs. You can think of WiKID like certificates, but without the hassles of white lists/black lists and more secure - because the PIN is validated on the server preventing offline brute-force attacks.
Companies that need to meet requirements, such as PCI-DSS or HIPAA, may need to secure their networks with two-factor authentication and tightly controlled access. Combining Freeradius and WiKID is a highly cost-effective way to accomplish that.
In this example, I am installing Freeradius on Fedora Core 7 and running the 3.0RC2 rpms of WiKID on Centos5 (however, the same instructions will work for the 2.0 version of WiKID.) We'll be testing with SSH, however, the same setup should work for Apache, WebDAV, OpenVPN, and any other application that supports PAM.
Installing and Configuring Freeradius
No matter what Linux variant you are running, there is probably a package for Freeradius. For Fedora, installing via Yum is simple:
yum install freeradius
Configuring Freeradius is fairly straight-forward. There are a lot of options, though. The key is to only change the minimal items that you understand. The default settings work, so make small changes and test them. We will modify three files. The /etc/raddb/clients.conf file tells Freeradius which clients to accept. The proxy.conf file tells Freeradius to send the authentication packets to the WiKID server and the radiusd.conf file configures the main Freeradius server.
First, edit the /etc/raddb/clients.conf file:
vi /etc/raddb/clients.conf
client 127.0.0.1 {
        secret          = shared_secret
        shortname       = localhost
        nastype     = other
}
All you need to change for now is the shared secret as we will login to the Freeradius server via SSH as our test.
Next, validate that requests can be proxied in the radiusd.conf file. This was the case on Fedora:
vi /etc/raddb/radiusd.conf
proxy_requests  = yes
$INCLUDE  ${confdir}/proxy.conf
Finally, add the WiKID Strong Authentication server as a valid proxy in proxy.conf:
vi /etc/raddb/proxy.conf
#  This realm is for requests which don't have an explicit realm
#  prefix or suffix.  User names like "bob" will match this one.
#
realm NULL {
        type            = radius
        authhost        = WIKIDSERVER_IP:1812
#       accthost        = WIKIDSERVER_IP:1813
        secret          = shared_secret
}
Needless to say, change WIKIDSERVER_IP and shared_secret to your WiKID server IP and shared secret. It probably should be different than the shared secret used for the client.
For additional security, you should lock down ownership of these flies:
chmod a-rwx,u+r /etc/raddb/proxy.conf
chmod a-rwx,u+r /etc/raddb/clients.conf
Now start Freeradius:
service radiusd start
Configurng PAM SSH
First, you need to install PAM Radius. There is excellent documentation on this at the PAM Radius home page. Depending on your distribution, you might also be able to find a suitable binary. I had no trouble compiling this on Fedora 7:
# ./configure
# make
# make install
Edit /etc/pam.d/sshd to allow Radius authentication:
vi /etc/pam.d/sshd
Go to the second line of the file, hit the Insert key or the i key and insert this line:
auth sufficient /lib/security/pam_radius_auth.so
just above this line:
auth required pam_stack.so service=system-auth
The “sufficient” tag indicates that if the Radius authentication succeeds then no additional authentication will be required. However, if the Radius authentication fails, a username and password from the system will work. Use "Required" to require strong authentication. Because we are only editing the sshd file, it will not affect terminal log-ins. PAM can be very different on different linux variants. Consult the specific documentation for your OS.
Edit or create your /etc/raddb/server file:
vi /etc/raddb/server
Below the line:
127.0.0.1 secret 1
Add this line:
localhost shared_secret 1
Finally, I made sure that PublicKey authentication was turned off in /etc/sshd/sshd_config:
PubkeyAuthentication no
Configuring the WiKID Server
Now, we'll configure the WiKID server to process the one-time passwords from Freeradius. We assume that you also need to set up a new WiKID domain. If you already have one, you may skip this part. Additional WiKID installation documentation is available here.
Log into the WiKID server and click on the Domains Tab.
Click on Create a New Domain.
Enter the information requested. The Domain Server code is the zero-padded IP address of the WiKID server. So, if the external IP address is 216.239.51.99, the WiKID server code would be 216239051099. Click "Create". (Obviously, if you already have a domain setup, you can skip this step.)
Click Network Clients tab and on "Create a new Network Client".
Enter the information requested. For the IP Address, use the IP address of the Freeradius server. Select Radius and the domain you just created. Click "Add" when you're finished.
On the next page, enter the shared secret you entered in the /etc/raddb/proxy.conf file of the Freeradius server. Do not have to enter any information under "Return Attributes".
Important: From the WiKID terminal or via SSH, you will need to run "wikidctl stop" and then "wikidcl start" to load the new configuration into the WiKID Radius server. (WiKID 2.0 users just run "stop" and "start".)
Testing Freeradius with one-time passwords
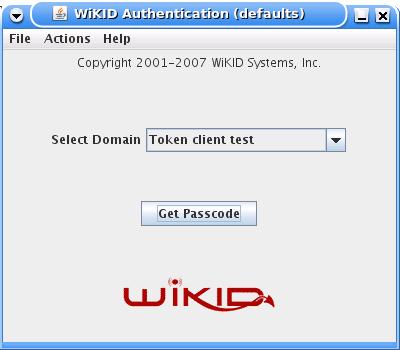
Download and install a WiKID Token client. You can manually validate yourself as a user from the WiKIDAdmin web interface. Once validated, select the Domain associated with the Freeradius resource:
Enter the PIN:
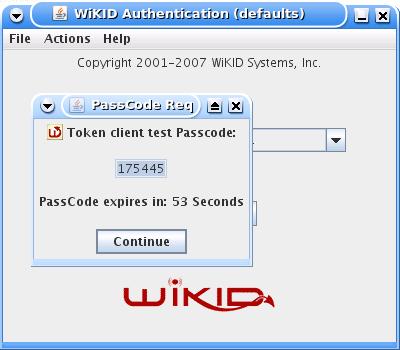
And you will get back the one-time passcode. The OTP is time-bounded, but the time can be set on the WiKID server to whatever you want:
Now, ssh to your Freeradius box:
ssh user@freeradius_server
When prompted, enter the WiKID one-time password - it should have automatically been pasted to your clip-board so ctrl-c or shift-ins should work. You should be granted access. If not, there a number of logs to consult. First, check /var/log/secure on your Freeradius server to see why the user was rejected. If you see "All RADIUS servers failed to respond." make sure that radiusd is running on port 1812. Check Freeradius's logs at /var/log/radius/radius.log and the WiKID radius log at /opt/WiKID/log/radius.log on the WiKID server.
An Alternative Configuration: Freeradius as a back-up
One of the benefits of using PAM Radius is that servers can be chained in the /etc/raddb/server file. If the top servers fail to respond, the next server will try to authenticate the user. To clarify: if the first server responds with an authentication failure, the user is rejected. Only if the there is no response will the second radius server be checked. This backup capability can be especially handy if your WiKID server is located in a remote datacenter. By configuring PAM to talk directly to WiKID and failing back to Freeradius, you create a fail-over solution in the event of a hardware failure.
First, change the /etc/raddb/server file to point to the WiKID server first, then the Freeradius server running on localhost second:
# server[:port] shared_secret      timeout (s)
127.0.0.1:1812        shared_secret        1
WIKIDSERVER_IP:1812   shared_secret      3
localhost:1812        shared_secret          2
I had to make some minor changes to get Freeradius working with /etc/passwd. First, I had to change radiusd's group /etc/raddb/radiusd.conf to shadow:
user = radiusd
group = shadow
Then I had to give shadow permissions for /etc/passwd:
chgrp shadow /etc/shadow
chmod g+r /etc/shadow
Now, if the WiKID server fails for some reason you have an automatic fall-back to your /etc/passwd file.
Conclusion
Radius is an excellent standard for authentication of remote users. Combining Freeradius with WiKID Strong Authentication creates a powerful, flexible and secure solution.


