Changing Desktop Appearance On Linux Mint 11 (Advanced)
Version 1.0
Author: Christian Schmalfeld <c [dot] schmalfeld [at] projektfarm[dot] de>
This tutorial is supposed to show you how to change the GNOME desktop's appearance on Linux Mint further than the standard options of the Appearance section in the Control Center allow. I am going to use several different applications for this cause.
1 Preliminary Note
This tutorial will describe how to alter the appearance of a Linux Mint 11 system with a GNOME desktop. This is the standard desktop that comes with Mint, so if you have not changed anything about that all steps should work fine for you. Be aware that the use of the nVidia proprietary drivers may not be unrisky!
This tutorial comes without warranty of any kind!
2 Things I Am Going To Change About The Desktop
If you have not changed anything about your Mint desktop yet, that is approximately what it should look like:
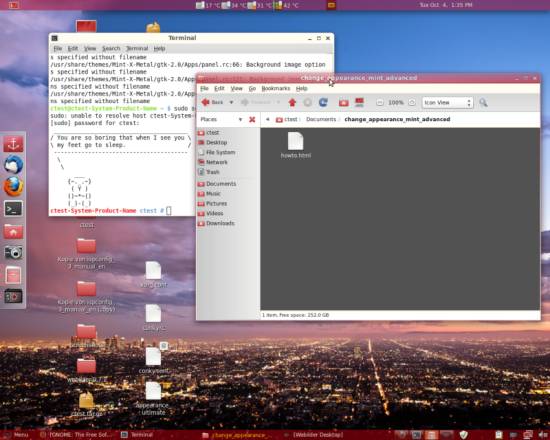
After I had gone through the options I am going to configure, my desktop looked like this:
Now what I have done expilicitly is:
- Install nVidia proprietary driver - allows desktop effects
- Install Compiz Fusion - software to use desktop effects
- Install Webilder Applet - applet to download and switch wallpaper automatically
- Install Gnome Color Chooser - GUI for easily changing the desktop's colors
- Install Docky - Apple-like dock to quickstart files and folders
- Install Screenlets - Software to put helpful little widgets on your desktop
- Make the panel's opacity option affect the complete panel
- Lower the window decorations' opacity
Of course you can choose which of those options you would like to apply to your desktop, however Compiz Fusion, Docky and lowering the window decorations' opacity need the nVidia proprietary drivers to be installed.
3 NVIDIA Drivers and Compiz Fusion
At this point I want to note that you should only try to install the nVidia proprietary drivers after you have backed up your system and no data would be lost if you had to reinstall Linux Mint. It may easily occur that the nVidia drivers are installed incorrectly, especially if you had other drivers installed manually in the past. Also, make sure that you have an installation medium of your present OS (which should be Linux Mint 11) in case there is no other way but to reinstall it.
If you decide to install the nVidia drivers, follow the installation as shown in this tutorial: https://www.howtoforge.com/enabling-compiz-fusion-on-linux-mint-11
If your machine reboots properly after the drivers' installation, proceed by installing Compiz Config and skip the rest of this chapter.
If it should happen that after installing and rebooting, your machine starts up with a black screen, the nVidia drivers were not installed properly. However you can still boot with another driver. To do so, press Alt + F1 to summon a terminal. Log in as root and enter
cd /etc/X11
to access the directory where your xorg.conf should be located. To check if that file exists, enter
ls -l
and you should get a list of files and folders that are located inside the /etc/X11 directory. If the xorg.conf file is among them, open it with
nano /etc/X11/xorg.conf
and find the line in the Device section that says
Driver "..."
Change the string in the double quote so that it looks like this:
Driver "vesa"
Now save the file and reboot your machine. If however there was no xorg.conf file in the /etc/X11 directory, create a new one using
touch /etc/X11/xorg.conf
and make it look like this:
Section "Device"
    Identifier    "Default Device"
    Driver        "vesa"
EndSection
Save the file and reboot afterwards. Your system should then be booted using the vesa drivers which should be enough to either remove, or try to install the nvidia drivers again. If you choose the latter, make sure that the Driver line of your xorg.conf says nvidia instead of vesa.
4 Install Webilder
Webilder is a tool that automatically downloads images from flickr and/or webshots, sorts them in categories and rotates your wallpaper every once in a specified interval, using the wallpapers it has downloaded. You are also free to set tags for downloading, delete downloaded images and rotate the wallpaper manually. It is also the tool used to rotate wallpapers in the Ubuntu derivative Pinguy OS.
Download Webilder from here http://www.webilder.org/static/downloads/Webilder-0.7.1.tar.gz and unpack it into any directory. I will unpack it onto /home/ctest/Desktop. After you have got the files, open a terminal and install the needed dependencies:
sudo apt-get install python-gtk2 python-glade2 python-imaging python-setuptools
sudo apt-get install python-gnome2 libglib2.0-0 python-appindicator gettext
Next, still in terminal, change into the directory where you have unpacked the files to and install them. They are in the webilder-0.7.1 folder, so in my case I enter:
cd /home/ctest/Desktop/webilder-0.7.1
sudo python setup.py install --install-data=/usr
Be sure to replace my installation path (and/or username) with yours.
If not started automatically, rightclick your desktop panel and select Add to Panel.... Browse the available applets and click on the Webilder Desktop Applet. Click on Add and the applet should appear on your desktop panel. If the applet was not available in the list of applets in the first place just restart your system and it should appear in the list. Leftclicking on the camera icon on the panel will give you the important menu points to deal with Webilder. To start with, select Preferences.
Here you can specify the intervals of rotation and download of wallpapers, which wallpapers should be downloaded and where they should be downoaded from. To add filters, head to the flickr tab, use the Add button and click on the filter fields to configure it.
To browse the wallpapers already downloaded, leftclick the icon on the desktop panel again and choose Browse Photos. They are organized in recently downloaded photos and monthly categories, however you can also add your own albums:
You can also delete, download and switch wallpapers manually by leftclicking the panel icon and selecting the appropriate action:


