How to Install and Configure Kubernetes and Docker on Ubuntu 18.04 LTS

Kubernetes is an open source platform for managing containerized applications. It allows you to manage, scale, and automatically deploy your containerized applications in the clustered environment. Kubernetes is developed by Google.

With Kubernetes, you can orchestrate containers across multiple hosts, scale the containerized applications with all resources on the fly, and have a centralized container management environment.

In this tutorial, I will show you step-by-step how to install and configure Kubernetes on Ubuntu 18.04. We will be using 1 server 'k8s-master' as the Kubernetes Host Master, and 2 servers as Kubernetes workers, 'worker01' and 'worker02'.

Prerequisites

  • 3 Ubuntu Servers
    • 10.0.15.10  k8s-master
    • 10.0.15.21  worker01
    • 10.0.15.22  worker02
  • Root privileges

What we will do

  1. Kubeadm Installation
    1. Setup Hosts
    2. Install Docker
    3. Disable SWAP
    4. Install Kubeadm Packages
  2. Kubernetes Cluster Initialization
  3. Adding Worker Nodes to the Kubernetes Cluster
  4. Testing

Step 1 - Kubeadm Installation

In this first step, we will prepare those 3 servers for Kubernetes installation, so run all commands on the master and worker nodes.

We will prepare all servers for Kubernetes installation by changing the existing configuration on servers, and also installing some packages, including docker and kubernetes itself.

Setup Hosts

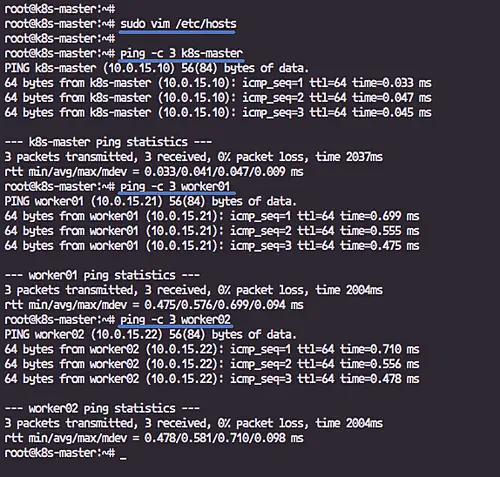
Edit hosts file on all server using the vim editor.

sudo vim /etc/hosts

Paste hosts configuration below.

10.0.15.10  k8s-master
10.0.15.21  worker01
10.0.15.22  worker02

Save and exit.

Now test ping all servers hostname.

ping -c 3 k8s-master
ping -c 3 worker01
ping -c 3 worker02

Make sure all IP address get resolved as a hostname.
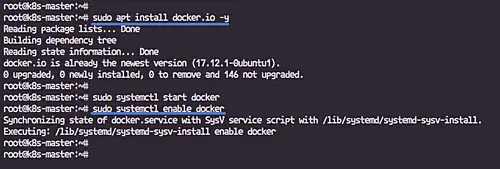
Install kubeadm

Install Docker

In this tutorial, we will install Docker from the Ubuntu repository.

Install Docker using the apt command below.

sudo apt install docker.io -y

After the installation is complete, start the docker service and enable it to launch everytime at system boot.

sudo systemctl start docker
sudo systemctl enable docker

Docker installation has been completed.

Install Docker

Disable SWAP

In order to set up the Kubernetes Linux servers, we need to disable the SWAP.

Check the swap list and disable it.

sudo swapon -s
sudo swapoff -a

To disable the SWAP permanently, we need to edit the '/etc/fstab' file.

sudo vim /etc/fstab

Make a comment on the SWAP partition type.

#/dev/mapper/hakase--labs--vg-swap_1 none            swap    sw              0       0

Disable swap space

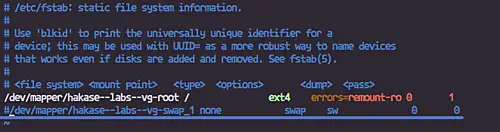
Save and exit, then reboot the system.

sudo reboot

Install Kubeadm Packages

In this tutorial, we will be using Kubeadm packages to set up the Kubernetes Cluster. We will install the Kubeadm packages from the official Kubernetes repository.

Install apt-transport-https.

sudo apt install -y apt-transport-https

Add the Kubernetes Key.

curl -s https://packages.cloud.google.com/apt/doc/apt-key.gpg | sudo apt-key add -

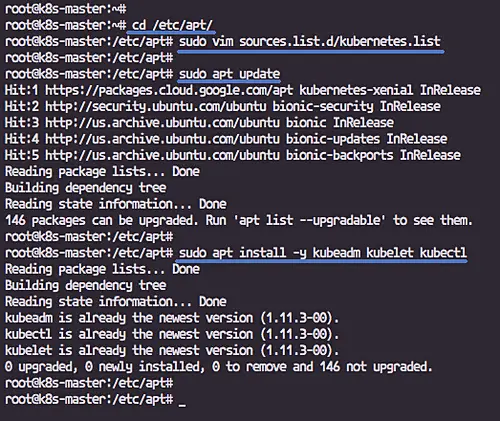
And add the Kubernetes Repository by creating a new repo.list file on the '/etc/apt/sources.list.d' directory.

cd /etc/apt/
sudo vim sources.list.d/kubernetes.list

paste kubernetes repository below.

deb http://apt.kubernetes.io/ kubernetes-xenial main

Note:

We're still using the Xenial Ubuntu 16.04 repository for our Kubeadm Installation.

Now update the repository and install kubeadm packages using apt commands below.

sudo apt update
sudo apt install -y kubeadm kubelet kubectl

Wait for kubeadm packages installations.

Install kubeadm package

Step 2 - Kubernetes Cluster Initialization

In this step, we will initialize Kubernetes on the 'k8s-master' node. Run all commands in this stage only on the 'k8s-master' server.

Initialize the Kubernetes cluster using the kubeadm command below.

sudo kubeadm init --pod-network-cidr=10.244.10.0/16 --apiserver-advertise-address=10.0.15.10 --kubernetes-version "1.11.0"

Note:

  • --apiserver-advertise-address = determines which IP address Kubernetes should advertise its API server on.
  • --pod-network-cidr = specify the range of IP addresses for the pod network. We're using the 'flannel' virtual network. If you want to use another pod network such as weave-net or calico, change the range IP address.

When the Kubernetes initialization is complete, you will get the result as shown below.

Initialize Kubernetes Cluster

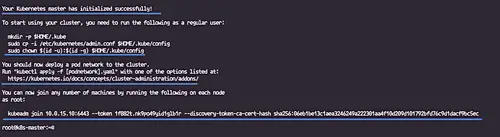
Copy the 'kubeadm join ... ... ...' command to your text editor. The command will be used to register new worker nodes to the kubernetes cluster.

Now in order to use Kubernetes, we need to run some commands as shown in the result.

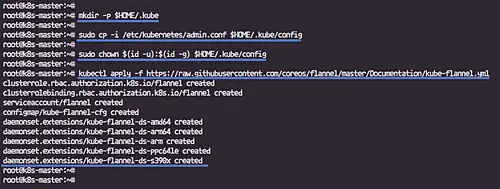
Create new '.kube' configuration directory and copy the configuration 'admin.conf' from '/etc/kubernetes' directory.

mkdir -p $HOME/.kube
sudo cp -i /etc/kubernetes/admin.conf $HOME/.kube/config
sudo chown $(id -u):$(id -g) $HOME/.kube/config

Next, deploy the flannel network to the kubernetes cluster using the kubectl command.

kubectl apply -f https://raw.githubusercontent.com/coreos/flannel/master/Documentation/kube-flannel.yml

The flannel network has been deployed to the Kubernetes cluster.

Deploy flannel network

Wait for a minute and then check the Kubernetes node and pods using the commands below to get pods from all namespaces.

kubectl get nodes
kubectl get pods --all-namespaces

And you will get the 'k8s-master' node is running as a 'master' cluster with status 'ready', and all 'kube-system' pods that are needed for the cluster is up and running.

get node list

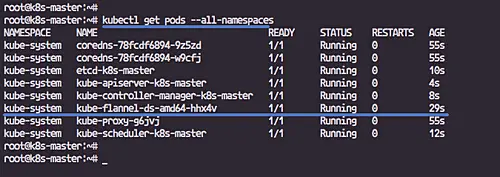
Kubernetes cluster master initialization and configuration has been completed.

Step 3 - Adding Worker Nodes to the Kubernetes Cluster

In this step, we will add two node workers 'worker01' and 'worker02' to the Kubernetes Cluster.

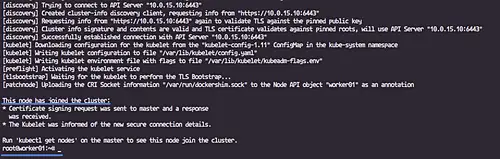
Connect to the 'worker01' server and run the kubeadm join command that you get from the cluster initialization.

kubeadm join 10.0.15.10:6443 --token daync8.5dcgj6c6xc7l8hay --discovery-token-ca-cert-hash sha256:65a3e69531d323c335613dea1e498656236bba22e6cf3d5c54b21d744ef97dcd

Adding Worker Nodes to the Kubernetes Cluster

Connect to the 'worker02' server and run the kubeadm join command that you get from the cluster initialization.

kubeadm join 10.0.15.10:6443 --token daync8.5dcgj6c6xc7l8hay --discovery-token-ca-cert-hash sha256:65a3e69531d323c335613dea1e498656236bba22e6cf3d5c54b21d744ef97dcd

Add second worker node

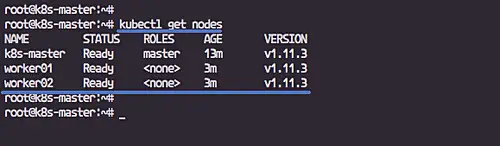
Wait for some minutes and back to the 'k8s-master' node master and check node status.

kubectl get nodes

You will see those worker nodes 'worker01' and 'worker02' are part of the Kubernetes Cluster.

List nodes

Step 4 - Testing

In this step, we will deploy the Nginx web server inside the cluster. We will deploy the Nginx web server using the YAML template.

Create a new directory named 'nginx' and go to that directory.

mkdir -p nginx/
cd nginx/

Now create the Nginx Deployment YAML file 'nginx-deployment.yaml' using the vim editor.

sudo vim nginx-deployment.yaml

Paste configurations below.

apiVersion: apps/v1
kind: Deployment
metadata:
  name: nginx-deployment
  labels:
    app: nginx
spec:
  replicas: 3
  selector:
    matchLabels:
      app: nginx
  template:
    metadata:
      labels:
        app: nginx
    spec:
      containers:
      - name: nginx
        image: nginx:1.14.0
        ports:
        - containerPort: 80

Save and exit.

Note:

  • We're creating a new 'Deployment' named 'nginx-deployment'.
  • Setup the app label as 'nginx' with '3' replicas.
  • The 'nginx-deployment' will have containers named 'nginx', based on 'nginx:1.14.0' docker image, and will expose the default HTTP port 80.

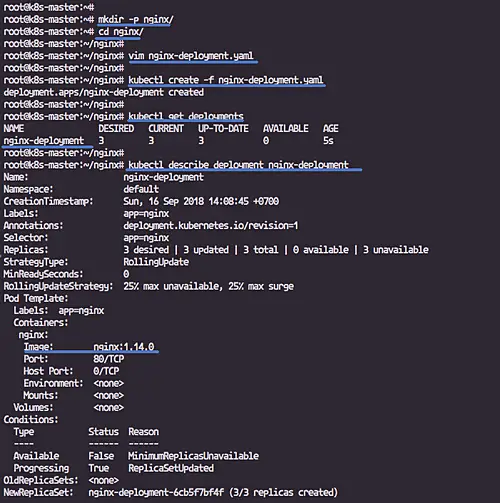
Now create the deployment by running the kubectl command below.

kubectl create -f nginx-deployment.yaml

After creating a new 'nginx-deployment', check the deployments list inside the cluster.

kubectl get deployments
kubectl describe deployment nginx-deployment

Test Kubernetes

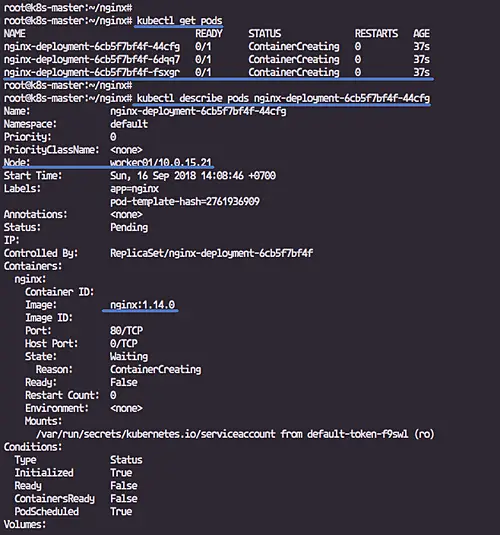
Now check Kubernetes Pods and you will see the 'nginx-deployment-xxx' pod, check details of the pod.

kubectl get pods
kubectl describe pods nginx-deployment-6cb5f7bf4f-t5xfh

You will get nginx-deployment pods with 3 replicas on the worker nodes.

Get pods

Next, we need to create a new service for our 'nginx-deployment'.

Create a new YAML file named 'nginx-service.yaml'.

vim nginx-service.yaml

Paste the configuration below.

apiVersion: v1
kind: Service
metadata:
  name: nginx-service
  labels:
    run: nginx-service
spec:
  type: NodePort
  ports:
  - port: 80
    protocol: TCP
  selector:
    app: nginx

Save and exit.

Note:

  • We're creating a new kubernetes service named 'nginx-service'.
  • Type of the service is 'NodePort' with the TargetPort HTTP default port 80.
  • The service belongs to the app named 'nginx' based on our deployment 'nginx-deployment'.

Create the kubernetes service using the kubectl command below.

kubectl create -f nginx-service.yaml

Now check all available services on the cluster and you will get the 'nginx-service' on the list, then check details of service.

kubectl get service
kubectl describe service nginx-service

Configure nginx service

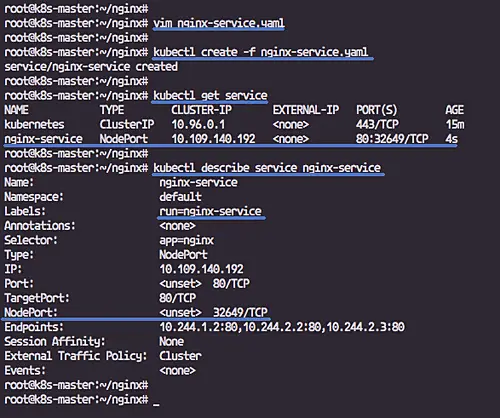
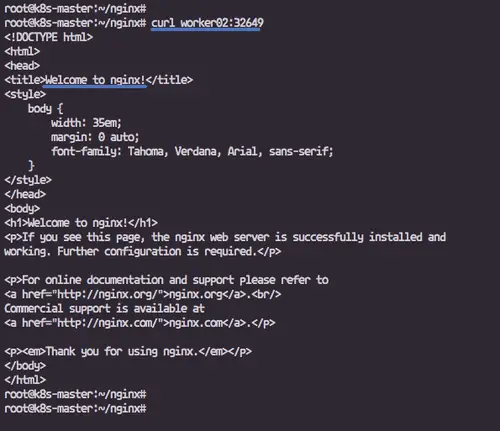
And you will see the 'nginx-service' NodePort is running on port '32649'.

Check using the curl command to all worker nodes.

On the worker01.

curl worker01:32649

Test nginx with curl

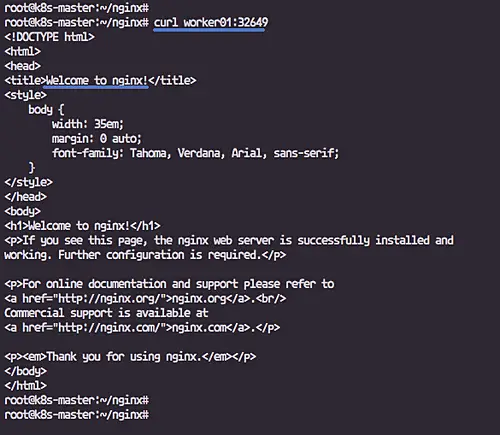
You will see the Nginx default page.

On the worker02.

curl worker02:32649

Test second worker with curl

The Kubernetes Cluster installation and configuration on Ubuntu 18.04 has been completed successfully.

Reference

Share this page:

19 Comment(s)

Add comment

Please register in our forum first to comment.

Comments

By: nmentityvibes

I am getting the following error message when trying to install docker using "sudo apt install docker.io -y" as mentioned in this documentation. I am using Ubuntu 18.04.1 LTS (Bionic Beaver)". I have tried all possible ways but was not successful. Please help.

By: till

Which error do you get?

By: nmentityvibes

E: Package 'docker.io' has no installation candidate

By: Phi Huynh

Thanks, it works well for my case.

Phi

By: Eric

I am getting the following error in Step 2

[email protected]:/etc/apt# kubeadm init --pod-network-cidr=10.244.10.0/16 --apiserver-advertise-address=10.0.15.10 --kubernetes-version "1.11.0"

this version of kubeadm only supports deploying clusters with the control plane version >= 1.12.0. Current version: v1.11.0

[email protected]:/etc/apt#


By: Apoloj

Successfully deployed.my observations and solutions:+Setup Hosts: I set up hosts via VM.Installed the unbuntu server 18.04Ran minimal installationAdded the requirements below via cli

+Kubeadm Installation+Install Docker+Install Kubeadm PackagesIssue: not able to install repositoryResolved: installed software-properties-common right after host insallationsudo apt install apt-transport-https ca-certificates curl software-properties-common

Kubernetes Cluster InitializationIssue: sudo kubeadm init --pod-network-cidr=10.244.10.0/16 --apiserver-advertise-address=10.0.15.10 --kubernetes-version "1.11.0"Solution: change the kubernetes version to match my kubernetes-version "1.14.0" sudo kubeadm init --pod-network-cidr=10.244.10.0/16 --apiserver-advertise-address=YourMasternode_ip --kubernetes-version "1.14.0"

Adding Worker Nodes to the Kubernetes ClusterIssue: I was having trouble joining the worker nodes to the clusterSolution: Swap was turn on at the master node and turned it back offsudo swapoff -a

Issue: trouble setting yaml when cut/paste the script to viSolution: copy/paste the script to notepad++ matached the spacing from notepad++ on vi and it worked

TestingDeployed local Kubenetes successfully

Thank very much for the lab. I looked for days for one I could successfully complete.

By: Stallion

The Kube version that gets downloaded is not 1.14 . If you run into issue that says "this version of kubeadm only supports deploying clusters with the control plane version >= 1.12.0. Current version: v1.11.0"


Change the command to :sudo kubeadm init --pod-network-cidr=10.244.10.0/16 --apiserver-advertise-address=13.12.. --kubernetes-version "1.14.0"


Also if somebody runs into a problem that says :

"Unfortunately, an error has occurred:

        timed out waiting for the condition


This error is likely caused by:

        - The kubelet is not running

        - The kubelet is unhealthy due to a misconfiguration of the node "


Try changing the advertise id to 0.0.0.0 like:

sudo kubeadm init --pod-network-cidr=10.244.10.0/16 --apiserver-advertise-address=0.0.0.0 --kubernetes-version "1.14.0"

By: celsocesila

I get an error with coredns pods, they don't initialize properly and stay in CrashLoopBackOff.

The log shows:

2019-04-18T09:19:51.659Z [INFO] CoreDNS-1.3.1 2019-04-18T09:19:51.659Z [INFO] linux/amd64, go1.11.4, 6b56a9c CoreDNS-1.3.1 linux/amd64, go1.11.4, 6b56a9c 2019-04-18T09:19:51.659Z [INFO] plugin/reload: Running configuration MD5 = 599b9eb76b8c147408aed6a0bbe0f669 E0418 09:20:16.659817       1 reflector.go:134] github.com/coredns/coredns/plugin/kubernetes/controller.go:322: Failed to list *v1.Namespace: Get https://10.96.0.1:443/api/v1/namespaces?limit=500&resourceVersion=0: dial tcp 10.96.0.1:443: i/o timeout E0418 09:20:16.659817       1 reflector.go:134] github.com/coredns/coredns/plugin/kubernetes/controller.go:322: Failed to list *v1.Namespace: Get https://10.96.0.1:443/api/v1/namespaces?limit=500&resourceVersion=0: dial tcp 10.96.0.1:443: i/o timeout log: exiting because of error: log: cannot create log: open /tmp/coredns.coredns-fb8b8dccf-nsv69.unknownuser.log.ERROR.20190418-092016.1: no such file or directory


By: Enrique Corro

Thanks so much to the author. This is heads down the best guide I could find after days of frustration. Almost flowless. The only suggestion is to avoid the enforcement of K8 version which might lead to errors. There's a small skewness allows among component versions

By: Chaos234

Where is the full how to for a single server setup? Means that you have only one root server and please no ubuntu distro, debian is prefered here. Also how to partition correctly? With SWRAID-Lvl 1? LVM or not? Because LVM and Docker sounds for me as double virtualisation.

By: Rizky

[email protected]:~$ sudo kubeadm init --pod-network-cidr=172.16.1.0/24 --apiserver-advertise-address=172.16.1.91 --kubernetes-version "1.14.2"

[init] Using Kubernetes version: v1.14.2

[preflight] Running pre-flight checks

error execution phase preflight: [preflight] Some fatal errors occurred:

        [ERROR NumCPU]: the number of available CPUs 1 is less than the required 2

[preflight] If you know what you are doing, you can make a check non-fatal with `--ignore-preflight-errors=...`


How to fix this error message ?

By: Svetlana

I just added --ignore-preflight-errors=all at the end of the command to bypass it becausde I am using a VM and have no way of adding another CPU :)

By: Xavier

Its a great tutorial.

I was able to run nginx and even a Go app that I had.

What I do miss (all tuts are over local minicubes) is to expose , for example, nginx to the internet.

I've tried with MetalLB, but the external IP its useless from outside the enviroment. 

Please, share with use how to simple access to your nginx at: 10.0.15.10 (your master).  

PS: I do belive your tutorial is for those who are trying to run K8 in baremetal or privte vps without cloud load balancers.


Thanks for the great work!!!

By: balaram.ramaswamy

Excellent, it worked as explained. nice tutorial.

By: ejez

I made a new project that facilitates installing kubernetes in ubuntu, and in general setting up web environments with an easy/quick way. It is made with ansible.

Check it here: https://aya-project.readthedocs.io

By: Daniel

The status of my pods is "NotReady"


NAME        STATUS     ROLES    AGE   VERSION

k8-master   NotReady   master   12h   v1.16.0

worker01    NotReady   <none>   59m   v1.16.0

worker02    NotReady   <none>   55m   v1.16.0


When I execute this command this is what I see.

$ kubectl describe node k8-master

Conditions:

  Type             Status  LastHeartbeatTime                 LastTransitionTime                Reason                       Message

  ----             ------  -----------------                 ------------------                ------                       -------

  MemoryPressure   False   Sat, 21 Sep 2019 09:28:42 -0700   Fri, 20 Sep 2019 21:00:20 -0700   KubeletHasSufficientMemory   kubelet has sufficient memory available

  DiskPressure     False   Sat, 21 Sep 2019 09:28:42 -0700   Fri, 20 Sep 2019 21:00:20 -0700   KubeletHasNoDiskPressure     kubelet has no disk pressure

  PIDPressure      False   Sat, 21 Sep 2019 09:28:42 -0700   Fri, 20 Sep 2019 21:00:20 -0700   KubeletHasSufficientPID      kubelet has sufficient PID available

  Ready            False   Sat, 21 Sep 2019 09:28:42 -0700   Fri, 20 Sep 2019 21:00:20 -0700   KubeletNotReady              runtime network not ready: NetworkReady=false reason:NetworkPluginNotReady message:docker: network plugin is not ready: cni config uninitialized


What is this issue?

KubeletNotReady              runtime network not ready: NetworkReady=false reason:NetworkPluginNotReady message:docker: network plugin is not ready: cni config uninitialized

By: baltazar

Hi!

I have exactly the same issue "What is this issue?

KubeletNotReady              runtime network not ready: NetworkReady=false reason:NetworkPluginNotReady message:docker: network plugin is not ready: cni config uninitialized


Is anybody know what to do? Any suggestions or workaround will be much appreciated? 

Thx

By: matt

Thanks,  very good instruction. 

Docker part is a bit out of date.  should install docker CE

https://kubernetes.io/docs/setup/production-environment/container-runtimes/

By: Tuyen

good article . Thanks