How to add two-factor authentication to Google Apps for your Domain using open source software
Everybody loves GMail. With Google Apps for you Domain, you can use GMail with your own domain, allowing organizations to outsource their email - and the requisite anti-spam filtering to Google. Webmail is very convenient, but for frequent travellers and those who use public wifi, it can be quite dangerous. Logging in from a kiosk or shared computer is a sure way to get your username and password stolen by a keystroke logger. Using a public WiFi system can lead to a man-in-the-middle attack. In this document we will take advantage of two open source projects to add two-factor authentication to Google Apps. The first is Gheimdall, a a TurboGears project for Google Apps SSO service. Gheimdall supports PAM and LDAP authentication natively. It also includes sample code to add new authentication methods, which made it very easy to add two-factor authentication from WiKID. WiKID is a dual-source two-factor authentication solution that uses public key cryptography to strongly authenticate users.
Installing Gheimdall
I installed Gheimdall following their instructions for Centos which allowed me to use yum:
wget http://download.fedora.redhat.com/pub/epel/5/i386/epel-release-5-2.noarch.rpm
rpm -ivh epel-release-5-2.noarch.rpm
wget http://gheimdall.googlecode.com/files/gheimdall-repos-5-3.noarch.rpm
rpm -ivh gheimdall-repos-5-3.noarch.rpm
yum install gheimdall
Configuring Google Apps for your Domain for Single Sign-on
You need to be using Google Apps premier to have SSO capability. They have a 30 day trial so you can test it first. Under Advanced Tools, select Set up single sign-on (SSO), check the box for Enable Single Sign-on and enter the URLs for SAML:
Sign-in page URL:  http://your.domain.example.com/gheimdall/login
Sign-out page URL: http://your.domain.example.com/gheimdall/logout
Change password URL: http://your.domain.example.com/gheimdall/passwd
We need to create the public-private keys for talking to Google. The docs for Gheimdall give us a quick method for this:
openssl genrsa -des3 -out privkey.pem 2048
openssl rsa -in privkey.pem -out privkey-nopass.pem
openssl rsa -in privkey-nopass.pem -pubout -outform DER -out publickey.der
Upload publickey.der as the verification certificate and that's it for the Google Apps console.
Configuring the WiKID Gheimdall plugin
The WiKID plugin requires pyOpenSSL:
yum install pyOpenSSL
Download the WiKID Gheimdall plugin from the Network clients page.
You need to copy the WiKID components, wikid_gheimdall.py, pywClient.py, WiKID-ca.pem to the Gheimdall directory:
cp wikid_gheimdall.py pywClient.py WiKID-ca.pem /usr/lib/python2.4/site-packages/gheimdall/auth/
Now we need to edit the settings in wikid_gheimdall.py. One day, these may externalized.
    domaincode = '010100000010'
    host = '10.100.0.10'
    port = 8388
    caCert = '/usr/lib/python2.4/site-packages/gheimdall/auth/WiKID-ca.pem'
    pkey = '/usr/lib/python2.4/site-packages/gheimdall/auth/test67_wauth.p12'
    passPhrase = 'google'
The domaincode is the domain on the WiKID server; host is its IP address. Port is the port that the WiKID wAuth protocol uses and should not be changed. caCert was copied into this directory in the previous step as WiKID-ca.pem. You will create the network client certificate on the WiKID server and reference it here as pkey with its passPhrase so an SSL encrypted channel can be created between your Gheimdall server and the WiKID server.
Now we need to edit config/app.cfg to tell Gheimdall to use WiKID:
# auth_engine to use
apps.auth_engine = 'wikid_gheimdall'
Adding Gheimdall as a Network Client on the WiKID Strong Authentication Server
We are using the open source Community Edition of the WiKID Strong Authentication Server.
First, we will add a domain on the WiKID server for the Gheimdall, then we will create a network client and copy the create certificate to the Gheimdall server.
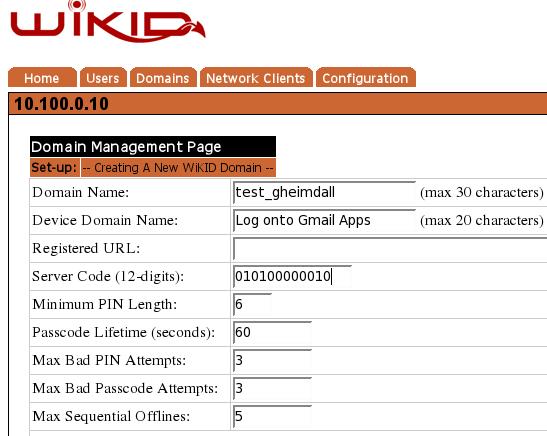
Adding a domain to the WiKID server
From the WiKID server web administration interface, click on the the Domains tab and Create New Domain. Enter a domain name and a device name. The device name will show up on the WiKID token. The server code will be the routable, zero-padded IP Address of the WiKID server (e.g. 10.1.1.1 = 010001001001 - though this address is of course not routable). Set the other parameters as you see fit. While a longer PIN may increase security mathematically, a four digit PIN may be better: if a user uses their ATM PIN, they are more likely to protect it.
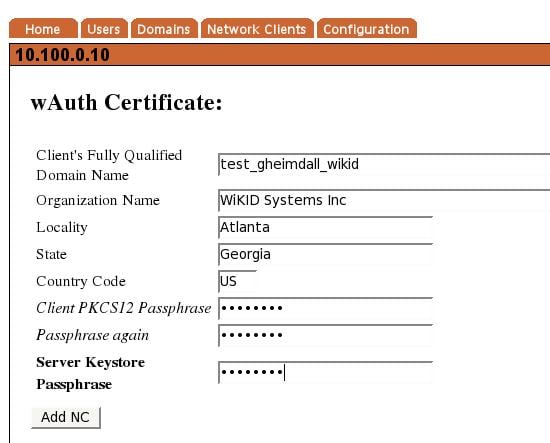
Create a network client
After saving the domain information, click on the Network Client tab and Create New Network Client. Enter a name for this client and the IP Address of the Gheimdall server on the network. Select wAuth as the protocol and then choose the domain you created above.

Click Add to get the next page and enter the information for the p12 certificate for the target server. Communications between the Gheimdal server and WiKID server will be encrypted with SSL using this p12 file. Enter a passphrase for this p12 file twice and the passphrase you used for the server's intermediate certificate during the configuration process. When you return to the Network Client page, you will see the new network client listed and a link to download the p12 file. Download the p12 file and put it on your Gheimdall server in the same directory as the Gheimdall WiKID code - /usr/lib/python2.4/site-packages/gheimdall/auth/ in our configuration.
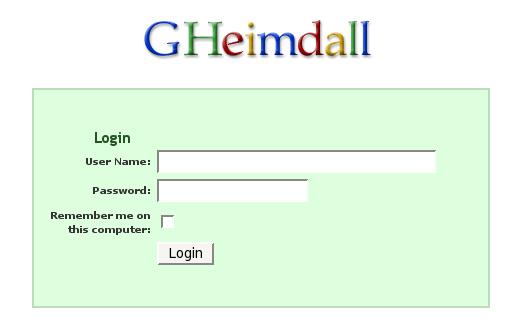
That should be it. We can now test it by logging into Google Apps. When you try to login, you should be redirected to your Gheimdall login page:
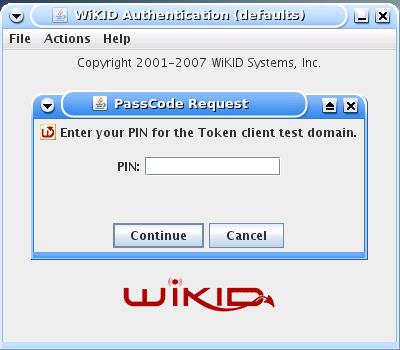
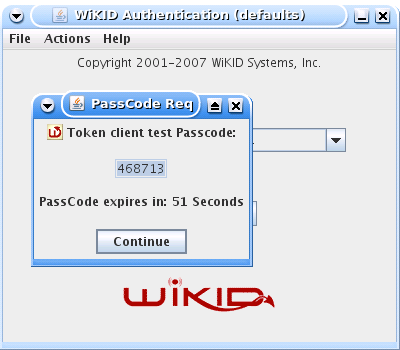
On your WiKID token, enter you PIN:
And you should get your one-time passcode back:
Enter your username and the one-time passcode and you should be authenticated:
Congratulations. You know have configured Google Apps for your Domain to use WiKID's open source two-factor authentication. That should make you feel much more secure.

