How To Harden PHP5 With Suhosin (Debian Etch/Ubuntu) - Page 2
On this page
4 Installing Suhosin
First we install the Suhosin PHP extension which is available as a package in the Debian Etch and Ubuntu repositories:
apt-get install php5-suhosin
Now on for the Suhosin patch. To install the patch, we need to recompile PHP5 on our system. Fortunately there's an easy way to do this: we download the PHP5 source package from our Debian/Ubuntu repository. That's the package from which our current PHP5 installation was compiled. Then we apply the Suhosin patch to the sources, and create new PHP5 .deb packages with dpkg-buildpackage. That way, we don't have to worry about the right PHP5 configuration options, and we stay in sync with our apt package database.
First we install everything we need to compile PHP5 from the sources:
apt-get install dpkg-dev build-essential
Then we go to the /usr/src directory and download the PHP5 sources:
cd /usr/src
apt-get source php5
Next we install the Hardened PHP-Project signaturekey:
wget http://www.hardened-php.net/hardened-php-signature-key.asc
gpg --import < hardened-php-signature-key.asc
Then we go to http://www.hardened-php.net/suhosin/download.html and select the Suhosin patch that suits our PHP version. In this tutorial my PHP version is 5.2.0-8+etch1, so I download the patch for PHP 5.2.0:
wget http://www.hardened-php.net/suhosin/_media/suhosin-patch-5.2.0-0.9.6.2.patch.gz
Now we unpack that patch and apply it to our PHP sources:
gunzip suhosin-patch-5.2.0-0.9.6.2.patch.gz
cd php5-5.2.0
patch -p 1 -i ../suhosin-patch-5.2.0-0.9.6.2.patch
After the patch has been applied without errors, we build our new PHP5 .deb packages:
dpkg-buildpackage
Depending on what PHP5 modules you have installed, dpkg-buildpackage will most likely complain about missing packages that it needs to build new packages for the various PHP5 modules:
server1:/usr/src/php5-5.2.0# dpkg-buildpackage
dpkg-buildpackage: source package is php5
dpkg-buildpackage: source version is 5.2.0-8+etch1
dpkg-buildpackage: source changed by sean finney <[email protected]>
dpkg-buildpackage: host architecture i386
dpkg-buildpackage: source version without epoch 5.2.0-8+etch1
dpkg-checkbuilddeps: Unmet build dependencies: apache-dev (>= 1.3.23) apache2-prefork-dev (>= 2.0.53-3) bison chrpath debhelper (>= 3) firebird2-dev flex (>= 2.5.4) freetds-dev libapr1-dev (>= 1.2.7-8) libbz2-dev (>= 1.0.0) libc-client-dev libcurl3-openssl-dev | libcurl3-dev libdb4.4-dev libexpat1-dev (>= 1.95.2-2.1) libfreetype6-dev libgcrypt11-dev libgd2-xpm-dev (>= 2.0.28-3) libjpeg62-dev libkrb5-dev libldap2-dev libmcrypt-dev libmhash-dev (>= 0.8.8) libmysqlclient15-dev | libmysqlclient12-dev libncurses5-dev libpam0g-dev libpcre3-dev (>= 6.6) libpng12-dev libpq-dev | postgresql-dev libpspell-dev librecode-dev libsnmp9-dev | libsnmp-dev libsqlite0-dev libt1-dev libtidy-dev libwrap0-dev libxmltok1-dev libxml2-dev (>= 2.4.14) libxslt1-dev (>= 1.0.18) re2c unixodbc-dev
dpkg-buildpackage: Build dependencies/conflicts unsatisfied; aborting.
dpkg-buildpackage: (Use -d flag to override.)
If you see an error like this, install the missing packages (a | symbol means OR, e.g. package1 | package2 means that you can install either package1 or package2), e.g. like this:
apt-get install apache-dev apache2-prefork-dev bison chrpath debhelper firebird2-dev flex freetds-dev libapr1-dev libbz2-dev libc-client-dev libcurl3-dev libdb4.4-dev libexpat1-dev libfreetype6-dev libgcrypt11-dev libgd2-xpm-dev libjpeg62-dev libkrb5-dev libldap2-dev libmcrypt-dev libmhash-dev libmysqlclient15-dev libncurses5-dev libpam0g-dev libpcre3-dev libpng12-dev libpq-dev libpspell-dev librecode-dev libsnmp9-dev libsqlite0-dev libt1-dev libtidy-dev libwrap0-dev libxmltok1-dev libxml2-dev libxslt1-dev re2c unixodbc-dev
Afterwards, run dpkg-buildpackage again:
dpkg-buildpackage
This should now compile PHP5 and all installed PHP5 modules again and create new .deb packages in the /usr/src directory. This can take some time, so please be patient. It's possible that you get some warnings about signatures at the end - you can ignore them.
Afterwards, we go to the /usr/src directory and see what we got:
cd /usr/src
ls -l
The output could look like this:
server1:/usr/src# ls -l
total 21792
-rw-r--r--  1 root src     1351 2005-07-05 13:02 hardened-php-signature-key.asc
-rw-r--r--  1 root src  2419598 2007-03-29 16:37 libapache2-mod-php5_5.2.0-8+etch1_i386.deb
-rw-r--r--  1 root src  2418714 2007-03-29 16:37 libapache-mod-php5_5.2.0-8+etch1_i386.deb
drwxr-xr-x 20 root root    4096 2007-03-29 16:37 php5-5.2.0
-rw-r--r--  1 root src     1044 2007-03-29 16:37 php5_5.2.0-8+etch1_all.deb
-rw-r--r--  1 root src   124228 2007-03-29 16:02 php5_5.2.0-8+etch1.diff.gz
-rw-r--r--  1 root src     1739 2007-03-29 16:02 php5_5.2.0-8+etch1.dsc
-rw-r--r--  1 root src     5689 2007-03-29 16:38 php5_5.2.0-8+etch1_i386.changes
-rw-r--r--  1 root src  8583491 2006-11-07 13:34 php5_5.2.0.orig.tar.gz
-rw-r--r--  1 root src  4771850 2007-03-29 16:37 php5-cgi_5.2.0-8+etch1_i386.deb
-rw-r--r--  1 root src  2405518 2007-03-29 16:37 php5-cli_5.2.0-8+etch1_i386.deb
-rw-r--r--  1 root src   215058 2007-03-29 16:37 php5-common_5.2.0-8+etch1_i386.deb
-rw-r--r--  1 root src    24464 2007-03-29 16:37 php5-curl_5.2.0-8+etch1_i386.deb
-rw-r--r--  1 root src   350954 2007-03-29 16:37 php5-dev_5.2.0-8+etch1_i386.deb
-rw-r--r--  1 root src    33416 2007-03-29 16:37 php5-gd_5.2.0-8+etch1_i386.deb
-rw-r--r--  1 root src    34496 2007-03-29 16:37 php5-imap_5.2.0-8+etch1_i386.deb
-rw-r--r--  1 root src    44322 2007-03-29 16:37 php5-interbase_5.2.0-8+etch1_i386.deb
-rw-r--r--  1 root src    17232 2007-03-29 16:37 php5-ldap_5.2.0-8+etch1_i386.deb
-rw-r--r--  1 root src    12822 2007-03-29 16:37 php5-mcrypt_5.2.0-8+etch1_i386.deb
-rw-r--r--  1 root src     5046 2007-03-29 16:37 php5-mhash_5.2.0-8+etch1_i386.deb
-rw-r--r--  1 root src    64902 2007-03-29 16:37 php5-mysql_5.2.0-8+etch1_i386.deb
-rw-r--r--  1 root src    33410 2007-03-29 16:37 php5-odbc_5.2.0-8+etch1_i386.deb
-rw-r--r--  1 root src    50652 2007-03-29 16:37 php5-pgsql_5.2.0-8+etch1_i386.deb
-rw-r--r--  1 root src     8628 2007-03-29 16:37 php5-pspell_5.2.0-8+etch1_i386.deb
-rw-r--r--  1 root src     4756 2007-03-29 16:37 php5-recode_5.2.0-8+etch1_i386.deb
-rw-r--r--  1 root src    11302 2007-03-29 16:37 php5-snmp_5.2.0-8+etch1_i386.deb
-rw-r--r--  1 root src    34454 2007-03-29 16:37 php5-sqlite_5.2.0-8+etch1_i386.deb
-rw-r--r--  1 root src    18392 2007-03-29 16:37 php5-sybase_5.2.0-8+etch1_i386.deb
-rw-r--r--  1 root src    16478 2007-03-29 16:37 php5-tidy_5.2.0-8+etch1_i386.deb
-rw-r--r--  1 root src    36450 2007-03-29 16:37 php5-xmlrpc_5.2.0-8+etch1_i386.deb
-rw-r--r--  1 root src    12260 2007-03-29 16:37 php5-xsl_5.2.0-8+etch1_i386.deb
-rw-r--r--  1 root src   310194 2007-03-29 16:37 php-pear_5.2.0-8+etch1_all.deb
-rw-r--r--  1 root src    95588 2007-03-06 10:37 suhosin-patch-5.2.0-0.9.6.2.patch
Now we install all the new PHP5 .deb packages (compare the creation times to see which packages are new) except a few - for example, we don't need php5-cgi and php5-cli because we use mod_php. php-pear and libapache-mod-php5 aren't needed either. libapache-mod-php5 is for Apache 1.3, but we have Apache 2.2 installed, therefore we need libapache2-mod-php5.
dpkg -i libapache2-mod-php5_5.2.0-8+etch1_i386.deb php5_5.2.0-8+etch1_all.deb php5-common_5.2.0-8+etch1_i386.deb php5-curl_5.2.0-8+etch1_i386.deb php5-dev_5.2.0-8+etch1_i386.deb php5-gd_5.2.0-8+etch1_i386.deb php5-imap_5.2.0-8+etch1_i386.deb php5-interbase_5.2.0-8+etch1_i386.deb php5-ldap_5.2.0-8+etch1_i386.deb php5-mcrypt_5.2.0-8+etch1_i386.deb php5-mhash_5.2.0-8+etch1_i386.deb php5-mysql_5.2.0-8+etch1_i386.deb php5-odbc_5.2.0-8+etch1_i386.deb php5-pgsql_5.2.0-8+etch1_i386.deb php5-pspell_5.2.0-8+etch1_i386.deb php5-recode_5.2.0-8+etch1_i386.deb php5-snmp_5.2.0-8+etch1_i386.deb php5-sqlite_5.2.0-8+etch1_i386.deb php5-sybase_5.2.0-8+etch1_i386.deb php5-tidy_5.2.0-8+etch1_i386.deb php5-xmlrpc_5.2.0-8+etch1_i386.deb php5-xsl_5.2.0-8+etch1_i386.deb
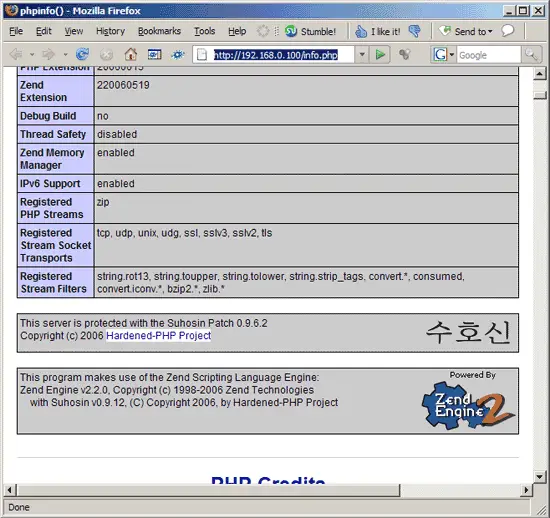
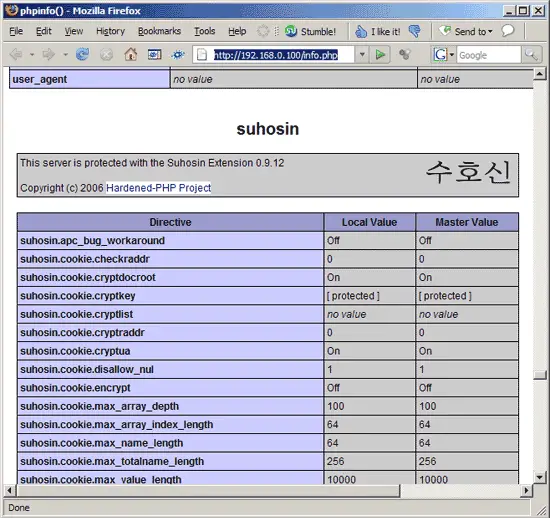
The last command willl automatically make Apache restart, so we don't have to. Now let's call our info.php page again in a browser (e.g. http://192.168.0.100/info.php). If everything went ok, you should now see Suhosin mentioned in two places on the page:
That's it. If you like you can configure Suhosin (see http://www.hardened-php.net/suhosin/configuration.html), although Suhosin will work out of the box with its default configuration, so be sure that you know what you're doing.
5 Links
- Suhosin: http://www.hardened-php.net/suhosin/index.html
- PHP: http://www.php.net
- Debian: http://www.debian.org
- Ubuntu: http://www.ubuntu.com

