How To Set Up Software RAID1 On A Running System (Incl. GRUB Configuration) (Debian Etch) - Page 3
On this page
7 Preparing /dev/sda
If all goes well, you should now find /dev/md0 and /dev/md2 in the output of
df -h
server1:~# df -h
Filesystem            Size  Used Avail Use% Mounted on
/dev/md2              4.4G  730M  3.4G  18% /
tmpfs                 126M     0  126M   0% /lib/init/rw
udev                   10M   68K   10M   1% /dev
tmpfs                 126M     0  126M   0% /dev/shm
/dev/md0              137M   17M  114M  13% /boot
server1:~#
The output of
cat /proc/mdstat
should be as follows:
server1:~# cat /proc/mdstat
Personalities : [raid1]
md2 : active raid1 sdb3[1]
      4594496 blocks [2/1] [_U]

md1 : active raid1 sdb2[1]
      497920 blocks [2/1] [_U]

md0 : active raid1 sdb1[1]
      144448 blocks [2/1] [_U]

unused devices: <none>
server1:~#
Now we must change the partition types of our three partitions on /dev/sda to Linux raid autodetect as well:
fdisk /dev/sda
server1:~# fdisk /dev/sda
Command (m for help): <-- t
Partition number (1-4): <-- 1
Hex code (type L to list codes): <-- fd
Changed system type of partition 1 to fd (Linux raid autodetect)
Command (m for help): <-- t
Partition number (1-4): <-- 2
Hex code (type L to list codes): <-- fd
Changed system type of partition 2 to fd (Linux raid autodetect)
Command (m for help): <-- t
Partition number (1-4): <-- 3
Hex code (type L to list codes): <-- fd
Changed system type of partition 3 to fd (Linux raid autodetect)
Command (m for help): <-- w
The partition table has been altered!
Calling ioctl() to re-read partition table.
WARNING: Re-reading the partition table failed with error 16: Device or resource busy.
The kernel still uses the old table.
The new table will be used at the next reboot.
Syncing disks.
server1:~#
Now we can add /dev/sda1, /dev/sda2, and /dev/sda3 to the respective RAID arrays:
mdadm --add /dev/md0 /dev/sda1
mdadm --add /dev/md1 /dev/sda2
mdadm --add /dev/md2 /dev/sda3
Now take a look at
cat /proc/mdstat
... and you should see that the RAID arrays are being synchronized:
server1:~# cat /proc/mdstat
Personalities : [raid1]
md2 : active raid1 sda3[2] sdb3[1]
      4594496 blocks [2/1] [_U]
      [=====>...............]  recovery = 29.7% (1367040/4594496) finish=0.6min speed=85440K/sec

md1 : active raid1 sda2[0] sdb2[1]
      497920 blocks [2/2] [UU]

md0 : active raid1 sda1[0] sdb1[1]
      144448 blocks [2/2] [UU]

unused devices: <none>
server1:~#
(You can run
watch cat /proc/mdstat
to get an ongoing output of the process. To leave watch, press CTRL+C.)
Wait until the synchronization has finished (the output should then look like this:
server1:~# cat /proc/mdstat
Personalities : [raid1]
md2 : active raid1 sda3[0] sdb3[1]
      4594496 blocks [2/2] [UU]

md1 : active raid1 sda2[0] sdb2[1]
      497920 blocks [2/2] [UU]

md0 : active raid1 sda1[0] sdb1[1]
      144448 blocks [2/2] [UU]

unused devices: <none>
server1:~#
).
Then adjust /etc/mdadm/mdadm.conf to the new situation:
cp /etc/mdadm/mdadm.conf_orig /etc/mdadm/mdadm.conf
mdadm --examine --scan >> /etc/mdadm/mdadm.conf
/etc/mdadm/mdadm.conf should now look something like this:
cat /etc/mdadm/mdadm.conf
# mdadm.conf # # Please refer to mdadm.conf(5) for information about this file. # # by default, scan all partitions (/proc/partitions) for MD superblocks. # alternatively, specify devices to scan, using wildcards if desired. DEVICE partitions # auto-create devices with Debian standard permissions CREATE owner=root group=disk mode=0660 auto=yes # automatically tag new arrays as belonging to the local system HOMEHOST <system> # instruct the monitoring daemon where to send mail alerts MAILADDR root # This file was auto-generated on Mon, 26 Nov 2007 21:22:04 +0100 # by mkconf $Id: mkconf 261 2006-11-09 13:32:35Z madduck $ ARRAY /dev/md0 level=raid1 num-devices=2 UUID=72d23d35:35d103e3:2b3d68b9:a903a704 ARRAY /dev/md1 level=raid1 num-devices=2 UUID=a50c4299:9e19f9e4:2b3d68b9:a903a704 ARRAY /dev/md2 level=raid1 num-devices=2 UUID=99fee3a5:ae381162:2b3d68b9:a903a704 |
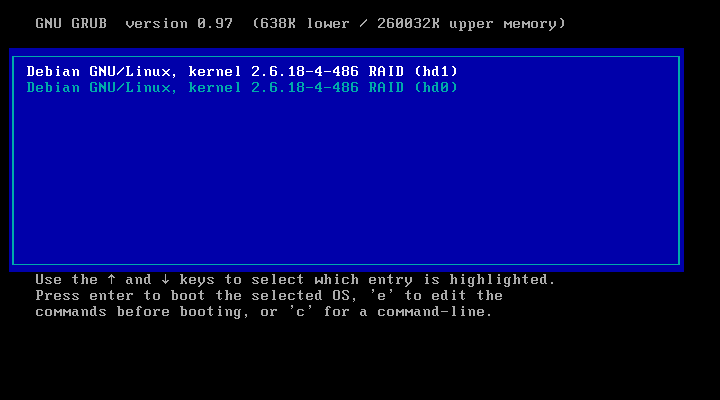
8 Preparing GRUB (Part 2)
We are almost done now. Now we must modify /boot/grub/menu.lst again. Right now it is configured to boot from /dev/sdb (hd1,0). Of course, we still want the system to be able to boot in case /dev/sdb fails. Therefore we copy the first kernel stanza (which contains hd1), paste it below and replace hd1 with hd0. Furthermore we comment out all other kernel stanzas so that it looks as follows:
vi /boot/grub/menu.lst
[...] ## ## End Default Options ## title Debian GNU/Linux, kernel 2.6.18-4-486 RAID (hd1) root (hd1,0) kernel /vmlinuz-2.6.18-4-486 root=/dev/md2 ro initrd /initrd.img-2.6.18-4-486 savedefault title Debian GNU/Linux, kernel 2.6.18-4-486 RAID (hd0) root (hd0,0) kernel /vmlinuz-2.6.18-4-486 root=/dev/md2 ro initrd /initrd.img-2.6.18-4-486 savedefault #title Debian GNU/Linux, kernel 2.6.18-4-486 #root (hd0,0) #kernel /vmlinuz-2.6.18-4-486 root=/dev/sda3 ro #initrd /initrd.img-2.6.18-4-486 #savedefault #title Debian GNU/Linux, kernel 2.6.18-4-486 (single-user mode) #root (hd0,0) #kernel /vmlinuz-2.6.18-4-486 root=/dev/sda3 ro single #initrd /initrd.img-2.6.18-4-486 #savedefault ### END DEBIAN AUTOMAGIC KERNELS LIST |
In the same file, there's a kopt line; replace /dev/sda3 with /dev/md2 (don't remove the # at the beginning of the line!):
[...] # kopt=root=/dev/md2 ro [...] |
Afterwards, update your ramdisk:
update-initramfs -u
... and reboot the system:
reboot
It should boot without problems.
That's it - you've successfully set up software RAID1 on your running Debian Etch system!

