This tutorial exists for these OS versions
On this page
Server Monitoring With munin And monit On Debian Wheezy
Version 1.0
Author: Falko Timme  Follow me on Twitter
In this article I will describe how you can monitor your Debian Wheezy server with munin and monit. munin produces nifty little graphics about nearly every aspect of your server (load average, memory usage, CPU usage, MySQL throughput, eth0 traffic, etc.) without much configuration, whereas monit checks the availability of services like Apache, MySQL, Postfix and takes the appropriate action such as a restart if it finds a service is not behaving as expected. The combination of the two gives you full monitoring: graphics that lets you recognize current or upcoming problems (like "We need a bigger server soon, our load average is increasing rapidly."), and a watchdog that ensures the availability of the monitored services.
Although munin lets you monitor more than one server, we will only discuss the monitoring of the system where it is installed here.
This tutorial was written for Debian Wheezy, but the configuration should apply to other distributions with little changes as well.
I want to say first that this is not the only way of setting up such a system. There are many ways of achieving this goal but this is the way I take. I do not issue any guarantee that this will work for you!
1 Preliminary Note
Our system's hostname is server1.example.com, and we have a web site www.example.com on it with the document root /var/www/www.example.com/web.
2 Install And Configure munin
To install munin on Debian Wheezy, we do this:
apt-get install munin munin-node munin-plugins-extra
Enable a few extra munin plugins:
cd /etc/munin/plugins
ln -s /usr/share/munin/plugins/mysql_ mysql_
ln -s /usr/share/munin/plugins/mysql_bytes mysql_bytes
ln -s /usr/share/munin/plugins/mysql_innodb mysql_innodb
ln -s /usr/share/munin/plugins/mysql_isam_space_ mysql_isam_space_
ln -s /usr/share/munin/plugins/mysql_queries mysql_queries
ln -s /usr/share/munin/plugins/mysql_slowqueries mysql_slowqueries
ln -s /usr/share/munin/plugins/mysql_threads mysql_threads
Next, we must edit the munin configuration file /etc/munin/munin.conf. Uncomment the dbdir, htmldir, logdir, rundir, and tmpldir lines (the default values are fine). We want munin to use the name server1.example.com instead of localhost.localdomain in the HTML output, therefore we replace localhost.localdomain with server1.example.com in the simple host tree section. Without the comments, the changed file looks like this:
vi /etc/munin/munin.conf
# Example configuration file for Munin, generated by 'make build'

# The next three variables specifies where the location of the RRD
# databases, the HTML output, logs and the lock/pid files.  They all
# must be writable by the user running munin-cron.  They are all
# defaulted to the values you see here.
#
dbdir   /var/lib/munin
htmldir /var/cache/munin/www
logdir /var/log/munin
rundir  /var/run/munin

# Where to look for the HTML templates
#
tmpldir /etc/munin/templates

# Where to look for the static www files
#
#staticdir /etc/munin/static

# temporary cgi files are here. note that it has to be writable by
# the cgi user (usually nobody or httpd).
#
# cgitmpdir /var/lib/munin/cgi-tmp

# (Exactly one) directory to include all files from.
includedir /etc/munin/munin-conf.d
[...]
# a simple host tree
[server1.example.com]
    address 127.0.0.1
    use_node_name yes
[...]
|
We should find the Apache configuration file for munin /etc/apache2/conf.d/munin (which actually is a symlink to /etc/munin/apache.conf) - it defines an alias called munin to munin's HTML output directory /var/cache/munin/www which means we can access munin from all web sites on this server by using the relative path /munin (e.g. http://www.example.com/munin).
Make sure you comment out the line Allow from localhost 127.0.0.0/8 ::1 and add Allow from all instead (otherwise you will only be able to access the munin output from localhost):
vi /etc/apache2/conf.d/munin
# Enable this for template generation
Alias /munin /var/cache/munin/www

# Enable this for cgi-based templates
#Alias /munin-cgi/static /var/cache/munin/www/static
#ScriptAlias /munin-cgi /usr/lib/munin/cgi/munin-cgi-html
#<Location /munin-cgi>
#       Order allow,deny
#       Allow from localhost 127.0.0.0/8 ::1
#       AuthUserFile /etc/munin/munin-htpasswd
#       AuthName "Munin"
#       AuthType Basic
#       require valid-user
#</Location>

<Directory /var/cache/munin/www>
        Order allow,deny
        #Allow from localhost 127.0.0.0/8 ::1
        Allow from all
        Options None

        # This file can be used as a .htaccess file, or a part of your apache
        # config file.
        #
        # For the .htaccess file option to work the munin www directory
        # (/var/cache/munin/www) must have "AllowOverride all" or something
        # close to that set.
        #

        # AuthUserFile /etc/munin/munin-htpasswd
        # AuthName "Munin"
        # AuthType Basic
        # require valid-user

        # This next part requires mod_expires to be enabled.
        #

        # Set the default expiration time for files to 5 minutes 10 seconds from
        # their creation (modification) time.  There are probably new files by
        # that time.
        #

    <IfModule mod_expires.c>
        ExpiresActive On
        ExpiresDefault M310
    </IfModule>

</Directory>
[...]
|
Restart Apache:
/etc/init.d/apache2 restart
Then restart munin:
/etc/init.d/munin-node restart
Now wait a few minutes so that munin can produce its first output, and then go to http://www.example.com/munin/ in your browser, and you see the first statistics. After a few days this could look like this:
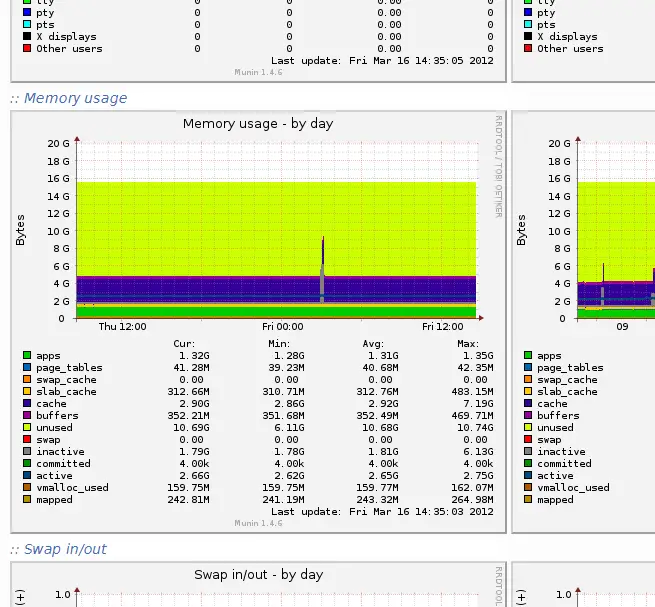
(This is just a small excerpt of the many graphics that munin produces...)
3 Password-Protect The munin Output Directory (Optional)
Now it is a good idea to password-protect the munin output directory unless you want everybody to be able to see every little statistic about your server.
To do this, we must create the password file /etc/munin/munin-htpasswd. We want to log in with the username admin, so we do this:
htpasswd -c /etc/munin/munin-htpasswd admin
Enter a password for admin. Then open /etc/apache2/conf.d/munin again...
vi /etc/apache2/conf.d/munin
... and uncomment the following section:
[...]
        AuthUserFile /etc/munin/munin-htpasswd
        AuthName "Munin"
        AuthType Basic
        require valid-user
[...]
|
Then restart Apache:
/etc/init.d/apache2 restart

