How To Compile A Kernel - The Ubuntu Way - Page 2
5 Configure The Kernel
It's a good idea to use the configuration of your current working kernel as a basis for your new kernel. Therefore we copy the existing configuration to /usr/src/linux:
cp /boot/config-`uname -r` ./.config
Then we run
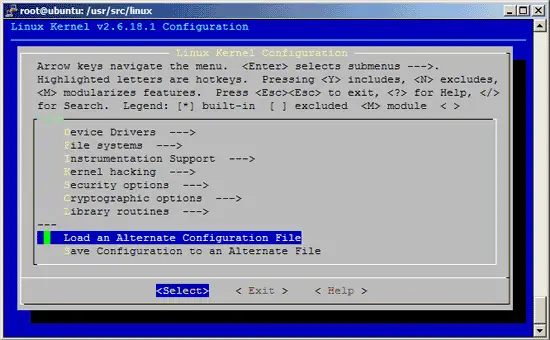
make menuconfig
which brings up the kernel configuration menu. Go to Load an Alternate Configuration File and choose .config (which contains the configuration of your current working kernel) as the configuration file:

Then browse through the kernel configuration menu and make your choices. When you are finished and select Exit, answer the following question (Do you wish to save your new kernel configuration?) with Yes:

6 Build The Kernel
To build the kernel, execute these two commands:
make-kpkg clean
fakeroot make-kpkg --initrd --append-to-version=-custom kernel_image kernel_headers
After --append-to-version= you can write any string that helps you identify the kernel, but it must begin with a minus (-) and must not contain whitespace.
Now be patient, the kernel compilation can take some hours, depending on your kernel configuration and your processor speed.
7 Install The New Kernel
After the successful kernel build, you can find two .deb packages in the /usr/src directory.
cd /usr/src
ls -l
On my test system they were called linux-image-2.6.18.1-custom_2.6.18.1-custom-10.00.Custom_i386.deb (which contains the actual kernel) and linux-headers-2.6.18.1-custom_2.6.18.1-custom-10.00.Custom_i386.deb (which contains files needed if you want to compile additional kernel modules later on). I install them like this:
dpkg -i linux-image-2.6.18.1-custom_2.6.18.1-custom-10.00.Custom_i386.deb
dpkg -i linux-headers-2.6.18.1-custom_2.6.18.1-custom-10.00.Custom_i386.deb
(You can now even transfer the two .deb files to other Ubuntu systems and install them there exactly the same way, which means you don't have to compile the kernel there again.)
That's it. You can check /boot/grub/menu.lst now, you should find two stanzas for your new kernel there:
vi /boot/grub/menu.lst
The stanzas that were added on my test system look like these:
title Ubuntu, kernel 2.6.18.1-custom root (hd0,0) kernel /boot/vmlinuz-2.6.18.1-custom root=/dev/sda1 ro quiet splash initrd /boot/initrd.img-2.6.18.1-custom savedefault boot title Ubuntu, kernel 2.6.18.1-custom (recovery mode) root (hd0,0) kernel /boot/vmlinuz-2.6.18.1-custom root=/dev/sda1 ro single initrd /boot/initrd.img-2.6.18.1-custom boot |
Now reboot the system:
shutdown -r now
If everything goes well, it should come up with the new kernel. You can check if it's really using your new kernel by running
uname -r
This should display something like
2.6.18.1-custom
If the system doesn't start, restart it, and when you see this:

press ESC to enter the GRUB menu:

Select your old kernel and start the system. You can now try again to compile a working kernel. Don't forget to remove the two stanzas of the not-working kernel from /boot/grub/menu.lst.
8 Links
- Ubuntu: http://www.ubuntu.com
- The Linux Kernel Archives: http://www.kernel.org

