Installing The WiKID HTML5 Token Client
The WiKID Strong Authentication System is a dual-sourced, two-factor authentication system. It uses public key encryption to secure communicate PINs to a server behind the corporate firewall (or in the cloud). If the PIN is correct, the account active and the encryption valid, the one-time passcode is generated on the server, encrypted and returned to the token client. WiKID has token clients for Windows, Mac and Linux and for iPhone, Android, J2ME etc. With the increased focus on cloud-based services and SSL-VPN and the increasing support for HTML5 in browsers, we have released an HTML5 browsers under the GPL license.
The WiKID HTML5 token uses the HTML5 APIs to enable the browser to contain an embedded token client. The token uses the same public key + PIN authentication as the standard WiKID tokens but is implemented in JavaScript within the browser. Using HTML5 provides cross-browser support (Firefox and Chrome, not IE yet), a very easy installation process and slick user experience. This tutorial will explain how to install the WiKID HTML5 token client. Please note that this token is still in beta and is not fully feature complete at this time.
Components
There are three main components to the HTML5 token:
- JavaScript token client - This is the majority of the token system. It is composed of a GWT application compiled into a Web Archive (.war file). The HTML5Token.war file is deployed in a servlet container (tomcat, jboss, etc.) and then embedded by reference into a webpage.
- Relay server - This is a small GWT servlet that is deployed on the server as part of the HTML5Token.war. The relay allows the browser token to communicate to WiKID Authentication servers over the network. Browser restrictions on JavaScript communications prevent the embedded token from making direct contact.
- Host webpage - This component is any webpage that contains an HTML5 token. Typically the token would be embedded in the login or account creation pages of a website.
Installation
The token installation consists primarily of deploying the HTML5Token.war file to the servlet container. The context path used for deployment is important for the configuration of the hosted page, please make a note of it. Once the token is deployed you can verify it by accessing http(s)://{server}/{context}/verify.jsp
If the token deployed correctly you should see something similar to:
The context path is:
[ /HTML5Token ]
Include this token using:
Note: When deploying the token in most containers the context path is the name of the archive file without the .war extension.
With the token deployed you can now embed it in your webpage. There are three parts to the webpage installation.
- Add the configuration variables in the section (See configuration below):
<script>
var WiKIDConfiguration = {
domainCode: "127000000001",
serverIP: "127.0.0.1",
showRegCode: "true",
registrationPage: "http://127.0.0.1:8888/register.html"
};
</script> - Insert
<div id="WiKID_TOKEN"></div>
in the location you want the token to appear in the page. - Add the script to include the token JavaScript:
<script type="text/javascript" language="javascript" src="HTML5Token/HTML5Token.nocache.js">
Note: The value used in part three is provided in the output from verify.jsp
Configuration
The token is configured via the WiKIDConfiguration variable at the top of the webpage.
- domainCode - the domain identifier that this token will register with when loaded. This must match the 12-digit code assigned to domain on the WiKID server.
- serverIp - the IP address or DNS name of the WiKID server.
- showRegCode - 'true' or 'false'. Determines if the registration code is displayed to the user or immediately passed to the registration page.
- registrationPage - URL of the registration page that users should be forwarded to for userid association.
Pulling it all together
Here's a complete webpage for presenting the WiKID HTML5 software token:
<?xml version="1.0" encoding="UTF-8"?>

<!DOCTYPE html>

<html>

<head>

    <title>WiKID Token</title>

    <script>

        var WiKIDConfiguration = {

            domainCode: "888888888888",

            serverIP: "127.0.0.1",

            showRegCode: "true",

            registrationPage: "http://www.wikidsystems.com/simple_reg_form"

        };

    </script>


</head>


<body>

<p>Test page</p>

<div id="WiKID_TOKEN"></div>

<script type="text/javascript" language="javascript" src="HTML5Token/HTML5Token.nocache.js"></script>

</body>

</html>
This page will look like this:
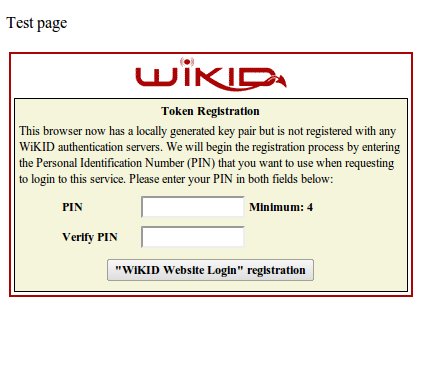
The HTML5 token provides tight integration with the targeted website, smooth registration and a super-simple user experience. To see a live demo of the token, including registration and login, please visit our website. To download the HTML5 .war file, please visit our Sourceforge page.

