Install Ubuntu With Software RAID 10
The Ubuntu Live CD installer doesn't support software RAID, and the server and alternate CDs only allow you to do RAID levels 0, 1, and 5. Raid 10 is the fastest RAID level that also has good redundancy too. So I was disappointed that Ubuntu didn't have it as a option for my new file server. I didn't want shell out lots of money for a RAID controller, especially since benchmarks show little performance benefit using a Hardware controller configured for RAID 10 in a file server.
1 Before you start
I'll asume you have already known about RAID 10, but I'll cover a some important information before you begin.
2 Prepare your disks
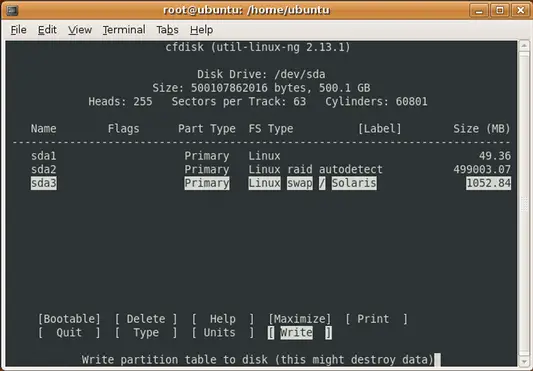
Use a partition program that can create RAID partitions, I use cfdisk which is text based but easier to use than fdisk. Partition your disks, make a 50 MB partition on the first drive, this is for /boot since grub doesn't support RAID well. Set up a partition on four drives to be RAID type, in cfdisk choose FD as the type. In my setup all of the system besides /boot will reside in one RAID 10 volume.
For best swap performance put a swap partition on each drive. I put a one GB swap on each drive.
Boot the Ubuntu Live CD.
Run the Terminal.
sudo su
cfdisk /dev/sda
cfdisk /dev/sdb
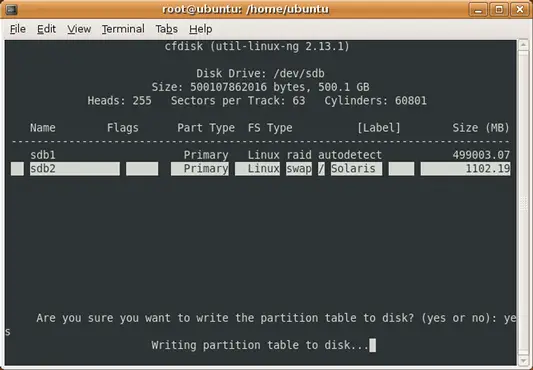
The next two drives are partitioned the same as /dev/sdb:
cfdisk /dev/sdc
cfdisk /dev/sdd
3 Install RAID utility, mdadm, and set up the RAID array
apt-get install mdadm
mdadm -v --create /dev/md0 --level=raid10 --raid-devices=4 /dev/sda2 /dev/sdb1 /dev/sdc1 /dev/sdd1
Then create the file system on the RAID array. Format it now because the partitioner in the installer doesn't know how to modify or format RAID arrays. I used XFS file system, because XFS has great large file performance. Then you will create an alias for the RAID array with the link command because the Ubuntu installer won't find devices starting with "md".
mkfs.xfs /dev/md0
ln /dev/md0 /dev/sde
4 Ubuntu Install
Run the installer, when you are in the partitioner choose manual and be careful not to modify the partition layout. For the /dev/sda1 partition choose ext3 as the file system and set /boot on.
Set your swap partitions to be used as swap.
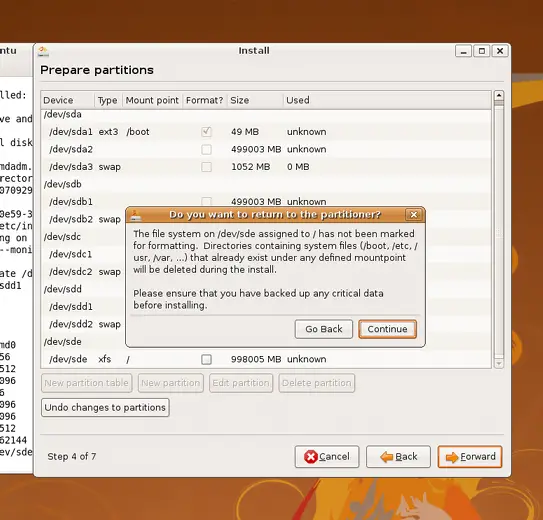
You select the type of file system you already formatted the RAID device and set the mount point. Do not choose to reformat or make partition table changes to the RAID array, because the partitioner will misconfigure it.
Click continue on the warning about the RAID not being marked for formatting.
When the installer finishes tell it to continue to use the Live CD.
5 Install RAID support inside the new install
A default Ubuntu setup won't automatically boot into a software RAID setup, you will need to chroot into the new install and have the chroot configured to see all the device information available in the LiveCD environment so that the mdadm install scripts can properly set up config and boot files for RAID support.
mkdir /myraid
mount /dev/md0 /myraid
mount /dev/sda1 /myraid/boot
mount --bind /dev /myraid/dev
mount -t devpts devpts /myraid/dev/pts
mount -t proc proc /myraid/proc
mount -t sysfs sysfs /myraid/sys
chroot /myraid
apt-get install mdadm
exit
You can now reboot into your new system.
Extra commands you may need
A helpful command that will tell you the status of the RAID and which partitions belong to a volume:
cat /proc/mdstat
If you reboot into the Live CD and want to mount your RAID array you will need to install mdadm in the Live CD environment and activate the RAID:
sudo su
apt-get install mdadm
mdadm --assemble /dev/md0
If you need to start over or remove the RAID array
Software RAID information is embedded in a place on each RAID partition called the superblock. If you decide to change your RAID setup and start over, you can't just repartition and try to recreate the RAID array. You will need to erase the superblock first on each partition belonging to the RAID array you want to remove.
Make sure your important data has been backed up before doing these steps.
First we will make sure RAID is unmounted and stopped.
sudo su
umount /dev/md0
mdadm --stop /dev/md0
mdadm --zero-superblock /dev/sda2
mdadm --zero-superblock /dev/sdb1
mdadm --zero-superblock /dev/sdc1
mdadm --zero-superblock /dev/sdd1

