How To Use Multiple PHP Versions (PHP-FPM & FastCGI) With ISPConfig 3 (CentOS 6.3)
Version 1.0
Author: Falko Timme <ft [at] falkotimme [dot]
com>
![]() Follow me on Twitter
Follow me on Twitter
Since ISPConfig 3.0.5, it is possible to use multiple PHP versions on one server and select the optimal PHP version for a website. This feature works with PHP-FPM (starting with PHP 5.3) and FastCGI (all PHP 5.x versions). This tutorial shows how to build PHP 5.3 and PHP 5.4 as a PHP-FPM and a FastCGI version on a CentOS 6.3 server. These PHP versions can be used together with the default PHP (installed through yum) in ISPConfig.
I do not issue any guarantee that this will work for you!
1 Preliminary Note
I will install PHP 5.3.22 and PHP 5.4.12, the latest PHP 5.3 and 5.4 versions at the time of this writing. I will also show how to build some additional PHP extensions such as APC, memcache, memcached, and ioncube.
Please note that PHP-FPM can be used on both Apache and nginx servers, while FastCGI is available only for Apache servers.
PHP-FPM and FastCGI are mutually exclusive in PHP 5.3 and 5.4, that's why I show two ways of building PHP, one for PHP-FPM, one for FastCGI, however you can compile PHP twice to get both, one time with --enable-fpm and one time with --enable-cgi (make sure to use different base directories, such as /opt/php-5.3.22 for PHP-FPM and /opt/phpfcgi-5.3.22 for FastCGI).
2 Building PHP 5.3.22 (PHP-FPM)
Download and extract PHP 5.3.22:
mkdir /opt/php-5.3.22
mkdir /usr/local/src/php5-build
cd /usr/local/src/php5-build
wget http://de.php.net/get/php-5.3.22.tar.bz2/from/this/mirror -O php-5.3.22.tar.bz2
tar jxf php-5.3.22.tar.bz2
cd php-5.3.22/
Install the prerequisites for building PHP5:
yum groupinstall 'Development Tools'
yum install libxml2-devel libXpm-devel gmp-devel libicu-devel t1lib-devel aspell-devel openssl-devel bzip2-devel libcurl-devel libjpeg-devel libvpx-devel libpng-devel freetype-devel readline-devel libtidy-devel libxslt-devel libmcrypt-devel pcre-devel curl-devel mysql-devel ncurses-devel gettext-devel net-snmp-devel libevent-devel libtool-ltdl-devel libc-client-devel postgresql-devel
Configure and build PHP 5.3.22 as follows (you can adjust the ./configure command to your needs, take a look at
./configure --help
to see all available options; if you use a different ./configure command, it is possible that additional libraries are required, or the build process will fail):
./configure \
--prefix=/opt/php-5.3.22 \
--with-pdo-pgsql \
--with-zlib-dir \
--with-freetype-dir \
--enable-mbstring \
--with-libxml-dir=/usr \
--enable-soap \
--enable-calendar \
--with-curl \
--with-mcrypt \
--with-zlib \
--with-gd \
--with-pgsql \
--disable-rpath \
--enable-inline-optimization \
--with-bz2 \
--with-zlib \
--enable-sockets \
--enable-sysvsem \
--enable-sysvshm \
--enable-pcntl \
--enable-mbregex \
--with-mhash \
--enable-zip \
--with-pcre-regex \
--with-mysql \
--with-pdo-mysql \
--with-mysqli \
--with-jpeg-dir=/usr \
--with-png-dir=/usr \
--enable-gd-native-ttf \
--with-openssl \
--with-fpm-user=nginx \
--with-fpm-group=nginx \
--with-libdir=lib64 \
--enable-ftp \
--with-imap \
--with-imap-ssl \
--with-kerberos \
--with-gettext \
--enable-fpm
The last switch (--enable-fpm) makes sure this PHP version will work with PHP-FPM. If you want to use this PHP-FPM version with Apache, please use --with-fpm-user=apache and --with-fpm-group=apache; if you want to use this PHP-FPM version with nginx, please use --with-fpm-user=nginx and --with-fpm-group=nginx.
make
make install
Copy php.ini and php-fpm.conf to the correct locations:
cp /usr/local/src/php5-build/php-5.3.22/php.ini-production /opt/php-5.3.22/lib/php.ini
cp /opt/php-5.3.22/etc/php-fpm.conf.default /opt/php-5.3.22/etc/php-fpm.conf
Open /opt/php-5.3.22/etc/php-fpm.conf and adjust the following settings - in the listen line you must use an unused port (e.g. 8999; port 9000 might be in use by the default CentOS PHP-FPM already), and you must add the line include=/opt/php-5.3.22/etc/pool.d/*.conf at the end. If you want to use this PHP-FPM version with Apache, please use user = apache and group = apache; if you want to use this PHP-FPM version with nginx, please use user = nginx and group = nginx.
vi /opt/php-5.3.22/etc/php-fpm.conf
[...] pid = run/php-fpm.pid [...] user = nginx group = nginx [...] listen = 127.0.0.1:8999 [...] include=/opt/php-5.3.22/etc/pool.d/*.conf |
Create the pool directory for PHP-FPM:
mkdir /opt/php-5.3.22/etc/pool.d
Next create an init script for PHP-FPM:
vi /etc/init.d/php-5.3.22-fpm
#! /bin/sh
### BEGIN INIT INFO
# Provides:          php-5.3.22-fpm
# Required-Start:    $all
# Required-Stop:     $all
# Default-Start:     2 3 4 5
# Default-Stop:      0 1 6
# Short-Description: starts php-5.3.22-fpm
# Description:       starts the PHP FastCGI Process Manager daemon
### END INIT INFO
php_fpm_BIN=/opt/php-5.3.22/sbin/php-fpm
php_fpm_CONF=/opt/php-5.3.22/etc/php-fpm.conf
php_fpm_PID=/opt/php-5.3.22/var/run/php-fpm.pid
php_opts="--fpm-config $php_fpm_CONF"

wait_for_pid () {
        try=0
        while test $try -lt 35 ; do
                case "$1" in
                        'created')
                        if [ -f "$2" ] ; then
                                try=''
                                break
                        fi
                        ;;
                        'removed')
                        if [ ! -f "$2" ] ; then
                                try=''
                                break
                        fi
                        ;;
                esac
                echo -n .
                try=`expr $try + 1`
                sleep 1
        done
}
case "$1" in
        start)
                echo -n "Starting php-fpm "
                $php_fpm_BIN $php_opts
                if [ "$?" != 0 ] ; then
                        echo " failed"
                        exit 1
                fi
                wait_for_pid created $php_fpm_PID
                if [ -n "$try" ] ; then
                        echo " failed"
                        exit 1
                else
                        echo " done"
                fi
        ;;
        stop)
                echo -n "Gracefully shutting down php-fpm "
                if [ ! -r $php_fpm_PID ] ; then
                        echo "warning, no pid file found - php-fpm is not running ?"
                        exit 1
                fi
                kill -QUIT `cat $php_fpm_PID`
                wait_for_pid removed $php_fpm_PID
                if [ -n "$try" ] ; then
                        echo " failed. Use force-exit"
                        exit 1
                else
                        echo " done"
                       echo " done"
                fi
        ;;
        force-quit)
                echo -n "Terminating php-fpm "
                if [ ! -r $php_fpm_PID ] ; then
                        echo "warning, no pid file found - php-fpm is not running ?"
                        exit 1
                fi
                kill -TERM `cat $php_fpm_PID`
                wait_for_pid removed $php_fpm_PID
                if [ -n "$try" ] ; then
                        echo " failed"
                        exit 1
                else
                        echo " done"
                fi
        ;;
        restart)
                $0 stop
                $0 start
        ;;
        reload)
                echo -n "Reload service php-fpm "
                if [ ! -r $php_fpm_PID ] ; then
                        echo "warning, no pid file found - php-fpm is not running ?"
                        exit 1
                fi
                kill -USR2 `cat $php_fpm_PID`
                echo " done"
        ;;
        *)
                echo "Usage: $0 {start|stop|force-quit|restart|reload}"
                exit 1
        ;;
esac |
Make the init script executable and create the system startup links:
chmod 755 /etc/init.d/php-5.3.22-fpm
chkconfig --levels 235 php-5.3.22-fpm on
Finally start PHP-FPM:
/etc/init.d/php-5.3.22-fpm start
As long as there are no pools in /opt/php-5.3.22/etc/pool.d, you will get this warning which you can ignore:
[root@server1 php-5.3.22]# /etc/init.d/php-5.3.22-fpm start
Starting php-fpm [05-Mar-2013 17:34:54] WARNING: Nothing matches the include pattern '/opt/php-5.3.22/etc/pool.d/*.conf' from /opt/php-5.3.22/etc/php-fpm.conf at line 511.
done
[root@server1 php-5.3.22]#
That's it - if you like, you can now install some additional modules like APC, memcache, memcached, and ioncube.
The APC, memcache, and memcached modules can be installed through PEAR which we must install and initialize first:
yum install php-pear
cd /opt/php-5.3.22/etc
pecl -C ./pear.conf update-channels
APC can now be installed as follows:
pecl -C ./pear.conf install apc
Accept all default values. Afterwards, open /opt/php-5.3.22/lib/php.ini...
vi /opt/php-5.3.22/lib/php.ini
... and add the line extension=apc.so at the end of the file (you can also configure some additional APC settings):
[...] extension=apc.so apc.enabled=1 apc.shm_size=128M apc.ttl=0 apc.user_ttl=600 apc.gc_ttl=600 apc.enable_cli=1 apc.mmap_file_mask=/tmp/apc.XXXXXX ;apc.mmap_file_mask=/dev/zero ;apc.shm_segments = 5 |
The memcache extension can be installed as follows:
pecl -C ./pear.conf install memcache
Open /opt/php-5.3.22/lib/php.ini...
vi /opt/php-5.3.22/lib/php.ini
... and add the line extension=memcache.so at the end of the file:
[...] extension=memcache.so |
The memcached extension can be installed as follows:
yum install libmemcached-devel
pecl -C ./pear.conf install memcached
Open /opt/php-5.3.22/lib/php.ini...
vi /opt/php-5.3.22/lib/php.ini
... and add the line extension=memcached.so at the end of the file:
[...] extension=memcached.so |
The ionCube Loader can be installed as follows:
cd /tmp
Next download and unpack the correct ionCube Loader package for your architecture (x86_64 or x86).
For x86_64:
wget http://downloads2.ioncube.com/loader_downloads/ioncube_loaders_lin_x86-64.tar.gz
tar xfvz ioncube_loaders_lin_x86-64.tar.gz
For x86:
wget http://downloads2.ioncube.com/loader_downloads/ioncube_loaders_lin_x86.tar.gz
tar xfvz ioncube_loaders_lin_x86.tar.gz
Proceed as follows:
cp ioncube/ioncube_loader_lin_5.3.so /opt/php-5.3.22/lib/php/extensions/no-debug-non-zts-20090626/ioncube.so
vi /opt/php-5.3.22/lib/php.ini
Add the line zend_extension = /opt/php-5.3.22/lib/php/extensions/no-debug-non-zts-20090626/ioncube.so right at the beginning of the file (before the [PHP] line):
zend_extension = /opt/php-5.3.22/lib/php/extensions/no-debug-non-zts-20090626/ioncube.so [PHP] [...] |
Reload PHP-FPM afterwards:
/etc/init.d/php-5.3.22-fpm reload
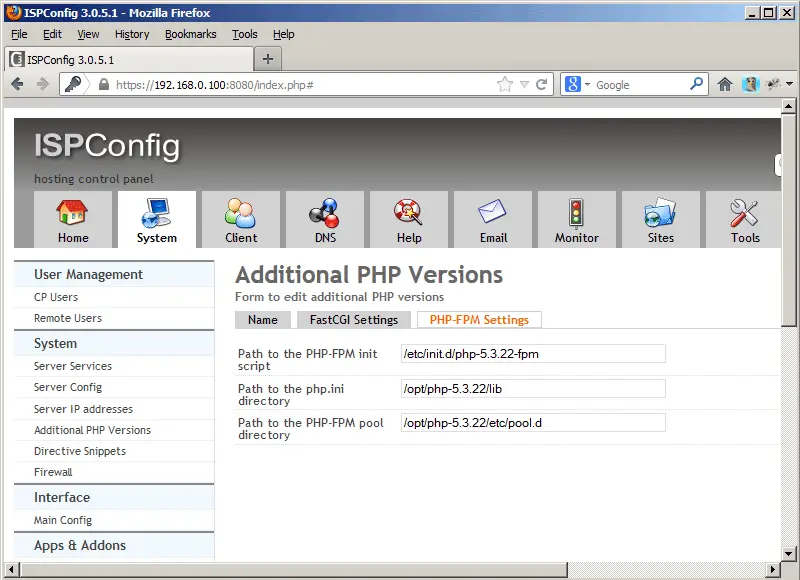
In ISPConfig 3.0.5, you can configure the new PHP version under System > Additional PHP Versions. On the Name tab, you just fill in a name for the PHP version (e.g. PHP 5.3.22) - this PHP version will be listed under this name in the website settings in ISPConfig:
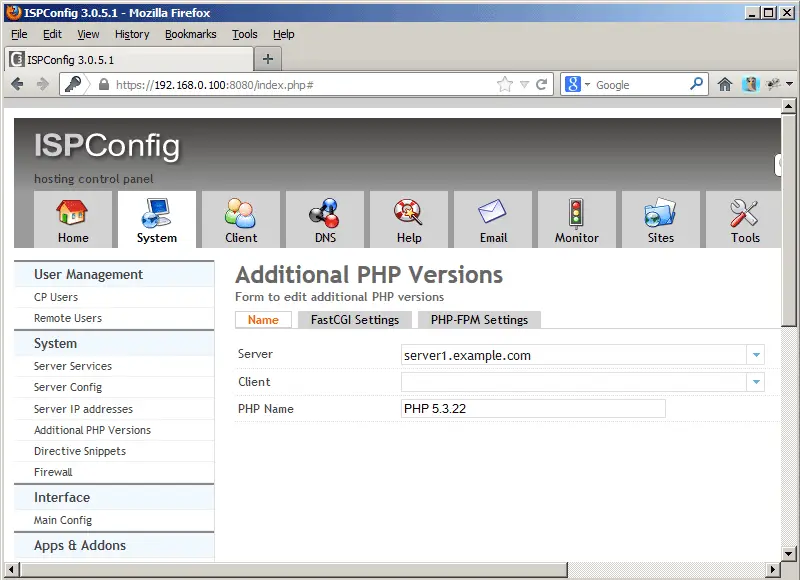
Go to the PHP-FPM Settings tab (the FastCGI Settings tab can be left empty) and fill out the fields as follows: