How To Build A Low Cost SAN - Page 3
8 AoE Initiator Setup
On client side you must have aoe driver and aoe-tools installed on your system (refer to section AoE Tools and Commands). You will find the corresponding exported block devices in your /dev/etherd directory. You just have to run the following command:
[root@aoeclient trunk]# modprobe aoe
[root@aoeclient trunk]# lsmod j grep aoe
[root@aoeclient trunk]# aoe-stat
[root@aoeclient trunk]# ls -l /dev/etherd/
[root@aoeclient trunk]# mkfs.ext3 /dev/etherd/e0.0
[root@aoeclient trunk]# mount /dev/etherd/e0.0 /mnt
So, finally you have access on your exported block device. Now you are free to do any type of read, write operation on this.
9 AoE Target Performance Graph
9.1 Hardware Used for Performance Measurement
In this experiment I have used following hardware to measure the disk i/o:
- 3 com super stack 24 port gigabyte switch
- gigabyte five port nic card 160 GB Sata hard disk ? Intel(R) Xeon(R) CPU E5450 @ 3.00 GHZ
- 24 GB RAM
My network supports following packet size:
[root@sigma13 ]# ifconfig eth0 mtu 9000
I have used FC7 and FC10 fedora OS because its' not possible to compile all the targets on same kernel.
9.2 Techniques to measure the disk i/o
After doing successful setup of all the available AoE targets, now its time to measure the disk i/o of exported block device. The available options to measure the i/o of block devices are hdparam, iostat, dd and some i/o tools like fio, bonnie, iozone, iometer etc.
9.3 Performance Graph with Fio
Here we have used fio (the i/o measurement tool) and plotted the performance graph. I have kept following configuration in surface-scan file:
[global]
ethread=1
bs=128k
direct=1
ioengine=sync
verify=meta
verify pattern=0xaa555aa5
verify interval=512
[write-phase]
filename=/dev/etherd/e0.1 ; or use a full disk, for example /dev/sda
rw=write
fill device=1
do verify=0
[verify-phase]
stonewall
create serialize=0
filename=/dev/etherd/e0.1
rw=read
do verify=1
bs=128k
After setting the appropriate parameter in this file, just run the following com- mand against all the available aoe targets to collect the required data for fol- lowing graph:
[root@aoeclient ]# fio surface-scan
The performance graph of AoE targets with fio in case of write operation is as follows: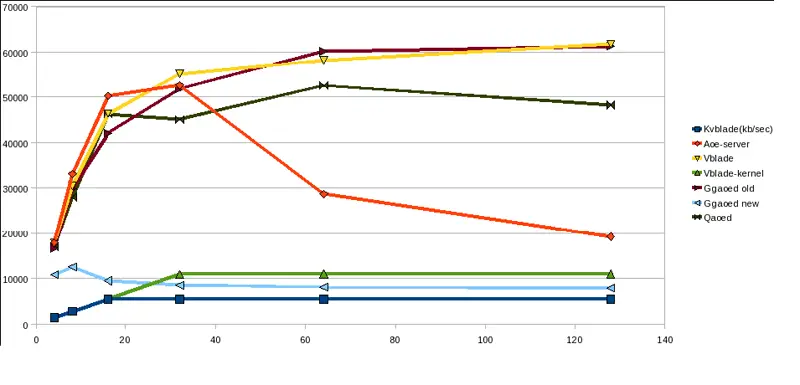
Here X-axis denotes block-size in kilo-bytes and Y-axis denotes throughput in KB/sec (kilo-byte per second).
The performance graph of AoE targets with fio in case of read operation is as follows: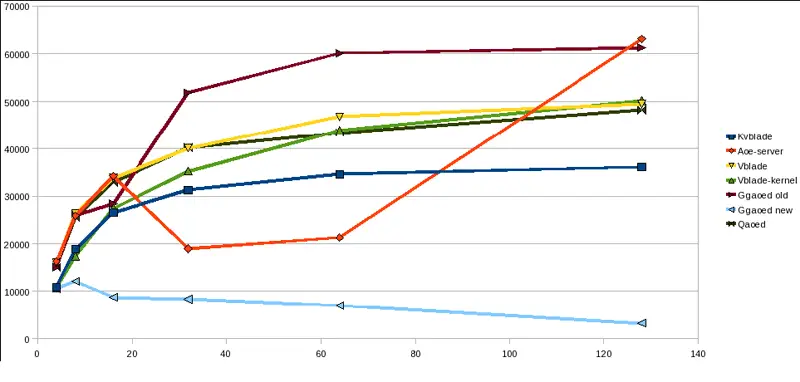
9.4 Performance Graph with Bonnie-64
We can setup bonnie-64 by following commands:
[root@sigma13 bonnie-64-read-only]# mount /dev/etherd/e0.0 /mnt
[root@sigma13 bonnie-64-read-only]#./Bonnie -d /mnt/ -s 128
The performance graph of AoE targets with bonnie in case of write operation is as follows:
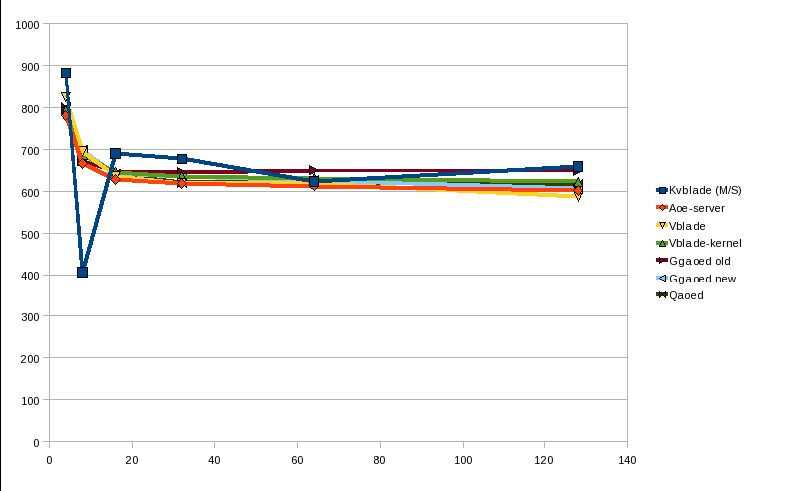
Here X-axis denotes file-size in mega-bytes and Y-axis denotes throughput in M/sec.
10 AoE Tools & commands
There are some tools and commands available to analyze aoe-traffic on the net- work.Run the following commands to download and install these tools:
[root@node1 kk]# wget http://support.coraid.com/support/linux/aoe6-70.tar.gz
[root@node1 kk]# tar -xzvf aoe/root/Documents/Documents/diagram2.eps6- 70.tar.gz
[root@node1 kk]# cd aoe6-70
[root@node1 aoe6-70]# make
[root@node1 aoe6-70]# make install
Now you have installed the necessary aoe-tools and you are able to use the following commands:
- aoecfg - manipulate AoE configuration strings
- aoe-discover - tell aoe driver to discover AoE devices
- aoe-flush- flush the down devices out of the aoe driver
- aoe-interfaces - restrict aoe driver to specified network interfaces
- aoe-interfaces - restrict aoe driver to specified network interfaces
- aoe-mkdevs - create special device files for aoe driver
- aoe-mkshelf - create special device files for one shelf address
- aoeping - simple communication with AoE device
- aoe-revalidate - revalidate the disk size of an aoe device
- aoe-stat - print aoe device status report
- aoe-version - print AoE-related software version information
11 Making of a Small SAN
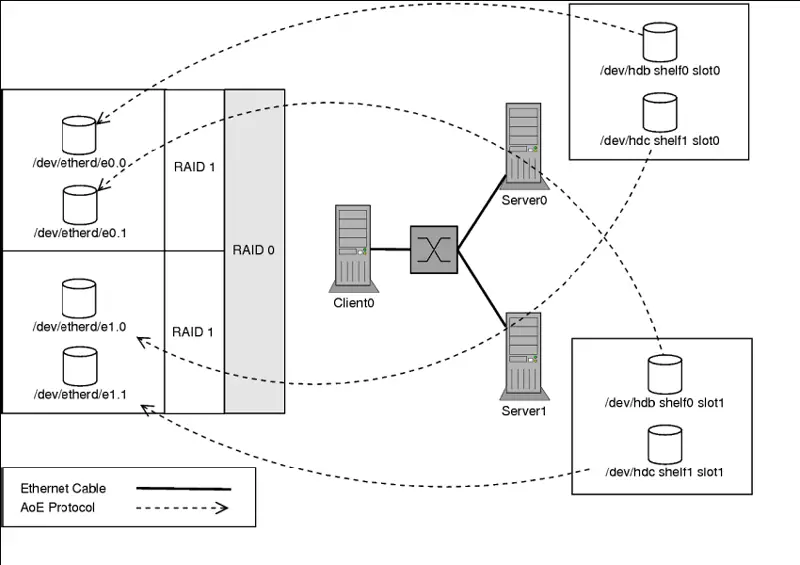
Till now, we have seen the available targets, corresponding features and their performances. Now its time to make a SAN based on the available disks and Gigabyte ethereal switch. So, following are the steps to make a SAN.Well, while writing this article, I don't have the extra hard disks. So, I have performed my experiment on 200 MB loop devices. In actual setup these loop devices will be replaced by actual 200 GB hard disks. The basic diagram of our SAN is as follows:
11.1 Server Setup For SAN
Export two devices from server0
[root@server0]# dd if=/dev/zero of=file1.img bs=1M count=200
[root@server0]# dd if=/dev/zero of=file2.img bs=1M count=200
[root@server0]# losetup /dev/loop0 file1.img
[root@server0]# losetup /dev/loop1 file2.img
[root@server0 vblade-19]# losetup -a
[root@server0 vblade-19]# ./vbladed 0 0 eth0 /dev/loop0
[root@server0 vblade-19]# ./vbladed 1 0 eth0 /dev/loop1
Export two devices from server1
[root@server1]# dd if=/dev/zero of=file1.img bs=1M count=200
[root@server1]# dd if=/dev/zero of=file2.img bs=1M count=200
[root@server1]# losetup /dev/loop0 file1.img
[root@server1]# losetup /dev/loop1 file2.img
[root@server1 vblade-19]# losetup -a
[root@server1 vblade-19]# ./vbladed 0 1 eth0 /dev/loop0
[root@server1 vblade-19]# ./vbladed 1 1 eth0 /dev/loop1
11.2 Client Setup For SAN
Exported block-devices at Client:
Make sure that at client side you have latest AoE driver and corresponding tools installed. You can check it out by following command:
[root@client1 krishna]# lsmod j grep aoe
If you don't have aoe driver at your box, you can download it from following mirror: http://support.coraid.com/support/linux/
[root@client1 krishna]# aoe-version
aoetools: 29
installed aoe driver: 70
running aoe driver: 70
Now run following commands to access the exported block device at client:
[root@client1 krishna]# modprobe aoe
[root@client1 krishna]# aoe-stat e0.0 0.209GB eth0 1024 up
e0.1 0.209GB eth0 1024 up
e1.0 0.209GB eth0 1024 up
e1.1 0.209GB eth0 1024 up
So, you can see the exported block devices on your box.
Creation of Raid Array:
Mirroring from e0.0 and e0.1:
[root@client1 krishna]# mdadm -C /dev/md0 -l 1 -n 2 /dev/etherd/e0.0 /dev/etherd/e0.1
Mirroring from e1.0 and e1.1:
[root@client1 krishna]# mdadm -C /dev/md1 -l 1 -n 2 /dev/etherd/e1.0 /dev/etherd/e1.1
Create the stripe over the mirrors:
[root@client1 krishna]# mdadm -C /dev/md2 -l 0 -n 2 /dev/md0 /dev/md1
So, now we have following configuration of Raid Array:
[root@client1 krishna]# cat /proc/mdstat
Personalities : [raid1] [raid0]
md2 : active raid0 md1[1] md0[0]
409344 blocks 64k chunks
md1 : active raid1 etherd/e1.1[1] etherd/e1.0[0]
204736 blocks [2/2] [UU]
md0 : active raid1 etherd/e0.1[1] etherd/e0.0[0]
204736 blocks [2/2] [UU]
unused devices:
Convert RAID md2 into an LVM
Convert the RAID into an LVM physical volume:
[root@client1 krishna]# pvcreate /dev/md2
Create an extendible LVM volume group:
[root@client1 krishna]# vgcreate volgrp /dev/md2
[root@client1 krishna]# pvs
PV VG Fmt Attr PSize PFree
/dev/md2 volgrp lvm2 a- 396.00M 396.00M
[root@client1 krishna]# vgs
VG #PV #LV #SN Attr VSize VFree
volgrp 1 0 0 wz{n- 396.00M 396.00M
Create a logical volume using all the space:
[root@client1 aoedoc]# lvcreate -L 300M -n logicalvol volgrp
[root@client1 aoedoc]# lvs
LV VG Attr LSize
logicalvol volgrp -wi-a- 300.00M
So, finally we have created our logical volume having 300 MB size.
Create a filesystem:
[root@client1 aoedoc]# mkfs.ext3 /dev/volgrp/logicalvol
[root@client1 aoedoc]# mount -t ext3 /dev/volgrp/logicalvol /mnt/
[root@client1 aoedoc]# cd /mnt/
[root@client1 mnt]# mkdir aoe
[root@client1 mnt]# touch aoefile
[root@client1 mnt]# ls
aoe aoefile lost+found
So, finally your SAN is ready. If you want to resize your volgroup or want to add some more disks then first unmount it and use vgextend, resize2fs for it.

