Ubuntu LAMP Server With Torrentflux In VMware - Page 3
Step 7: Installing Torrentflux
All right, we downloaded Torrentflux, now on to installing it. Set mysql root password:
mysqladmin -u root -p password <YourNewPassword>
when asked for a password: just press <Enter>
it's the current mysql root password which isn't assigned yet.
Unpack Torrentflux:
tar zxvf torrentflux_2.1.tar.gz
cd torrentflux_2.1
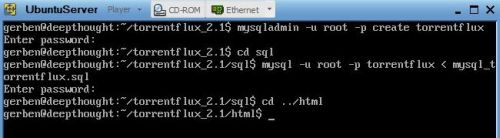
mysqladmin -u root -p create torrentflux
<YourNewPassword>
cd sql
mysql -u root -p torrentflux < mysql_torrentflux.sql
<YourNewPassword>
cd ../html
Set up the config.php:
vi config.php
Now edit the settings as below: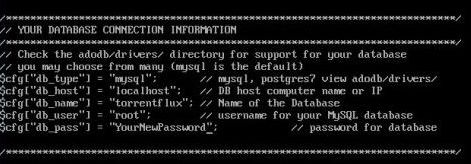
Consult a vi manual to find out how vi works.
After saving your updated config.php file copy the files to your web server root directory:
sudo mkdir /var/www/tf
sudo cp -rf * /var/www/tf
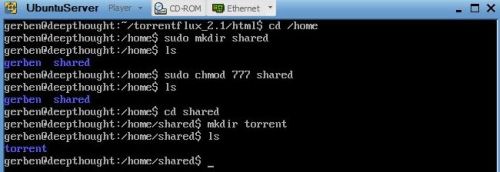
Create a folder to save the downloaded torrents
cd /home
sudo mkdir shared
sudo chmod 777 shared
cd shared
mkdir torrent
chmod 777 torrent
Step 8: Test!
If everything went OK it's time to try if it's working and to set up the last bits in Torrentflux. To find out what the ip address is of your new server:
ip address
Look for the eth0 network card:
in my case the ip address is: 172.16.50.83
On your host: open your webbrowser and go to:
http://<ip_address>/tf
Tadaaaa! :)

Login with: root and mysql password: <YourNewPassword>
As a final step: change the path to: /home/shared/torrent and press 'Update settings'
Configuring Torrentflux further is beyond the scope of this how-to.
Congratulations, you now have a working webserver with Apache, MySql, PHP and Torrentflux.
Step 9 (Optional): Installing SSH
Torrentflux has a nice system to download your downloaded files from your server but I prefer some sort of secure ftp-connection.
I installed openssh for this, this is how:
sudo apt-get install openssh-server
No need to start it or anything. it's ready for use with e.g. WinSCP or PuTTY.
Step 10: Shutdown your Ubuntu server
sudo shutdown -h now
If you don't want to shutdown but simply log-off:
exit

